
iOS 抽屜效果實作:Pan 手勢搭配框架縮放與邊緣吸附
側滑抽屜是國內 App 幾乎標配的互動模式。它看起來只是「推一下」,但細節不少:滑動要跟手、要有視覺層次(背景略微縮放)、放手後要吸附到最近的停點。本文拆解一個完整實作。
一、視圖結構設計
在最外層控制器上放三個 view:左邊一層、右邊一層、中間一層。中間那層是主視圖,滑動的就是它。如果只需要單側抽屜,放兩個即可。
#import "ViewController.h"

@interface ViewController ()
@property (nonatomic, weak) UIView *mainV;
@property (nonatomic, weak) UIView *leftV;
@property (nonatomic, weak) UIView *rightV;
@end
二、加入子視圖
三層由下往上依序加入,後加入的自然在上層:
#pragma mark - 加入子控制項
- (void)setUpChildViews {
    UIView *leftV = [[UIView alloc] initWithFrame:self.view.bounds];
    leftV.backgroundColor = [UIColor orangeColor];
    [self.view addSubview:leftV];
    _leftV = leftV;

    UIView *rightV = [[UIView alloc] initWithFrame:self.view.bounds];
    rightV.backgroundColor = [UIColor groupTableViewBackgroundColor];
    [self.view addSubview:rightV];
    _rightV = rightV;

    UIView *mainV = [[UIView alloc] initWithFrame:self.view.bounds];
    mainV.backgroundColor = [UIColor yellowColor];
    [self.view addSubview:mainV];
    _mainV = mainV;
}

- (void)viewDidLoad {
    [super viewDidLoad];

    [self setUpChildViews];

    // 拖曳手勢:負責滑動
    UIPanGestureRecognizer *pan = [[UIPanGestureRecognizer alloc] initWithTarget:self action:@selector(pan:)];
    [self.view addGestureRecognizer:pan];

    // 點按手勢:點一下回到起始位置
    UITapGestureRecognizer *tap = [[UITapGestureRecognizer alloc] initWithTarget:self action:@selector(tap)];
    [self.view addGestureRecognizer:tap];
}
三、Pan 手勢的處理邏輯
核心有兩段:滑動過程中即時更新 frame;放手時判斷該吸附到左、右還是中間。
#pragma mark - 手勢識別方法
#define targetL -230
#define targetR 200
#define screenW [UIScreen mainScreen].bounds.size.width

- (void)pan:(UIPanGestureRecognizer *)pan {
    // 取得手勢的位移量
    CGPoint tranP = [pan translationInView:self.view];
    CGFloat offsetX = tranP.x;

    // 依位移更新 mainV 的 frame
    _mainV.frame = [self frameWithOffsetX:offsetX];

    // 依目前位置決定左右層的顯示
    [self observeValueForKeyPath:nil ofObject:nil change:nil context:nil];

    // 位移是相對值,必須歸零
    [pan setTranslation:CGPointZero inView:self.view];

    // 手指抬起時進行吸附
    if (pan.state == UIGestureRecognizerStateEnded) {
        CGFloat target = 0;

        if (_mainV.frame.origin.x > screenW * 0.5) {
            // 滑過一半,吸附到右側
            target = targetR;
        } else if (CGRectGetMaxX(_mainV.frame) < screenW * 0.5) {
            // 右緣還在左半邊,吸附到左側
            target = targetL;
        }

        // 算出還差多少位移
        CGFloat offsetX = target - _mainV.frame.origin.x;

        [UIView animateWithDuration:0.25 animations:^{
            _mainV.frame = (target == 0) ? self.view.bounds : [self frameWithOffsetX:offsetX];
        }];
    }
}
這裡的「滑過螢幕一半就吸附過去」是一個常見門檻設定,實際產品會依設計稿調整,有些會用速度(velocity)來判斷——快速一甩即使沒過半也會吸附。
順帶一提,示範中的 observeValueForKeyPath:ofObject:change:context: 呼叫其實沒有實際作用,這裡只是把「依位置切換左右層可見性」的邏輯包成一個方法。正式寫作時直接呼叫自己的方法即可,不必借用 KVO 的形式。
四、點擊回到起始位置
- (void)tap {
    [UIView animateWithDuration:0.25 animations:^{
        _mainV.frame = self.view.bounds;
    }];
}
五、讓抽屜有層次感:X 位移連動 Y 與縮放
如果主視圖只是平移,看起來會很平。加上「往左滑時高度增加、往右滑時高度減少」的連動,就能製造出景深的錯覺:
#define kMaxY 80

#pragma mark - 依 offsetX 計算 mainV 的 frame
- (CGRect)frameWithOffsetX:(CGFloat)offsetX {
    CGRect frame = _mainV.frame;

    CGFloat screenH = [UIScreen mainScreen].bounds.size.height;

    // X 軸平移多少,對應 Y 軸要位移多少
    CGFloat offsetY = offsetX * kMaxY / screenW;

    CGFloat preH = frame.size.height;
    CGFloat preW = frame.size.width;

    // 預設往右滑時高度變小
    CGFloat curH = preH - 2 * offsetY;

    // 若是向左滑,高度反而變大
    if (frame.origin.x < 0) {
        curH = preH + 2 * offsetY;
    }

    // 依高度比例縮放寬度,保持不變形
    CGFloat scale = curH / preH;
    CGFloat curW = preW * scale;

    frame.origin.x += offsetX;
    frame.origin.y = (screenH - curH) / 2;   // 垂直居中
    frame.size.width = curW;
    frame.size.height = curH;

    return frame;
}
寬度用高度比例縮放,是為了避免畫面被拉成變形。垂直方向則始終居中,看起來才穩。
六、依位置切換左右層顯示
- (void)observeValueForKeyPath:(NSString *)keyPath ofObject:(id)object change:(NSDictionary *)change context:(void *)context {
    if (_mainV.frame.origin.x > 0) {
        // 往右滑,露出左側
        _rightV.hidden = YES;
    } else if (_mainV.frame.origin.x < 0) {
        // 往左滑,露出右側
        _rightV.hidden = NO;
    }
}
七、在主視圖裡放 TableView
主視圖通常不是空的,而是承載主要內容。做法是把一個 TableViewController 塞進 mainV:
- (NSInteger)tableView:(UITableView *)tableView numberOfRowsInSection:(NSInteger)section {
    return 30;
}

- (UITableViewCell *)tableView:(UITableView *)tableView cellForRowAtIndexPath:(NSIndexPath *)indexPath {
    static NSString *ID = @"cell";
    UITableViewCell *cell = [tableView dequeueReusableCellWithIdentifier:ID];
    if (cell == nil) {
        cell = [[UITableViewCell alloc] initWithStyle:UITableViewCellStyleDefault reuseIdentifier:ID];
    }
    cell.textLabel.text = [NSString stringWithFormat:@"第%ld行", indexPath.row];
    return cell;
}
然後建立一個 XXMainViewController 繼承自實作了抽屜效果的 ViewController,在 Storyboard 裡把它的 class 改成這個類別,並把顯示 tableView 的控制器作為它的子控制器:
- (void)viewDidLoad {
    [super viewDidLoad];

    XXViewController *vc = [[XXViewController alloc] init];
    vc.view.frame = self.view.bounds;

    // 讓 vc 成為主視圖控制器的子控制器
    [self addChildViewController:vc];

    // 把 tableView 放進主視圖
    [self.mainV addSubview:vc.view];
}
八、用 readonly 保護對外暴露的視圖
子類別需要取得 mainV 才能塞內容進去,但不應該讓它任意修改。把头檔中的屬性設為 readonly 就能兼顧:
#import <UIKit/UIKit.h>

@interface ViewController : UIViewController
@property (nonatomic, weak, readonly) UIView *mainV;
@property (nonatomic, weak, readonly) UIView *leftV;
@property (nonatomic, weak, readonly) UIView *rightV;
@end
在實作檔中改成 readwrite,就能對外只讀、對內可寫。這是 Objective-C 裡很實用的一個小技巧。
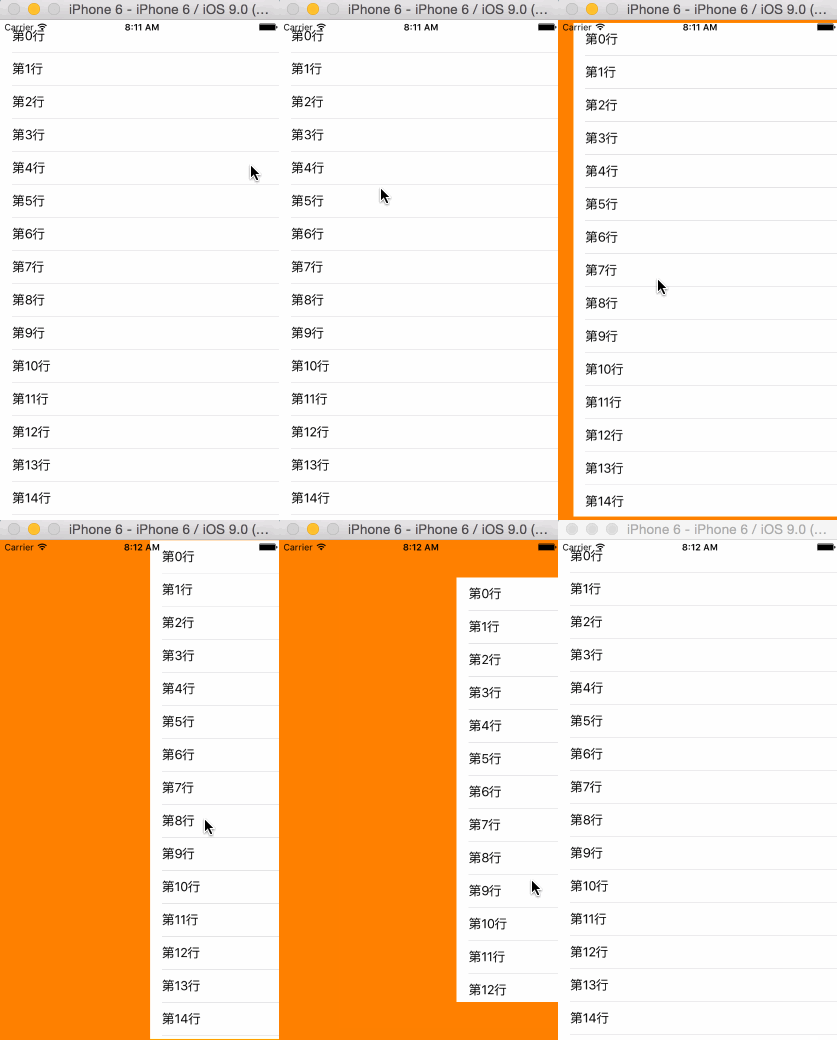
執行結果如下:
補充:現代的替代方案
若你的專案已經全面採用 Auto Layout,直接改 frame 這套寫法會顯得綁手。此時可以改用「更新 constant」的方式驅動動畫,或者直接引入成熟的抽屜元件(如 ENSideMenu、SWRevealViewController 這類)。理解本文的手動計算邏輯仍然有價值——它讓你知道元件背後到底做了什麼,出問題時才知道往哪裡查。
- 上一篇文章: iOS 觸摸事件與六大手勢識別器完整實作
- 下一篇文章: iOS 圓形頭像裁剪與加邊框:UIBezierPath 加 addClip 實作