
iOS 開發中 UITextView 文字選中操作控件的用法詳解
UITextView 是 iOS 中用於多行文字輸入與顯示的核心元件。相比 UITextField,它支援多行、可捲動,並能透過豐富的屬性客製化外觀與行為。本文將從建立初始化、鍵盤管理,到進階的文字樣式客製,全面梳理 UITextView 的用法。
一、建立與初始化
首先在頭檔中宣告 UITextView 並遵循其代理協議:
@interface TextViewController : UIViewController <UITextViewDelegate> {
    UITextView *textView;
}
@property (nonatomic, retain) UITextView *textView;
@end
接著在實作檔中完成初始化與各項屬性設定:
self.textView = [[[UITextView alloc] initWithFrame:self.view.frame] autorelease];
self.textView.textColor = [UIColor blackColor];        // 文字顏色
self.textView.font = [UIFont fontWithName:@"Arial" size:18.0]; // 字體與大小
self.textView.delegate = self;                          // 設定代理
self.textView.backgroundColor = [UIColor whiteColor];   // 背景顏色
self.textView.text = @"這是一段示範文字...";             // 顯示內容
self.textView.returnKeyType = UIReturnKeyDefault;       // 返回鍵類型
self.textView.keyboardType = UIKeyboardTypeDefault;     // 鍵盤類型
self.textView.scrollEnabled = YES;                      // 是否可捲動
self.textView.autoresizingMask = UIViewAutoresizingFlexibleHeight; // 自適應高度
[self.view addSubview:self.textView];                   // 加入頁面
二、退出鍵盤的幾種方式
點擊 UITextView 會彈出鍵盤,如何讓它收起來?以下整理幾種常見做法。
方式一:在導航列加 Done 按鈕
若頁面有導航列,可在開始編輯時於右側加上一個 Done 按鈕,點擊後呼叫 resignFirstResponder 收起鍵盤:
- (void)textViewDidBeginEditing:(UITextView *)textView {
    UIBarButtonItem *done = [[[UIBarButtonItem alloc]
        initWithBarButtonSystemItem:UIBarButtonSystemItemDone target:self action:@selector(leaveEditMode)] autorelease];
    self.navigationItem.rightBarButtonItem = done;
}
- (void)leaveEditMode {
    [self.textView resignFirstResponder];
}
方式二:把回車鍵當作收起鍵
若不需要在文字中使用換行,可攔截回車鍵來收起鍵盤,無論實體鍵盤還是螢幕鍵盤的 return 鍵都適用:
- (BOOL)textView:(UITextView *)textView shouldChangeTextInRange:(NSRange)range replacementText:(NSString *)text {
    if ([text isEqualToString:@"\n"]) {
        [textView resignFirstResponder];
        return NO;
    }
    return YES;
}
方式三:在鍵盤上方加工具列
透過 inputAccessoryView 可以在鍵盤頂部加一條 UIToolbar,放置 Done 按鈕:
UIToolbar *topView = [[UIToolbar alloc] initWithFrame:CGRectMake(0, 0, 320, 30)];
[topView setBarStyle:UIBarStyleBlack];
UIBarButtonItem *doneButton = [[UIBarButtonItem alloc]
    initWithTitle:@"Done" style:UIBarButtonItemStyleDone target:self action:@selector(dismissKeyBoard)];
UIBarButtonItem *flexible = [[UIBarButtonItem alloc]
    initWithBarButtonSystemItem:UIBarButtonSystemItemFlexibleSpace target:self action:nil];
topView.items = [NSArray arrayWithObjects:flexible, doneButton, nil];
[textView setInputAccessoryView:topView];

- (void)dismissKeyBoard {
    [textView resignFirstResponder];
}
三、其他實用技巧
圓角設定:引入 <QuartzCore/QuartzCore.h> 後,即可透過 [textView.layer setCornerRadius:10]; 為 UITextView 加上圓角。
自適應高度:可根據文字內容計算高度,再據此調整外層視圖尺寸。
CGSize size = [desc sizeWithFont:[UIFont systemFontOfSize:14]
              constrainedToSize:CGSizeMake(240, 2000)
                  lineBreakMode:UILineBreakModeWordWrap];
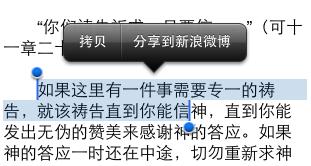
自訂選字後的功能選單:透過 UIMenuController 加入自定義選單項,並在 canPerformAction:withSender: 中控制它的顯示時機。
UIMenuItem *menuItem = [[UIMenuItem alloc] initWithTitle:@"分享到新浪微博" action:@selector(changeColor:)];
[[UIMenuController sharedMenuController] setMenuItems:[NSArray arrayWithObject:menuItem]];

- (BOOL)canPerformAction:(SEL)action withSender:(id)sender {
    if (action == @selector(changeColor:)) {
        if (textView.selectedRange.length > 0) return YES;
    }
    return NO;
}
四、個性化文字樣式
客製化 UITextView 的內容主要有兩種途徑:一是從檔案讀取(rtf、rtfd 格式效果尤佳);二是使用 NSAttributedString 進行精細排版。
透過 NSMutableParagraphStyle 可以控制行距、對齊、首行縮排等段落屬性:
NSMutableParagraphStyle *paragraphStyle = [[NSMutableParagraphStyle alloc] init];
paragraphStyle.lineHeightMultiple = 20.f;
paragraphStyle.alignment = NSTextAlignmentJustified;

NSDictionary *attributes = @{
    NSFontAttributeName: [UIFont systemFontOfSize:14],
    NSParagraphStyleAttributeName: paragraphStyle,
    NSForegroundColorAttributeName: [UIColor colorWithRed:76./255. green:75./255. blue:71./255. alpha:1]
};
textView.attributedText = [[NSAttributedString alloc] initWithString:content attributes:attributes];
此外,還可以客製化文字中的連結樣式:
NSDictionary *linkAttributes = @{
    NSForegroundColorAttributeName: [UIColor blueColor],
    NSUnderlineColorAttributeName: [UIColor blackColor],
    NSUnderlineStyleAttributeName: @(NSUnderlinePatternDash)
};
self.linkTextAttributes = linkAttributes;
以上只是基礎示例,實際上還有大量屬性可供調整,具體可參考官方頭檔。掌握這些用法,你就能打造出具備完整互動與精緻排版的多行文字元件。
- 上一篇文章: iOS 圖片保存與搜索功能實作(Photos.framework)
- 下一篇文章: 詳解 iOS 開發中的 ARC 記憶體管理方式