
iOS 自動化測試入門:UIAutomation 完整學習指南
UIAutomation 是 Apple 早期的 iOS 自動化測試工具,用 JavaScript 撰寫腳本,可驅動 App 進行點擊、驗證等操作。以下從安裝、寫腳本、錄製回放,一路到命令列執行,做一份完整整理。
一、軟體安裝
先透過 App Store 下載安裝 Xcode(本文撰寫時最新版本為 4.5.1)。UIAutomation 隨 Xcode 一起提供,無需另外安裝。
二、用 Xcode 撰寫並執行測試腳本
若要在模擬器上跑測試,需要被測 App 的源碼才能把它裝進模擬器。以下用一個自己寫的簡單 iPhone App 示範,你也可以在網路上找一個開源 App 來試。
1. 啟動 Instruments
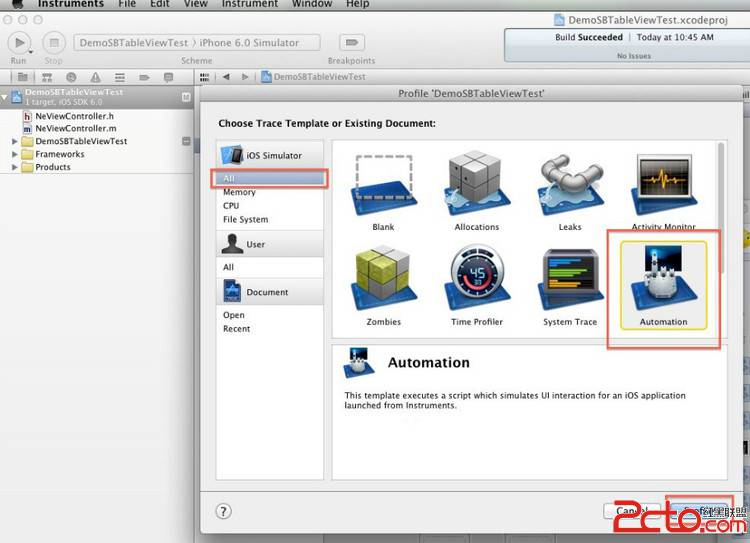
有了源碼後,在 Xcode 中選中被測 App,點選工具列「Product → Profile」,會跳出 Instruments。選擇「iOS Simulator → Automation」,再點 Profile:
2. 撰寫第一支腳本
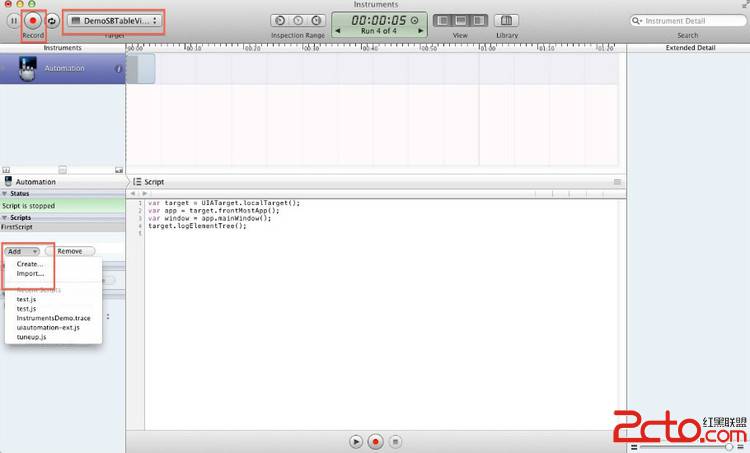
在 Automation 工具中選擇測試項目,透過「Add → Create」新增腳本,在中間區域輸入:
// 取得目前的 window 物件
var target = UIATarget.localTarget();
var app = target.frontMostApp();
var window = app.mainWindow();

// 印出目前畫面的控件樹
target.logElementTree();
完整的 API 可參考官方文件(UIAutomation Reference)。
3. 執行與看結果
點左上角 Record 開始執行,跑完後原本寫程式碼的區域會顯示 log。target.logElementTree() 會印出目前頁面的控件樹狀結構,點節點可查看控件屬性,寫腳本時非常有用。
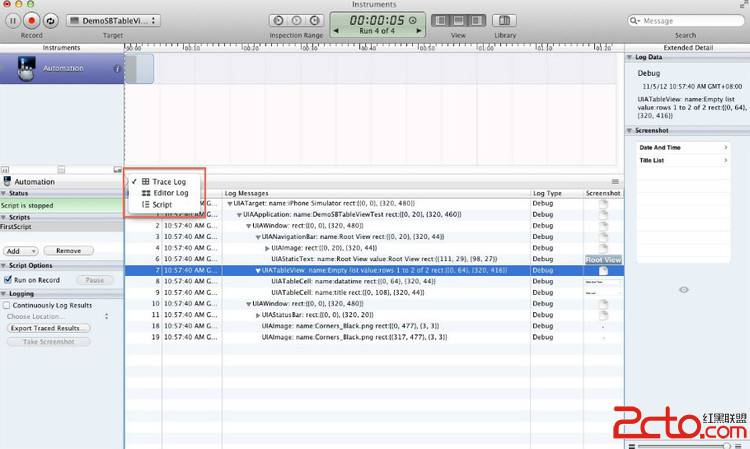
注意:用 Record 執行時,程式跑完不會自動停止,需要手動點左上角的 Stop 按鈕結束。
4. 錄製回放
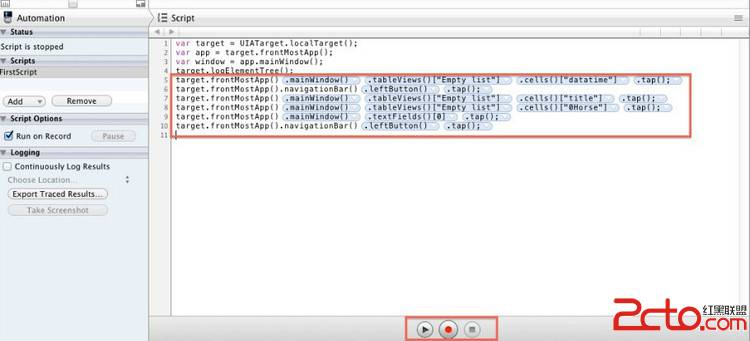
第一次寫腳本、對 API 不熟時,可以先用錄製回放功能:切到寫腳本畫面,點下方紅色按鈕開始錄製,工具會自動啟動模擬器中的 App,你在模擬器上的每一步點擊都會被記錄成程式碼。錄製好可點旁邊的方形停止鈕結束,再點 Record 重放。熟悉之後就能脫離錄製、自行撰寫了。
三、撰寫真正的測試用例(進階)
1. 元素識別
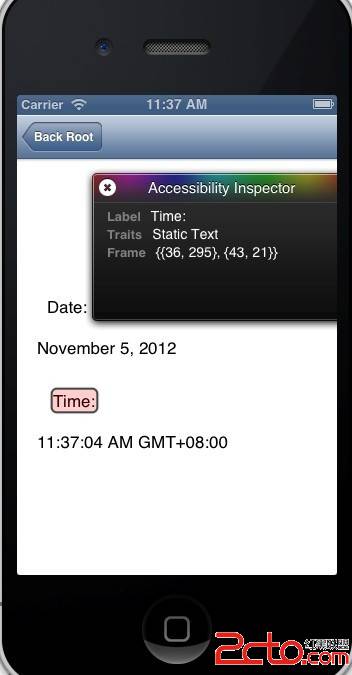
除了用 logElementTree() 印出控件,另一種方式是用模擬器內建的 Accessibility Inspector。啟動模擬器,找到「Settings → General → Accessibility → Accessibility Inspector」並開啟。此時畫面會出現一個覆層,點擊控件即可看到資訊:Label 是控件的 id,Traits 是類型,Frame 是位置與大小 {{x, y}, {寬, 高}}。
2. 含斷言的測試用例
var testName = "FirstTest";
UIALogger.logStart(testName);

var target = UIATarget.localTarget();
var app = target.frontMostApp();
var window = app.mainWindow();
app.logElementTree();

window.tableViews()[0].cells()[0].tap();
target.delay(3);

var date = window.elements()["date"];
UIALogger.logMessage(date);

if (date) {
    UIALogger.logPass(testName);
} else {
    UIALogger.logFail(testName);
}
這段腳本示範了元素查找與斷言。不過寫多個用例時,你會發現程式碼重複、組織不佳、斷言不方便等問題。
3. tuneup 擴充庫
為了解決上述痛點,社群有個開源 JS 擴充庫 tuneup(https://github.com/alexvollmer/tuneup_js),讓測試用例更好寫。用法是建立一個用例目錄(如 Demo),下面放 lib 子目錄存放 tuneup,再撰寫測試檔並用 import 引入:
#import "lib/tuneup/tuneup.js"

var target = UIATarget.localTarget();
var app = target.frontMostApp();

test("Second", function(target, app) {
    var window = app.mainWindow();
    app.logElementTree();
    window.tableViews()[0].cells()[0].tap();
    var date = window.elements()["date"];
    assertNotNull(date, "進入日期詳情頁面,date 屬性沒找到!");
});
四、用命令列執行測試
為了能定時自動執行,測試用例最好能用命令列啟動:
instruments -t /Applications/Xcode.app/Contents/Applications/Instruments.app/Contents/PlugIns/AutomationInstrument.bundle/Contents/Resources/Automation.tracetemplate \
  "/Users/ios/Library/Application Support/iPhone Simulator/6.0/Applications/D02EF837-94F7-457A-989A-A654FC034803/DemoSBTableViewTest.app" \
  -e UIASCRIPT /AutoTest/workspace/IosDemo/test.js \
  -e UIARESULTSPATH /AutoTest/workspace/IosDemo/lib/
參數說明:-t 後是 Automation.tracetemplate 的路徑(Xcode 4.5 以後皆同,更早版本路徑不同);接著是被測 App 的絕對路徑(模擬器安裝的 App 都能在本機硬碟找到);-e UIASCRIPT 指定要執行的 js 腳本;-e UIARESULTSPATH 指定結果輸出位置。
五、後續可延伸的改進方向
- 把測試結果輸出成 XML,再解析成 TestNG 格式,方便與 Jenkins 等持續整合平台結合。
- 目前只能照控件層級一層層往下定位,使用上略嫌繁瑣,可再封裝更好用的定位方式。
- 加入外圍控制與失敗重跑機制,讓整個自動化測試流程更穩定、更全面自動化。
值得一提的是,UIAutomation 這套工具在後續 iOS 版本中已被 Apple 逐步淘汰,取而代之的是 XCTest 與 XCUITest(Swift/Objective-C)。若是全新專案,建議直接採用 XCUITest;上面這份整理則適合作為理解 iOS 自動化測試概念、或維護舊有 UIAutomation 腳本時的參考。