
iOS 網路篇:用 NSURLSession 發送 GET 與 POST 請求
編輯:iOS 開發綜合
前言
本文聚焦一件事:如何用 NSURLSession 送出 GET 與 POST 請求。NSURLConnection 的相關用法這裡不再贅述。範例中的請求皆為 http,info.plist 已相應配置好 ATS 例外(相關設定可參考作者 GitHub)。完整範例程式碼亦可在作者的 GitHub 取得。
為什麼改用 NSURLSession
從 iOS 9.0 起,NSURLConnection 被標記為過時,Apple 建議以 NSURLSession 取代它完成所有網路請求工作。
使用方式非常精簡:先建立一個 session,再依需求建立對應的 Task,最後 resume 執行。
NSURLSessionTask 本身是抽象類別,實務上會用到它的幾個子類別:
- NSURLSessionDataTask:最常用,適合一般 API 呼叫,可搭配代理方法監聽資料流。
- NSURLSessionDownloadTask:檔案下載,支援背景續傳。
- NSURLSessionUploadTask:檔案上傳。
一、發送 GET 請求
GET 的參數直接接在 URL 後面,以 ? 起始,多組參數之間用 & 串接。整個流程是:
- 確定請求路徑(通常由後端以介面文件提供)
- 建立請求物件(可省略,它預設已含請求標頭與 GET 方法)
- 建立 session
- 依 session 建立 NSURLSessionDataTask
- 呼叫 resume 執行
- 在回呼中解析回應(XML / JSON / 其他)
寫法一:明確建立請求物件
-(void)getWithRequest{
    // 路徑結構:https://120.25.226.186:32812/login?username=520it&pwd=520it&type=JSON
    //          協議 + 主機:埠 + 介面名稱 + ? + 參數1&參數2&參數3
    NSURL *url = [NSURL URLWithString:
        @"https://120.25.226.186:32812/login?username=520it&pwd=520it&type=JSON"];

    // 請求物件內部預設已含請求標頭與方法(GET)
    NSURLRequest *request = [NSURLRequest requestWithURL:url];

    NSURLSession *session = [NSURLSession sharedSession];

    /* completionHandler 三個參數:
       data     → 回應本文,也就是我們真正想要的資料
       response → 回應標頭,關於伺服端的描述
       error    → 請求失敗時才有值 */
    NSURLSessionDataTask *dataTask =
        [session dataTaskWithRequest:request
                   completionHandler:^(NSData *data, NSURLResponse *response, NSError *error) {
        if (error == nil) {
            NSDictionary *dict = [NSJSONSerialization JSONObjectWithData:data
                                                               options:kNilOptions
                                                                 error:nil];
            NSLog(@"%@", dict);
        }
    }];

    [dataTask resume];      // 忘了 resume 是不會發出請求的
}
寫法二:直接傳 URL
-(void)getWithURL{
    NSURL *url = [NSURL URLWithString:
        @"https://120.25.226.186:32812/login?username=520it&pwd=520it&type=JSON"];
    NSURLSession *session = [NSURLSession sharedSession];

    /* 這個方法內部會自動把路徑包成請求物件,預設即為 GET。
       注意:若要發 POST 就不能用這個版本。 */
    NSURLSessionDataTask *dataTask =
        [session dataTaskWithURL:url
               completionHandler:^(NSData *data, NSURLResponse *response, NSError *error) {
        NSDictionary *dict = [NSJSONSerialization JSONObjectWithData:data
                                                           options:kNilOptions
                                                             error:nil];
        NSLog(@"%@", dict);
    }];

    [dataTask resume];
}
執行結果

印出來的是一個字典,其中 success 對應的值顯示為 Unicode 轉義。若想看懂中文,可以幫 NSDictionary 寫一個分類,覆寫系統的描述方法:
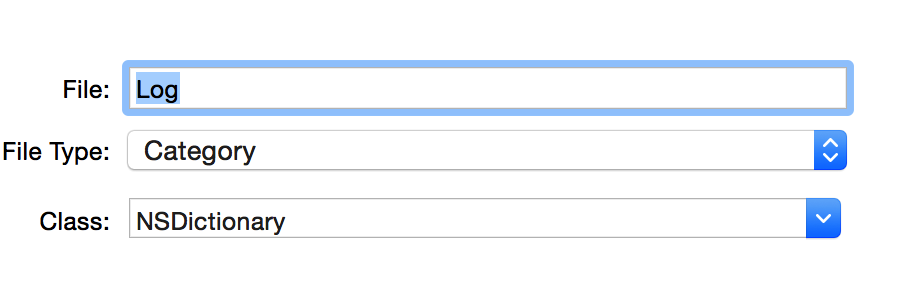
@implementation NSDictionary (Log)
-(NSString *)descriptionWithLocale:(id)locale indent:(NSUInteger)level{
    NSMutableString *string = [NSMutableString stringWithString:@"["];
    [self enumerateKeysAndObjectsUsingBlock:^(id key, id obj, BOOL *stop) {
        [string appendFormat:@"\n%@ : %@,", obj, key];
    }];
    [string appendString:@"\n]"];
    return string;
}
@end
執行結果

二、發送 POST 請求
POST 的參數不放 URL,而是轉成二進位資料塞進請求本文。因此這裡必須使用可變請求物件:
- 確定請求路徑
- 建立 NSMutableURLRequest(此步不可省略)
- 把 HTTPMethod 改為 POST
- 將參數字串轉為 NSData 並設為 HTTPBody
- 建立 session
- 建立 NSURLSessionDataTask
- resume 執行
- 在回呼中解析回應
-(void)post{
    // POST 介面:https://120.25.226.186:32812/login
    NSURLSession *session = [NSURLSession sharedSession];
    NSURL *url = [NSURL URLWithString:@"https://120.25.226.186:32812/login"];

    NSMutableURLRequest *request = [NSMutableURLRequest requestWithURL:url];
    request.HTTPMethod = @"POST";
    request.HTTPBody = [@"username=520it&pwd=520it&type=JSON"
                        dataUsingEncoding:NSUTF8StringEncoding];

    NSURLSessionDataTask *dataTask =
        [session dataTaskWithRequest:request
                   completionHandler:^(NSData *data, NSURLResponse *response, NSError *error) {
        if (error == nil) {
            NSDictionary *dict = [NSJSONSerialization JSONObjectWithData:data
                                                               options:kNilOptions
                                                                 error:nil];
            NSLog(@"%@", dict);
        }
    }];

    [dataTask resume];
}
三、透過代理方法觀察請求過程
/Block 回呼只告訴你「完成時」的結果。若需要監聽過程——例如掌握下載進度——就得改用帶 delegate 的 session。
@interface ViewController () <NSURLSessionDataDelegate>
@property (nonatomic, strong) NSMutableData *responseData;
@end

@implementation ViewController

-(NSMutableData *)responseData{
    if (_responseData == nil) {
        _responseData = [NSMutableData data];
    }
    return _responseData;
}

-(void)touchesBegan:(NSSet *)touches withEvent:(UIEvent *)event{
    [self delegateTest];
}

-(void)delegateTest{
    NSURL *url = [NSURL URLWithString:
        @"https://120.25.226.186:32812/login?username=520it&pwd=520it&type=JSON"];
    NSURLRequest *request = [NSURLRequest requestWithURL:url];

    /* 參數一:連線設定(此處用預設)
       參數二:誰當代理(此處是控制器本身)
       參數三:代理方法在哪條執行緒被呼叫
               [NSOperationQueue mainQueue] → 主執行緒
               [[NSOperationQueue alloc] init] → 子執行緒 */
    NSURLSession *session =
        [NSURLSession sessionWithConfiguration:[NSURLSessionConfiguration defaultSessionConfiguration]
                                      delegate:self
                                 delegateQueue:[NSOperationQueue mainQueue]];

    NSURLSessionDataTask *dataTask = [session dataTaskWithRequest:request];
    [dataTask resume];
}

// 1. 收到伺服端回應時呼叫,可在此取得回應標頭
-(void)URLSession:(NSURLSession *)session
        dataTask:(NSURLSessionDataTask *)dataTask
didReceiveResponse:(NSURLResponse *)response
 completionHandler:(void (^)(NSURLSessionResponseDisposition))completionHandler{
    NSLog(@"didReceiveResponse--%@", [NSThread currentThread]);
    // 必須透過 completionHandler 告訴系統怎麼處理這份資料,預設是取消
    // Cancel = 0(預設,取消)、Allow = 1(接收)、BecomeDownload = 2(轉為下載)
    completionHandler(NSURLSessionResponseAllow);
}

// 2. 收到資料時呼叫,資料量大時會被呼叫多次
-(void)URLSession:(NSURLSession *)session
        dataTask:(NSURLSessionDataTask *)dataTask
  didReceiveData:(NSData *)data{
    NSLog(@"didReceiveData--%@", [NSThread currentThread]);
    [self.responseData appendData:data];        // 記得自己拼接
}

// 3. 請求結束(成功或失敗)時呼叫,失敗則 error 有值
-(void)URLSession:(NSURLSession *)session
            task:(NSURLSessionTask *)task
didCompleteWithError:(NSError *)error{
    NSLog(@"didCompleteWithError--%@", [NSThread currentThread]);
    if (error == nil) {
        NSDictionary *dict = [NSJSONSerialization JSONObjectWithData:self.responseData
                                                           options:kNilOptions
                                                             error:nil];
        NSLog(@"%@", dict);
    }
}
@end
三個代理方法的分工很清晰:didReceiveResponse 決定要不要收、didReceiveData 負責累積片段、didCompleteWithError 收尾解析。搭配 delegateQueue 的設定,還能選擇讓這些回呼發生在主執行緒還是子執行緒。
執行結果
