
iOS UIAlertView 完整使用指南:按鈕、代理、自訂子視圖
UIAlertView 是傳統 iOS 專案中最常見的提示方塊元件。雖然它在 iOS 9 之後被 UIAlertController 取代,但理解它的運作方式(尤其是「按鈕索引」與「willPresent 時機」這兩個觀念),對維護舊專案或改用新 API 都有幫助。本文從最簡單的呼叫寫起,一路談到在對話框中塞入自訂控件。
一、最簡單的用法
核心初始化方法如下:
- (instancetype)initWithTitle:(NSString *)title
                      message:(NSString *)message
                     delegate:(id<UIAlertViewDelegate>)delegate
            cancelButtonTitle:(NSString *)cancelButtonTitle
            otherButtonTitles:(NSString *)otherButtonTitles, ...;
傳入標題、內容、代理,以及一串以 nil 結尾的按鈕標題即可:
UIAlertView *alert = [[UIAlertView alloc] initWithTitle:@"我的警告框"
                                                  message:@"這是一個警告框"
                                                 delegate:self
                                        cancelButtonTitle:@"取消"
                                        otherButtonTitles:@"確定", nil];
[alert show];
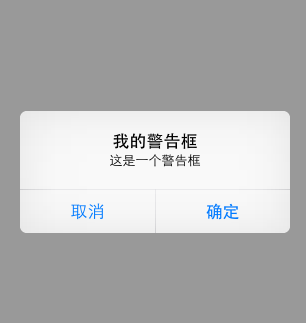
值得注意的是按鈕數量的影響:超過兩個按鈕時,版面會改成上下堆疊的樣式;若按鈕多到超出螢幕可顯示範圍,則會自動變成類似 tableView 的可捲動清單。
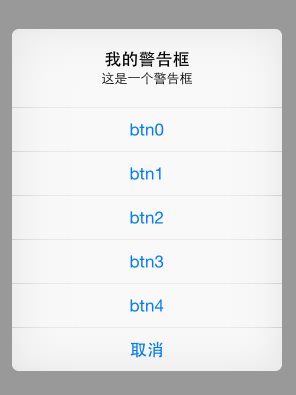
二、加入多個按鈕
UIAlertView *alert = [[UIAlertView alloc] initWithTitle:@"提示"
                                                  message:@"請選擇一個按鈕:"
                                                 delegate:nil
                                        cancelButtonTitle:@"取消"
                                        otherButtonTitles:@"按鈕一", @"按鈕二", @"按鈕三", nil];
[alert show];
[alert release];
三、判斷使用者按下了哪顆按鈕
UIAlertView 透過 UIAlertViewDelegate 回報點擊結果,因此承接類別必須宣告這個協定。頭檔看起來像這樣:
@interface MyAlertViewViewController : UIViewController {
}

- (void)alertView:(UIAlertView *)alertView clickedButtonAtIndex:(NSInteger)buttonIndex;
- (IBAction)buttonPressed;

@end
實作檔:
- (IBAction)buttonPressed {
    UIAlertView *alert = [[UIAlertView alloc] initWithTitle:@"提示"
                                                    message:@"請選擇一個按鈕:"
                                                   delegate:self
                                          cancelButtonTitle:@"取消"
                                          otherButtonTitles:@"按鈕一", @"按鈕二", @"按鈕三", nil];
    [alert show];
    [alert release];
}

- (void)alertView:(UIAlertView *)alertView clickedButtonAtIndex:(NSInteger)buttonIndex {
    NSString *msg = [[NSString alloc] initWithFormat:@"您按下的是第%d個按鈕!", buttonIndex];

    UIAlertView *alert = [[UIAlertView alloc] initWithTitle:@"提示"
                                                    message:msg
                                                   delegate:nil
                                          cancelButtonTitle:@"確定"
                                          otherButtonTitles:nil];
    [alert show];
    [alert release];
    [msg release];
}
這裡有個容易搞錯的細節:索引從 0 開始,且取消按鈕永遠是 0。也就是說在上例中,「取消」「按鈕一」「按鈕二」「按鈕三」對應的 buttonIndex 依序為 0、1、2、3。
四、以程式碼主動關閉對話框
[alert dismissWithClickedButtonIndex:0 animated:YES];
五、往 UIAlertView 裡塞子視圖
這是最實用也最容易踩坑的一招。有兩點要先記住:
其一,如果你把原本的按鈕全部移除,版面並不會自動收緊——按鈕佔的空間仍然存在,只是變成不可見而已。若對話框只用來顯示文字,在 message 開頭加一個換行符(@"\n")有助於平衡上下留白。
其二,加子視圖之前,通常得先調整原有 button 與 label 的位置,否則新控件會把預設內容蓋住。
以下示範做一個「請等待」的 loading 對話框,在裡頭放一個轉圈動畫:
UIAlertView *alert = [[UIAlertView alloc] initWithTitle:@"請等待"
                                                  message:nil
                                                 delegate:nil
                                        cancelButtonTitle:nil
                                        otherButtonTitles:nil];
[alert show];

UIActivityIndicatorView *activeView =
    [[UIActivityIndicatorView alloc] initWithActivityIndicatorStyle:UIActivityIndicatorViewStyleWhiteLarge];
activeView.center = CGPointMake(alert.bounds.size.width / 2.0f, alert.bounds.size.height - 40.0f);
[activeView startAnimating];

[alert addSubview:activeView];
[activeView release];
[alert release];
六、進階:改對齊、加輸入框
UIAlertView 的文字預設是置中對齊。若要改為靠左,或想加入 UITextField 之類的輸入控件,最合適的切入點是 willPresentAlertView:——此時對話框即將顯示,內部視圖已經備好,正好可以逐一調整。
先把訊息文字改為左對齊:
- (void)willPresentAlertView:(UIAlertView *)alertView {
    for (UIView *view in alertView.subviews) {
        if ([view isKindOfClass:[UILabel class]]) {
            UILabel *label = (UILabel *)view;
            label.textAlignment = UITextAlignmentLeft;
        }
    }
}
再來加入兩個輸入框(帳號與密碼),同時把既有的按鈕往下推開:
- (void)willPresentAlertView:(UIAlertView *)alertView {
    CGRect frame = alertView.frame;
    frame.origin.y   -= 120;
    frame.size.height += 80;
    alertView.frame = frame;

    // 把固有的 button 往下移,避免被輸入框遮住
    for (UIView *view in alertView.subviews) {
        if (![view isKindOfClass:[UILabel class]]) {
            CGRect btnFrame = view.frame;
            btnFrame.origin.y += 70;
            view.frame = btnFrame;
        }
    }

    UITextField *accoutName = [[UITextField alloc] init];
    UITextField *accoutPassword = [[UITextField alloc] init];

    accoutName.frame = CGRectMake(10, frame.origin.y + 40, frame.size.width - 20, 30);
    accoutPassword.frame = CGRectMake(10, frame.origin.y + 80, frame.size.width - 20, 30);

    accoutName.placeholder = @"請輸入帳號";
    accoutPassword.placeholder = @"請輸入密碼";
    accoutPassword.secureTextEntry = YES;

    [alertView addSubview:accoutPassword];
    [alertView addSubview:accoutName];

    [accoutName release];
    [accoutPassword release];
}
最後補充一點:UIActionSheet 的處理方式幾乎一模一樣,只要改在 willPresentActionSheet: 中做同樣的事情,就能得到自訂的操作表單。