
iOS 開發實戰:UIAlertView 提示框的三種用法
編輯:iOS 開發綜合
在學完 Objective-C 的基礎語法後,從這裡開始進入 iOS 的視圖開發。第一個要認識的就是 UIAlertView(提示視圖)。本文由淺入深,介紹普通彈框、代理彈框以及帶輸入框的提示框三種用法。
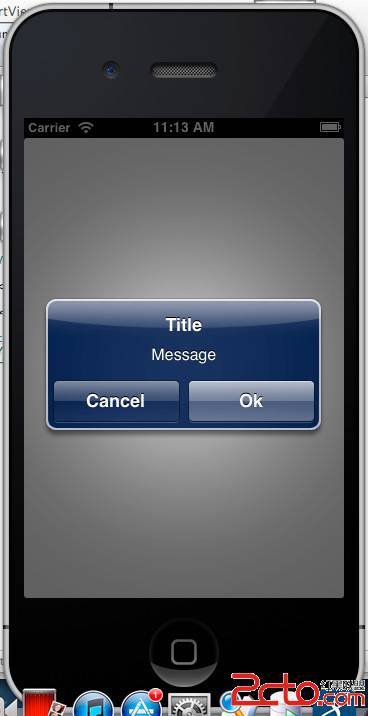
一、普通彈框
建立提示視圖最好的方式,就是使用系統提供的指定初始化方法:
- (void)viewDidLoad
{
    [super viewDidLoad];

    //Title:顯示在提示框最上方的標題
    UIAlertView *alertView = [[UIAlertView alloc] initWithTitle:@"Title"
        //message:真正要給使用者看的訊息
        message:@"Message"
        //delegate:可選的代理對象,需實作 UIAlertViewDelegate 協議
        delegate:nil
        //cancelButtonTitle:取消按鈕的標題,文字可自行設定
        cancelButtonTitle:@"Cancel"
        //otherButtonTitles:其他按鈕標題,以逗號分隔,並用 nil 結尾
        otherButtonTitles:@"Ok", nil];
    [alertView show];
}
運行結果:
二、代理彈框
.h 檔:
@interface ZYAlertYesOrNoViewController : UIViewController<UIAlertViewDelegate>//加入 UIAlertViewDelegate 代理
-(void) alertView:(UIAlertView *)alertView clickedButtonAtIndex:(NSInteger)buttonIndex;
@end
.m 檔:
- (void)viewDidAppear:(BOOL)animated{
    [super viewDidAppear:animated];
    self.view.backgroundColor = [UIColor whiteColor];
    UIAlertView *alertView = [[UIAlertView alloc]
        initWithTitle:@"Rating"
        message:@"Can you please rate our app?"
        delegate:self//為自身加入代理
        cancelButtonTitle:[self noButtonTitle]
        otherButtonTitles:[self yesButtonTitle], nil];
    [alertView show];
}

- (NSString *) yesButtonTitle{ return @"Yes"; }
- (NSString *) noButtonTitle{ return @"No"; }

//判斷使用者按下的是 Yes 還是 No
-(void) alertView:(UIAlertView *)alertView clickedButtonAtIndex:(NSInteger)buttonIndex{
    NSString *buttonTitle = [alertView buttonTitleAtIndex:buttonIndex];
    if ([buttonTitle isEqualToString:[self yesButtonTitle]]) {
        NSLog(@"User pressed the Yes button.");
    }else if([buttonTitle isEqualToString:[self noButtonTitle]]){
        NSLog(@"User pressed the No button.");
    }
}
點擊 Yes 按鈕後,控制台會輸出:
2013-04-22 11:21:33.675 UIAlertViewTestDemo[1147:c07] User pressed the Yes button.
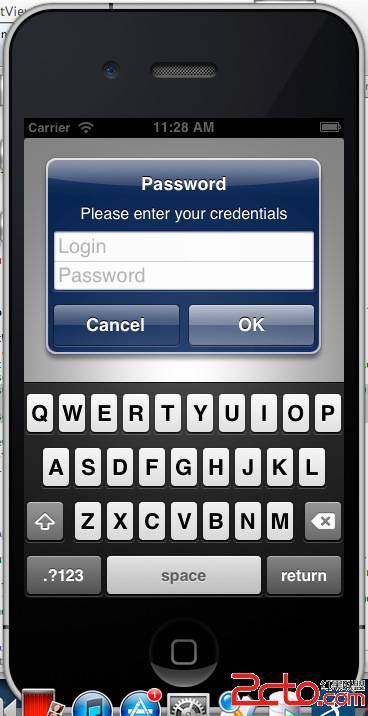
三、帶輸入框的提示框
//登陸彈框:包含一個文字輸入框與一個密碼框
UIAlertView *alertView = [[UIAlertView alloc]
    initWithTitle:@"Password" message:@"Please enter your credentials" delegate:self
    cancelButtonTitle:@"Cancel" otherButtonTitles:@"OK", nil];
//設定 AlertView 樣式
[alertView setAlertViewStyle:UIAlertViewStyleLoginAndPasswordInput];
[alertView show];
運行結果:
四、UIAlertView 樣式列舉
typedef enum {
    UIAlertViewStyleDefault,             //預設樣式
    UIAlertViewStyleSecureTextInput,     //密碼框
    UIAlertViewStylePlainTextInput,      //文字輸入框
    UIAlertViewStyleLoginAndPasswordInput //含登陸效果的提示框
} UIAlertViewStyle;
透過 setAlertViewStyle: 切換不同樣式,就能讓同一個提示框呈現純訊息、輸入框或登陸表單等多種形態。
- 上一篇文章: iOS 開發實戰:UISwitch 開關控件的基本用法
- 下一篇文章: iOS 開發實戰:實現 App 啟動動畫並優化內存佔用