
iOS 動畫系列之五:UIBezierPath 繪圖完全指南
在之前的博客中,大家可能會發現總是出現 UIBezier 的身影,但我一直沒有做過多的介紹,今天便集中講解一下 UIBezierPath。首先需要說明的是,它的內容相當豐富,我今天介紹的並非全部,但涵蓋了大部分常用知識,其餘部分請大家參考官方文檔。
由於今天的內容較多,某些地方可能不太容易理解,我會盡量把它們講得通俗易懂,方便大家學習。
先上一張圖,你便能看到今天要講的主要內容。
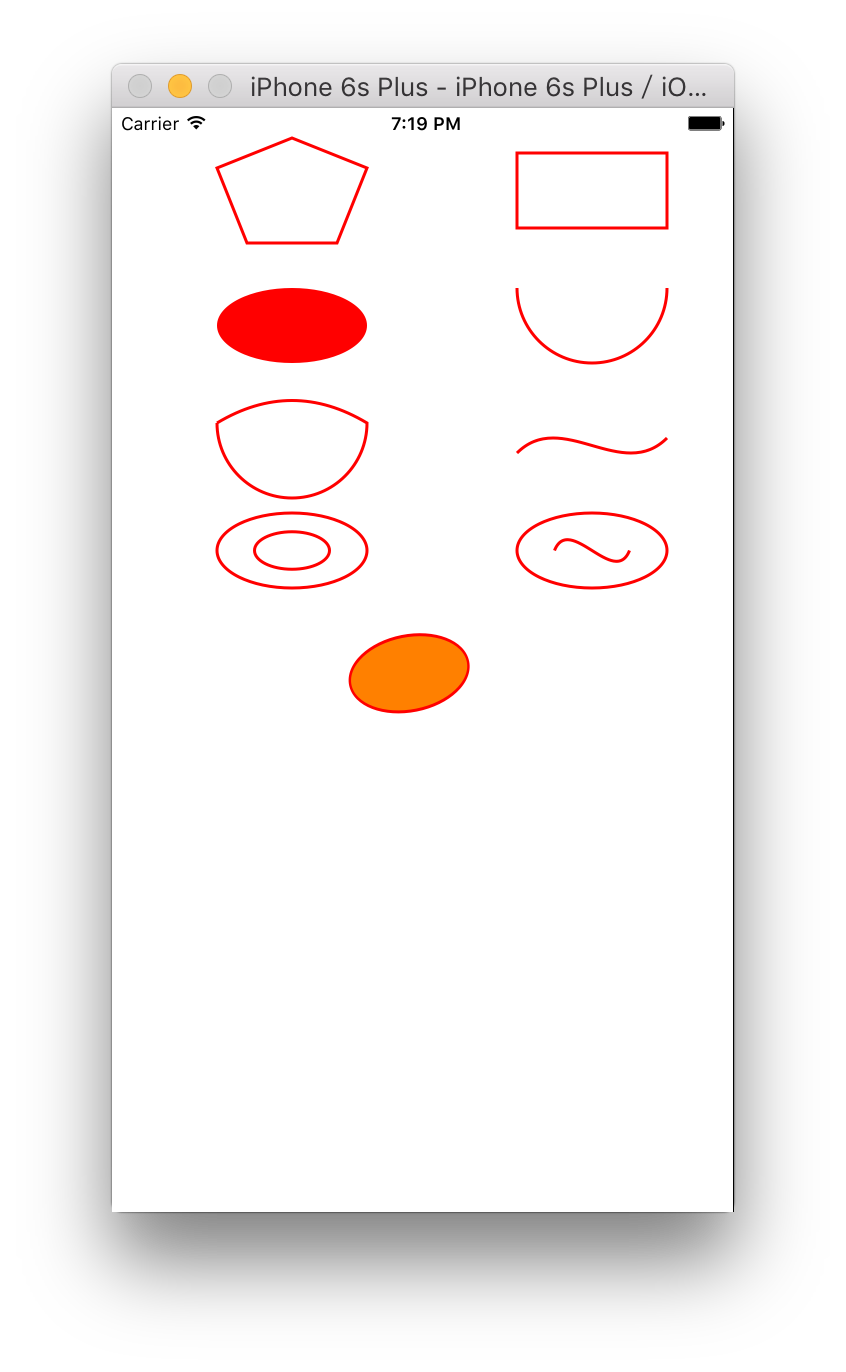
我創建了一個名為 PathView 的 UIView 子類,然後在 ViewController 中創建它的對象:
//創建一個 PathView let pathView = PathView() pathView.frame = CGRect(x: 50, y: 0, width: 350, height: 550) view.addSubview(pathView)
接下來的操作都在這個 PathView 裡進行,在 drawRect 方法中對視圖進行繪制。
一次貝塞爾曲線
一次貝塞爾曲線比較簡單,相信大家都看得懂。
五邊形
func creatPentagonPath() { let path = UIBezierPath() path.lineWidth = 2.0 //設置起點 path.moveToPoint(CGPoint(x: 70.0, y: 20.0)) //設置各個拐角點 path.addLineToPoint(CGPoint(x: 120.0, y: 40.0)) path.addLineToPoint(CGPoint(x: 100.0, y: 90.0)) path.addLineToPoint(CGPoint(x: 40.0, y: 90.0)) path.addLineToPoint(CGPoint(x: 20.0, y: 40.0)) //最後閉合 path.closePath() path.stroke()//描邊樣式 //path.fill()//填充樣式 }
解釋:這是最簡單的一種 UIBezierPath。moveToPoint() 與 closePath() 作為起點與閉合是必須的,中間的 addLineToPoint 用於添加各個頂點,這裡添加的五個點組成一個五邊形。stroke() 與 fill() 的區別在於:前者是描邊樣式,後者是填充樣式。
矩形
矩形有專門的初始化方法,無需手動繪制。
func creatRectanglePath() { //創建 bezier 路徑 let path = UIBezierPath(rect: CGRect(x: 220, y: 30, width: 100, height: 50)) path.lineCapStyle = .Round //線類型 path.lineJoinStyle = .Miter //拐角類型 path.lineWidth = 2.0//設置線寬 path.stroke()//描邊樣式 //path.fill()//填充樣式 }
解釋:rect 即矩形;lineCapStyle 是線端類型,lineJoinStyle 是拐角類型,與之前講的 CAShapeLayer 中某些屬性頗為相似。
橢圓
它也可以用來畫圓——當內切於正方形時,便是圓了。
func creatOvalPath() { //畫出 ovalInRect 所定義矩形的內切橢圓 let path = UIBezierPath(ovalInRect: CGRect(x: 20, y: 120, width: 100, height: 50)) path.lineWidth = 2 path.fill() }
解釋:ovalInRect 代表橢圓,且是內切於 rect 的橢圓,只是初始化方式不同而已。
圓弧
func creatArcPath() { let path = UIBezierPath(arcCenter: CGPoint(x: 270, y: 120), radius: 50, startAngle: 0, endAngle: CGFloat(M_PI), clockwise: true) path.lineWidth = 2 path.stroke() }
解釋:參數依次指定這段圓弧的中心、半徑、開始角度、結束角度以及是否順時針方向。
二次貝塞爾曲線
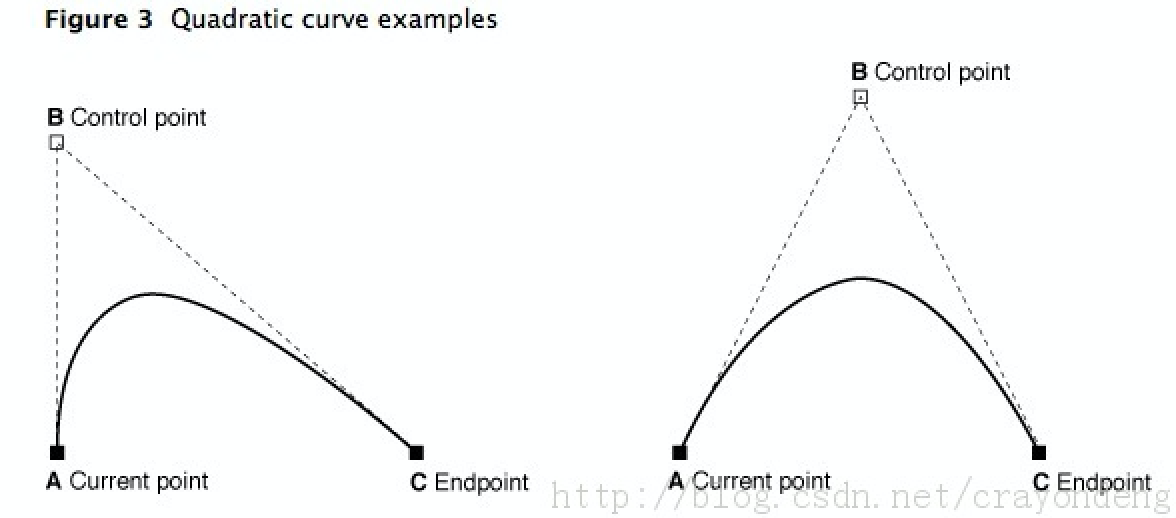
二次貝塞爾曲線比一次曲線稍微複雜一些,其特點是會有一個控制點。
func creatQuadCurvePath() { let path = UIBezierPath() //設置起點 path.moveToPoint(CGPoint(x: 20, y: 210)) //參數分別為終點、中間控制點 path.addQuadCurveToPoint(CGPoint(x: 120, y: 210), controlPoint: CGPoint(x: 70, y: 180)) //添加圓弧, 參數依次為中心點、半徑、開始角度、結束角度、是否順時針 path.addArcWithCenter(CGPoint(x: 70, y: 210), radius: 50, startAngle: 0.0, endAngle: CGFloat(M_PI), clockwise: true) path.lineWidth = 2 path.stroke() }
解釋:addQuadCurveToPoint 就是二次貝塞爾曲線,第二個參數(控制點)決定曲線的彎曲程度,第一個參數是終點,此外還需一個 moveToPoint 作為起點。通過下面這張圖,二次貝塞爾曲線各參數的作用便一目了然。
三次貝塞爾曲線
func creatCurvePath() { let path = UIBezierPath() //起點 path.moveToPoint(CGPoint(x: 220, y: 230)) //參數分別為終點、控制點1、控制點2 path.addCurveToPoint(CGPoint(x: 320, y: 220), controlPoint1: CGPoint(x: 250, y: 200), controlPoint2: CGPoint(x: 290, y: 250)) path.lineWidth = 2 path.stroke() }
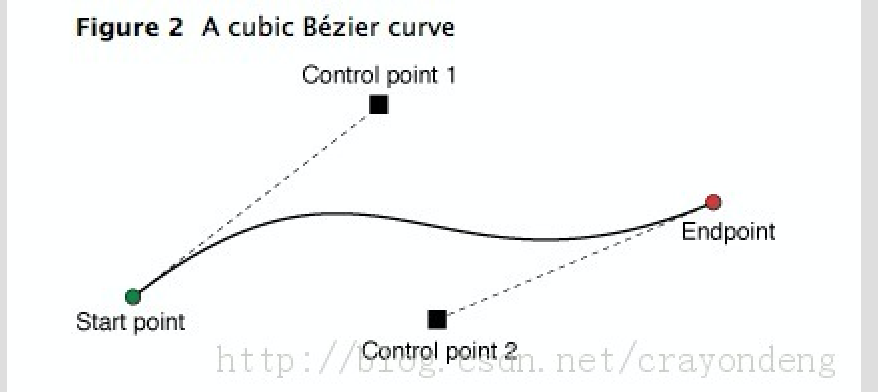
解釋:可以看到,三次貝塞爾曲線相比二次曲線只是多了一個控制點,關係圖如下。
簡單涉足一下 Core Graphics
單一修改 CGPath
func creatSingleCGPath() { //創建可變 CGPath let cgPath = CGPathCreateMutable() CGPathAddEllipseInRect(cgPath, nil, CGRect(x: 20, y: 270, width: 100, height: 50)) CGPathAddEllipseInRect(cgPath, nil, CGRect(x: 45, y: 282.5, width: 50, height: 25)) let path = UIBezierPath() path.CGPath = cgPath path.usesEvenOddFillRule = true path.lineWidth = 2 path.stroke() // CGPathRelease(cgPath); 如果是 OC 需要執行這句代碼 }
解釋:通過 Core Graphics 函數創建並修改可變 Path。
CGPath 與 UIBezierPath 混合使用
func creatMixCGPathAndUIBezierPath() { //創建貝塞爾曲線 let path = UIBezierPath(ovalInRect: CGRect(x: 220, y: 270, width: 100, height: 50)) //獲取 CGPath let cgPath = path.CGPath //copy 給可變 CGPath let mutablePath = CGPathCreateMutableCopy(cgPath)! as CGMutablePathRef //設置起點 CGPathMoveToPoint(mutablePath, nil, 245, 295) //添加曲線, 參數為控制點1、控制點2、終點 CGPathAddCurveToPoint(mutablePath, nil, 255, 270, 285, 320, 295, 295) //其他可用函數還有: CGPathAddLineToPoint 添加直線、CGPathAddLines 添加多條直線、CGPathAddPath 添加路徑、CGPathAddQuadCurveToPoint 添加二次曲線、CGPathAddRect(s) 添加矩形、CGPathAddRoundedRect 添加圓角矩形、CGPathAddArc 添加圓弧、CGPathAddRelativeArc 添加相對圓弧 path.CGPath = mutablePath path.lineWidth = 2 path.stroke() }
解釋:這裡內容較多,就不再逐一解釋了,其方法與參數基本與前面介紹的相似,仔細看便能理解各參數含義。
內容控制(附加)
func setUpContext() { let path = UIBezierPath(ovalInRect: CGRect(x: 20, y: 350, width: 100, height: 50)) UIColor.redColor().setStroke() UIColor.orangeColor().setFill() let ref = UIGraphicsGetCurrentContext() //內容平移 CGContextTranslateCTM(ref, 20, 20) //內容旋轉 (因所有圖形畫在同一視圖中, anchorPoint 並非當前橢圓中心, 旋轉後會偏離原位) CGContextRotateCTM(ref, CGFloat(-M_PI_4/4)); //內容縮放 CGContextScaleCTM(ref, 0.8, 1.0) path.lineWidth = 2 path.fill() path.stroke() }
解釋:關於內容控制其實又是很大一塊內容,這裡就不展開細講了。