
iOS 語音聽寫功能實戰:接入科大訊飛 SDK
編輯:iOS 開發綜合
項目裡需要把語音實時轉成文字,調研之後選擇了科大訊飛,這裡把接入要點和封裝思路分享出來。
接入前的準備工作
- 在科大訊飛開放平台註冊開發者帳號(
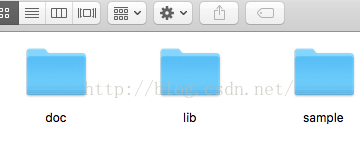
https://www.xfyun.cn)。 - 下載對應平台的 SDK,壓縮包裡通常包含說明文檔、iflyMSC.framework 以及官方 Demo。
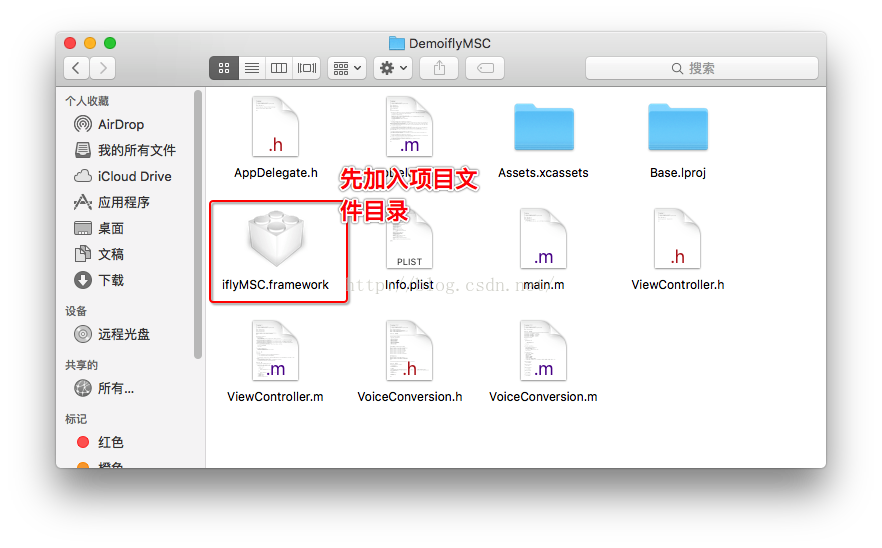
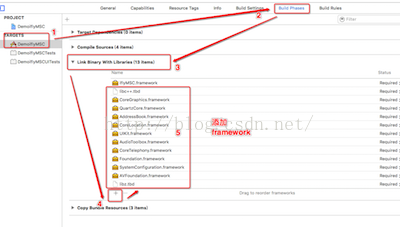
- 把 SDK 復制進項目目錄,再通過 Add Other 的方式添加 framework 引用,同時關聯所需的系統庫。路徑:TARGETS → Build Phases → Link Binary With Libraries → 「+」→ Add Other。
- 在使用到的文件中引入相應頭文件。
幾個容易翻車的細節:
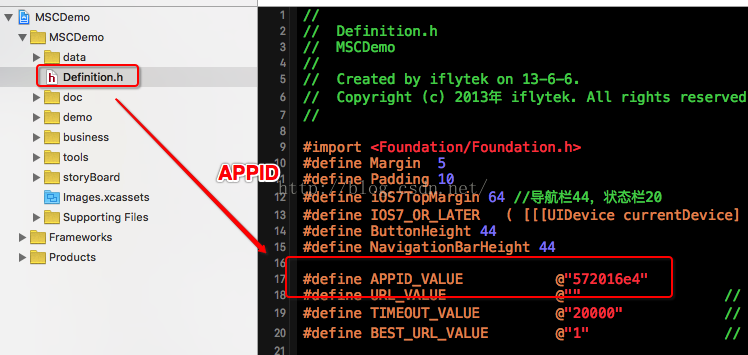
- SDK 與 APPID 是綁定的,APPID 可以在下載的 Demo 中找到。如果替換了 SDK,APPID 也要一起換。
- 必須在
application:didFinishLaunchingWithOptions:中完成初始化,否則調用服務時通常會拿到錯誤碼 10111。 - 聽寫依賴雲端服務,必須有網絡才能工作。
下載到的 SDK 目錄結構:
Demo 中的 APPID:
添加 SDK:
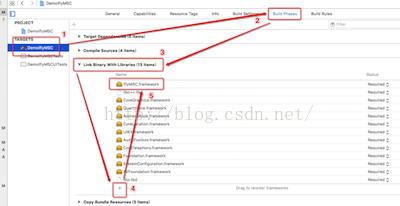
關聯所需 framework:
封裝設計思路
為了讓業務層調用起來清爽,我把 SDK 拆成兩層:一個 IATConfig 單例集中管理所有可配置參數(語言、方言、採樣率、前後端點、超時等),另一個 VoiceConversion 類對外暴露「初始化、開始、停止、取消」四個動作,並通過 block 回調把開始、結束、錯誤、識別結果、音量五類事件拋給業務層。
// VoiceConversion.h
#import <Foundation/Foundation.h>
#import "iflyMSC.framework/Headers/IFlyMSC.h"
#import "iflyMSC.framework/Headers/IFlySpeechUtility.h"
#import "iflyMSC/IFlySpeechConstant.h"

@interface VoiceConversion : NSObject
+ (void)VoiceInitialize;

- (void)voiceStart:(void (^)(BOOL isStart))startListening
       speechBegin:(void (^)(void))begin
         speechEnd:(void (^)(void))end
        speechError:(void (^)(BOOL isSuccess))error
       speechResult:(void (^)(NSString *text))result
       speechVolume:(void (^)(int volume))volume;

- (void)voiceCancel;
- (void)voiceStop;
@end
初始化的關鍵幾行:
+ (void)VoiceInitialize {
    [IFlySetting setLogFile:LVL_ALL];
    [IFlySetting showLogcat:YES;
    NSArray *paths = NSSearchPathForDirectoriesInDomains(NSCachesDirectory, NSUserDomainMask, YES);
    [IFlySetting setLogFilePath:[paths objectAtIndex:0]];
    NSString *initString = [NSString stringWithFormat:@"appid=%@", VoiceAPPID];
    [IFlySpeechUtility createUtility:initString];
}
會話參數配置:
- (void)initializeVoice {
    self.iFlySpeechRecognizer.delegate = self;
    IATConfig *instance = [IATConfig sharedInstance];
    [self.iFlySpeechRecognizer setParameter:instance.speechTimeout forKey:IFlySpeechConstant_SPEECH_TIMEOUT];
    [self.iFlySpeechRecognizer setParameter:instance.vadEos forKey:IFlySpeechConstant_VAD_EOS];
    [self.iFlySpeechRecognizer setParameter:instance.vadBos forKey:IFlySpeechConstant_VAD_BOS];
    [self.iFlySpeechRecognizer setParameter:@"20000" forKey:IFlySpeechConstant_NET_TIMEOUT];
    [self.iFlySpeechRecognizer setParameter:instance.sampleRate forKey:IFlySpeechConstant_SAMPLE_RATE];
    [self.iFlySpeechRecognizer setParameter:instance.dot forKey:IFlySpeechConstant_ASR_PTT];
}
開始錄音時需要指定音頻來源與結果格式:
[self.iFlySpeechRecognizer setParameter:IFLY_AUDIO_SOURCE_MIC forKey:@"audio_source"];
[self.iFlySpeechRecognizer setParameter:@"json" forKey:IFlySpeechConstant_RESULT_TYPE];
[self.iFlySpeechRecognizer setParameter:@"asr.pcm" forKey:IFlySpeechConstant_ASR_AUDIO_PATH];
BOOL isStart = [self.iFlySpeechRecognizer startListening];
識別結果是 JSON,需要自己解析出文本:
+ (NSString *)stringFromJson:(NSString *)params {
    if (params == NULL) { return nil; }
    NSMutableString *tempStr = [[NSMutableString alloc] init];
    NSData *dataJSON = [params dataUsingEncoding:NSUTF8StringEncoding];
    NSDictionary *resultDic = [NSJSONSerialization JSONObjectWithData:dataJSON options:kNilOptions error:nil];
    NSArray *wordArray = [resultDic objectForKey:@"ws"];
    for (int i = 0; i < wordArray.count; i++) {
        NSArray *cwArray = [[wordArray objectAtIndex:i] objectForKey:@"cw"];
        for (int j = 0; j < cwArray.count; j++) {
            [tempStr appendString:[[[cwArray objectAtIndex:j] objectForKey:@"w"] description]];
        }
    }
    return tempStr;
}
代理回調把結果逐段拼回去,實現「边说边出字」的效果:
- (void)onResults:(NSArray *)results isLast:(BOOL)isLast {
    NSMutableString *resultString = [[NSMutableString alloc] init];
    NSDictionary *dic = results[0];
    for (NSString *key in dic) { [resultString appendFormat:@"%@", key]; }
    NSString *resultFromJson = [[self class] stringFromJson:resultString];
    [self.resultText appendString:resultFromJson];
    if (self.resultSpeech) { self.resultSpeech(self.resultText); }
}
在頁面中使用
App 啟動時調用一次初始化:
- (BOOL)application:(UIApplication *)application
    didFinishLaunchingWithOptions:(NSDictionary *)launchOptions {
    [VoiceConversion VoiceInitialize];
    return YES;
}
界面上放三個按鈕分別觸發開始、停止、取消,並把回調結果展示到 Label 上:
ViewController __weak *weakSelf = self;
[self.voiceConversion voiceStart:^(BOOL isStart) {
    weakSelf.messageLabel.text = isStart ? @"正在錄音" : @"啟動識別服務失敗,請稍後重試";
} speechBegin:^{ NSLog(@"begin"); }
      speechEnd:^{ NSLog(@"end"); }
     speechError:^(BOOL isSuccess) { NSLog(@"error"); }
    speechResult:^(NSString *text) { weakSelf.messageLabel.text = text; }
    speechVolume:^(int volume) {
        weakSelf.messageLabel.text = [NSString stringWithFormat:@"音量:%d", volume];
    }];
封裝之後,業務層只關心「開始說、說完了拿文字」這件事,SDK 的細節都被擋在了 VoiceConversion 內部。
- 上一篇文章: Xcode 7 打包與發布流程詳解(二)
- 下一篇文章: iOS 動畫詳解:UIView 動畫與 CALayer 動畫全對比