
Swift 實作提示框:第三方庫 MBProgressHUD 使用筆記
編輯:iOS 開發綜合
本文示範如何在 Swift 專案中使用 MBProgressHUD。這個開源庫能做出多種形式的提示框,用法簡單、整合方便。
GitHub 下載地址:https://github.com/jdg/MBProgressHUD/
下載完成後,把 MBProgressHUD.h 與 MBProgressHUD.m 拖進已經建好的 Swift 專案。由於專案使用 Swift,拖入的過程中 Xcode 會詢問是否建立 Objective-C 與 Swift 的橋接檔,選擇「是」即可,系統會自動產生一個橋接標頭檔:
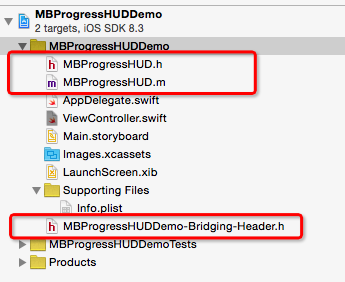
在這個檔案(MBProgressHUDDemo-Bridging-Header.h)裡會看到一段預設註解,我們只要在其中補上一行引入即可:
#import "MBProgressHUD.h"
完成後你會發現 Build Settings → Swift Compiler - Code Generation 底下多了一個 Objective-C Bridging Header 項目,指的就是這個橋接檔的宣告路徑。(這個理解若有偏差,歡迎指正。)

接著試了幾種不同樣式的提示框,用按鈕觸發:

以下是整個 Demo 的程式碼:
//
//  ViewController.swift
//  MBProgressHUDDemo
//  MBProgressHUD GitHub:https://github.com/jdg/MBProgressHUD/
//

import UIKit

class ViewController: UIViewController {

    var HUD: MBProgressHUD?

    @IBAction func TextDialogBtn(sender: AnyObject)    { showTextDialog() }
    @IBAction func ProgressDialogBtn1(sender: AnyObject) { showProgressDialog1() }
    @IBAction func ProgressDialogBtn2(sender: AnyObject) { showProgressDialog2() }
    @IBAction func CustomDialogBtn(sender: AnyObject)  { showCustomDialog() }
    @IBAction func AllTextDialogBtn(sender: AnyObject)  { showAllTextDialog() }

    override func viewDidLoad() {
        super.viewDidLoad()
    }

    // 純文字提示框
    func showTextDialog() {
        HUD = MBProgressHUD(view: self.view)
        self.view.addSubview(HUD!)
        HUD?.dimBackground = true          // 當前視圖轉為背景變暗
        HUD?.labelText = "請稍等"
        HUD?.showAnimated(true, whileExecutingBlock: {
            sleep(3)
        }, completionBlock: {
            self.HUD?.removeFromSuperview()
            self.HUD = nil
        })
    }

    // 圓形進度提示
    func showProgressDialog1() {
        HUD = MBProgressHUD(view: self.view)
        self.view.addSubview(HUD!)
        HUD?.dimBackground = true
        HUD?.labelText = "正在加載"
        HUD?.mode = MBProgressHUDMode.Determinate
        HUD?.showAnimated(true, whileExecutingBlock: {
            var progress: Float = 0.0
            while progress < 1.0 {
                progress += 0.01
                self.HUD?.progress = progress
                usleep(50000)
            }
        }, completionBlock: {
            self.HUD?.removeFromSuperview()
            self.HUD = nil
        })
    }

    // 橫向進度條提示
    func showProgressDialog2() {
        HUD = MBProgressHUD(view: self.view)
        self.view.addSubview(HUD!)
        HUD?.dimBackground = true
        HUD?.labelText = "正在加載"
        HUD?.mode = MBProgressHUDMode.DeterminateHorizontalBar
        HUD?.showAnimated(true, whileExecutingBlock: {
            var progress: Float = 0.0
            while progress < 1.0 {
                progress += 0.01
                self.HUD?.progress = progress
                usleep(50000)
            }
        }, completionBlock: {
            self.HUD?.removeFromSuperview()
            self.HUD = nil
        })
    }

    // 自訂提示(例如成功勾選圖示)
    func showCustomDialog() {
        HUD = MBProgressHUD(view: self.view)
        self.view.addSubview(HUD!)
        HUD?.dimBackground = true
        HUD?.labelText = "操作成功"
        HUD?.mode = MBProgressHUDMode.CustomView
        HUD?.customView = UIImageView(image: UIImage(named: "37x-Checkmark-1"))
        HUD?.showAnimated(true, whileExecutingBlock: {
            sleep(2)
        }, completionBlock: {
            self.HUD?.removeFromSuperview()
            self.HUD = nil
        })
    }

    // 純文字提示(不帶進度)
    func showAllTextDialog() {
        HUD = MBProgressHUD(view: self.view)
        self.view.addSubview(HUD!)
        HUD?.dimBackground = true
        HUD?.mode = MBProgressHUDMode.Text
        HUD?.labelText = "操作成功"
        // 需要時可指定相對中心點的偏移,不設則顯示在正中央
        // HUD?.yOffset = 150.0
        // HUD?.xOffset = 150.0
        HUD?.showAnimated(true, whileExecutingBlock: {
            sleep(2)
        }, completionBlock: {
            self.HUD?.removeFromSuperview()
            self.HUD = nil
        })
    }

    override func didReceiveMemoryWarning() {
        super.didReceiveMemoryWarning()
    }
}
以下是實際運行效果。
文字提示框:

進度提示框(圓形):

進度提示框(橫條):

自訂提示框:

純文字提示框:

實務小提醒:showAnimated 的 whileExecutingBlock 是在背景執行緒跑的,所以裡面可以放 sleep 或網路請求;但若要更新 UI,記得跳回主執行緒。另外記得在移除時把 HUD 釋放掉,避免強引用殘留。