
iOS 自動布局入門:用 autoresizingMask 讓子視圖跟著父視圖伸縮
編輯:iOS 開發綜合
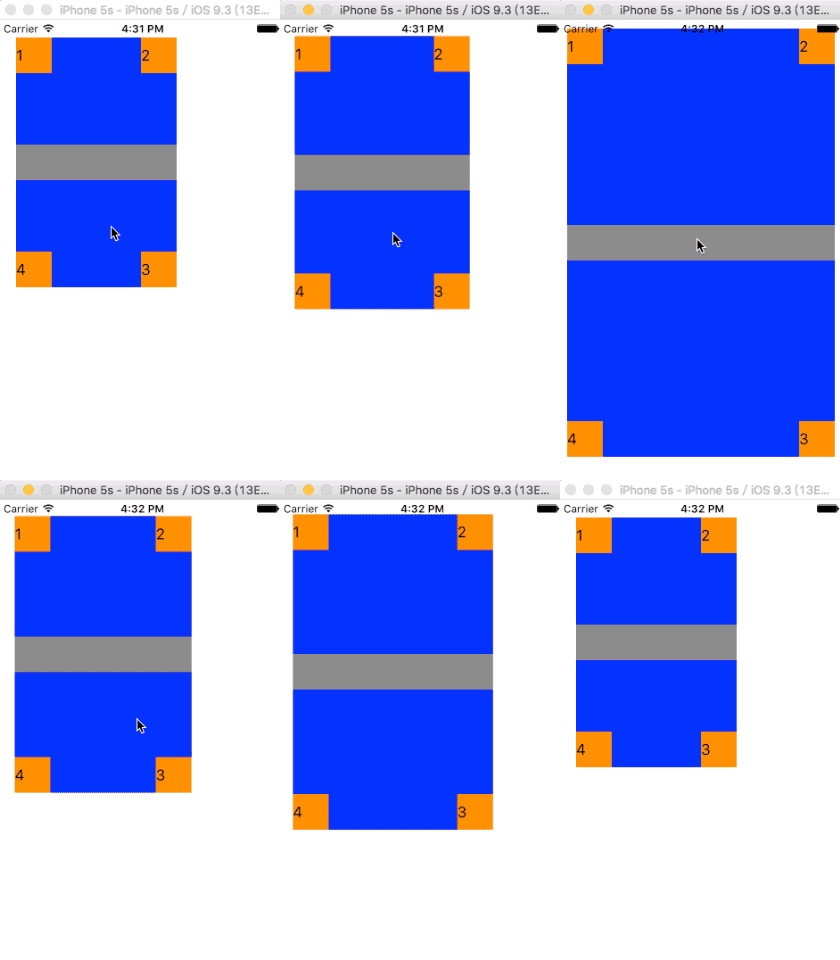
在 Auto Layout 全面普及之前,autoresizingMask 是處理「父視圖尺寸變化時,子視圖該怎麼跟著調整」最輕量的手段。它不需要任何約束描述,只要設定一組枚舉值,系統就會在父視圖 bounds 改變時自動幫你重新計算子視圖的 frame。
案例結構
我們做一個父視圖,裡頭放四個 label 分別貼齊四個角落,正中間再放一個灰色方塊。點一下畫面,父視圖會從 180×280 放大到 300×480,並附帶一秒的縮放動畫——觀察各子視圖如何依各自的 mask 設定做出不同反應。
宣告與初始化
#import <UIKit/UIKit.h>

@interface ViewController : UIViewController{
    //父視圖
    UIView * _superView;
    //四個角的 label
    UILabel * _label01;
    UILabel * _label02;
    UILabel * _label03;
    UILabel * _label04;
    //正中央的方塊
    UIView * _viewCenter;
}
@end
建立視圖階層
先建立父視圖,再以父視圖為座標基準配置四個 label。注意這裡的 frame 都是「相對於父視圖」的,這也是 frame 布局最容易搞混的地方。
#import "ViewController.h"

@interface ViewController ()
@end

@implementation ViewController

- (void)viewDidLoad {
    [super viewDidLoad];

    _superView = [[UIView alloc] init];
    _superView.frame = CGRectMake(20, 20, 180, 280);
    _superView.backgroundColor = [UIColor blueColor];

    //左上角
    _label01 = [[UILabel alloc] init];
    _label01.frame = CGRectMake(0, 0, 40, 40);
    _label01.text = @"1";
    _label01.backgroundColor = [UIColor orangeColor];

    //右上角
    _label02 = [[UILabel alloc] init];
    _label02.frame = CGRectMake(180 - 40, 0, 40, 40);
    _label02.text = @"2";
    _label02.backgroundColor = [UIColor orangeColor];

    //右下角
    _label03 = [[UILabel alloc] init];
    _label03.frame = CGRectMake(180 - 40, 280 - 40, 40, 40);
    _label03.text = @"3";
    _label03.backgroundColor = [UIColor orangeColor];

    //左下角
    _label04 = [[UILabel alloc] init];
    _label04.frame = CGRectMake(0, 280 - 40, 40, 40);
    _label04.text = @"4";
    _label04.backgroundColor = [UIColor orangeColor];

    [_superView addSubview:_label01];
    [_superView addSubview:_label02];
    [_superView addSubview:_label03];
    [_superView addSubview:_label04];

    //正中央的方塊
    _viewCenter = [[UIView alloc] init];
    _viewCenter.frame = CGRectMake(0, 0, _superView.frame.size.width, 40);
    _viewCenter.center = CGPointMake(180 / 2, 280 / 2);
    _viewCenter.backgroundColor = [UIColor grayColor];
    [_superView addSubview:_viewCenter];

    [self.view addSubview:_superView];

    //核心:透過 autoresizingMask 描述「父視圖變化時,我怎麼跟著變」
    _viewCenter.autoresizingMask = UIViewAutoresizingFlexibleTopMargin
        | UIViewAutoresizingFlexibleBottomMargin
        | UIViewAutoresizingFlexibleWidth
        | UIViewAutoresizingFlexibleRightMargin
        | UIViewAutoresizingFlexibleLeftMargin;

    //label02 釘在右上:左邊距可變,其餘固定
    _label02.autoresizingMask = UIViewAutoresizingFlexibleLeftMargin;

    //label03 釘在右下:上邊距與左邊距可變
    _label03.autoresizingMask = UIViewAutoresizingFlexibleTopMargin | UIViewAutoresizingFlexibleLeftMargin;

    //label04 釘在左下:上邊距可變
    _label04.autoresizingMask = UIViewAutoresizingFlexibleTopMargin;
}
驗證效果
在 touchesBegan 裡切換父視圖尺寸,並包成動畫,就能清楚看到 mask 的作用:
-(void)touchesBegan:(NSSet<UITouch> *)touches withEvent:(UIEvent *)event{
    static BOOL isLarge = NO;
    [UIView beginAnimations:nil context:nil];
    [UIView setAnimationDuration:1];
    if (isLarge) {
        _superView.frame = CGRectMake(20, 20, 180, 280);
        isLarge = NO;
    } else {
        _superView.frame = CGRectMake(10, 10, 300, 480);
        isLarge = YES;
    }
    [UIView commitAnimations];
}

- (void)didReceiveMemoryWarning {
    [super didReceiveMemoryWarning];
    // Dispose of any resources that can be recreated.
}
@end
幾個實務提醒
autoresizingMask 的判斷方式很直覺:哪個邊距設成 Flexible,那個邊距就允許伸縮,於是視圖會被「推」向對側。想讓 label02 固定在右上角,就讓左邊距可變;想讓 label04 固定在左下角,就讓上邊距可變。
中間那個灰色方塊四個方向都設成 Flexible,因此它會同時隨寬高變形,中心點也自動跟著父視圖中心移動,永遠保持置中。
另外要留意,autoresizingMask 在引入 Auto Layout 之後並不會自動生效——只要視圖(或其任一祖先)使用了 Auto Layout 約束,系統就會忽略 autoresizing mask。它能派上用場的場合,主要是尚未遷移到 Auto Layout 的舊專案,或是刻意關掉 Translates Autoresizing Mask Into Constraints 的局部場景。