
iOS 開發中控制螢幕旋轉的幾種做法總整理
螢幕旋轉是 iOS 開發中經常需要處理的細節。從 iOS 6 開始,旋轉機制有了大幅變動,舊有的方法被棄用,取而代之的是新的 API。本文系統性地整理各版本的控制方式,並說明自動旋轉、手動旋轉與強制旋轉的實作重點。
從 iOS 6 說起
在 iOS 6 之前,我們通常用 shouldAutorotateToInterfaceOrientation 來控制某個 UIViewController 的方向,只要重寫這個方法即可。但在 iOS 6 之後,這個方法被標記為 DEPRECATED:
// Applications should use supportedInterfaceOrientations and/or shouldAutorotate..
- (BOOL)shouldAutorotateToInterfaceOrientation:(UIInterfaceOrientation)toInterfaceOrientation NS_DEPRECATED_IOS(2_0, 6_0);
改由以下兩個方法取代:
- (BOOL)shouldAutorotate;
- (NSUInteger)supportedInterfaceOrientations;
除了重寫這兩個方法,還有一個硬性條件:必須在 Info.plist 中設定 App 支援的所有方向。若要相容舊系統,也需保留原本的 shouldAutorotateToInterfaceOrientation 等方法。

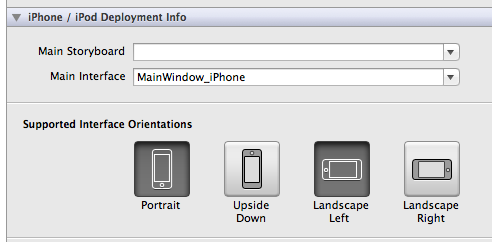
自動旋轉設定
關鍵觀念:控制某個 viewController 的旋轉,並不是在它自己身上重寫方法,而是要在它的 rootViewController(根視圖控制器)中重寫。也就是最直接接觸 self.window 的那個 controller。
UIViewController *viewCtrl = [[UIViewController alloc] init];
UINavigationController *navCtrl = [[UINavigationController alloc] initWithRootViewController:viewCtrl];
if ([window respondsToSelector:@selector(setRootViewController:)]) {
self.window.rootViewController = navCtrl;
} else {
[self.window addSubview:navCtrl.view];
}
由於 UINavigationController 是系統控制元件,需要建立它的子類別,並在裡面實作這兩個方法:
-(NSUInteger)supportedInterfaceOrientations{
return UIInterfaceOrientationMaskAllButUpsideDown;
}
- (BOOL)shouldAutorotate{
return YES;
}
eg1:如果 rootViewController 直接設為 viewCtrl 而非 navCtrl,那麼這兩個方法就該寫在 viewCtrl 裡。
eg2:若 viewCtrl 又 push 到 viewCtrl2,要控制 viewCtrl2 的旋轉,仍在 navCtrl 中處理,因為兩者的 rootViewController 都是 navCtrl。同理,若 rootViewController 是 UITabBarController,則需在其子類別中分別控制。
如果初始化 navCtrl 時無法預知所有會被 push 的 viewController,可以讓每個 viewController 自己控制自己。做法是在 navCtrl 中改為調用 topViewController:
- (BOOL)shouldAutorotate
{
return self.topViewController.shouldAutorotate;
}
- (NSUInteger)supportedInterfaceOrientations
{
return self.topViewController.supportedInterfaceOrientations;
}
如此一來,各 viewController 就能各自重寫這兩個方法,獨立設定自己的旋轉行為。
eg3:若 viewCtrl 是透過 presentModalViewController 呈現 viewCtrl3,則 viewCtrl3 的旋轉設定不在 navCtrl 中,而應在 viewCtrl3 本身或其外層包裝的 controller 中設定。
手動旋轉
手動旋轉有兩種方式。第一種是直接設定 UIDevice 的 orientation,但這種做法有被 App Store 拒絕的風險,不建議使用:
if ([[UIDevice currentDevice] respondsToSelector:@selector(setOrientation:)]) {
[[UIDevice currentDevice] performSelector:@selector(setOrientation:) withObject:(id)UIInterfaceOrientationPortrait];
}
第二種是「假旋轉」,不改變 UIDevice 的 orientation,而是改變某個 view 的 transform,利用 CGAffineTransformMakeRotation 達成目的:
self.view.transform = CGAffineTransformMakeRotation(M_PI/2)
採用第二種方式時,思路是:先設定 statusBarOrientation,再讓某個 view 的方向與之一致。此時必須關閉自動旋轉:
- (BOOL)shouldAutorotate{
return NO;
}
觸發旋轉的方法如下:
[[UIApplication sharedApplication] setStatusBarOrientation:UIInterfaceOrientationLandscapeRight];
self.view.transform = CGAffineTransformMakeRotation(M_PI/2);
self.view.bounds = CGRectMake(0, 0, kScreenHeight, 320);
注意兩點:一、只需改變 self.view.transform,所有 subview 都會跟著變,且因方向改變,需用 bounds 而非 frame 重新設定大小;二、只有當 shouldAutorotate 回傳 NO 時,setStatusBarOrientation 才會生效。
強制旋轉螢幕
曾遇過一個案例:使用 MWPhotoBrowser 這個第三方圖片瀏覽庫時,裝置橫屏 modal 該元件會發生圖片位置錯亂。為了解決這個問題,可以在 modal 時用程式碼把裝置強制旋轉回來,做法是利用 Runtime 呼叫私有方法:
//UIDevice+WJ.h
@interface UIDevice (WJ)
+ (void)setOrientation:(UIInterfaceOrientation)orientation;
@end
//UIDevice+WJ.m
#import "UIDevice+WJ.h"
@implementation UIDevice (WJ)
+ (void)setOrientation:(UIInterfaceOrientation)orientation {
SEL selector = NSSelectorFromString(@"setOrientation:");
NSInvocation *invocation = [NSInvocation invocationWithMethodSignature:[self instanceMethodSignatureForSelector:selector]];
[invocation setSelector:selector];
[invocation setTarget:[self currentDevice]];
int val = orientation;
[invocation setArgument:&val atIndex:2];
[invocation invoke];
}
@end
需要提醒的是,這種做法依賴私有 API,僅適合在無法取得上層修正時的權宜之計,正式上架前仍應審慎評估。