
CoreText 圖文混排與圖片點擊互動實作(Swift)
前面的文章已經把 CoreText 繪製純文本的流程走過一遍,這一篇接著往下談圖文混排,以及排版完成之後如何回應使用者的點擊動作。
CoreText 做圖文混排的基本思路
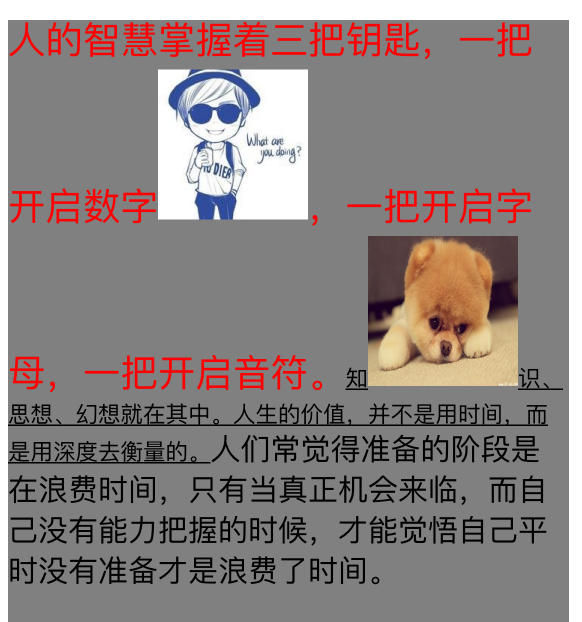
CoreText 本身並沒有繪製圖片的能力,它只負責文字排版。要讓文字與圖片共存,常見做法是先在富文本裡插入一段空白字串當作「佔位符」,透過代理告訴 CoreText 這個佔位符要佔多大的寬度與行高;等 CTFrame 排版完成後,再依佔位符的位置,用 Core Graphics 把真正的圖片畫上去。
一句話總結:CoreText 負責留白,Core Graphics 負責補圖。
CTRunDelegate 扮演的角色
CTRun 是 CTLine 中的最小片段,而 CTRunDelegate 就是 CTRun 的擴充入口,讓我們能對某個 run 自訂行為。實作圖文混排時,我們塞進一個空白的 CTRun,並自訂它的 ascent、descent、width,排版時就會自動空出對應的方塊。
建立方式為 CTRunDelegateCreate,它接受兩個參數:一個是 callbacks 結構體,一個是要傳給各回呼的 context 物件。callbacks 的型別是 CTRunDelegateCallbacks,裡頭放的是 ascent、descent、width 等回呼函式;至於回呼被觸發時怎麼分辨是哪個 run,就靠第二個參數帶入的指標來判斷。
自訂 View 的整體流程
private let ImageName:String = "boy"
private let UrlImageName:String = "https://img3.3lian.com/2013/c2/64/d/65.jpg"

class FirstViewTwo: UIView {
    var image:UIImage?
    var imageFrameArr:NSMutableArray = NSMutableArray()
    var ctFrame: CTFrame?

    override func drawRect(rect: CGRect) {
        super.drawRect(rect)
        //1 取得目前的繪圖上下文
        let context = UIGraphicsGetCurrentContext()
        //2 翻轉座標系,讓原點回到左上角
        convertCoordinateSystem(context!)
        //3 決定排版區域
        let mutablePath = UIBezierPath(rect: rect)
        //4 建立帶屬性的文字
        let mutableAttributeString = settingTextAndAttribute()
        //5 為本地圖片掛上 CTRunDelegate 並插入佔位符
        addCTRunDelegateWith(ImageName, indentifier: ImageName, insertIndex: 18, attribute: mutableAttributeString)
        //6 為網路圖片掛上 CTRunDelegate
        addCTRunDelegateWith(UrlImageName, indentifier: UrlImageName, insertIndex: 35, attribute: mutableAttributeString)
        //7 由屬性字串產生 framesetter,再產生 CTFrame
        let framesetter = CTFramesetterCreateWithAttributedString(mutableAttributeString)
        let frame = CTFramesetterCreateFrame(framesetter, CFRangeMake(0, mutableAttributeString.length), mutablePath.CGPath, nil)
        ctFrame = frame
        //8 先把文字畫完
        CTFrameDraw(frame, context!)
        //9 再把圖片補進剛才留下的空格
        searchImagePosition(frame, context: context!)
    }
}
座標系翻轉
Core Graphics 的原點在左下角、y 軸向上,而 UIKit 剛好相反,所以每次自繪都要先翻一次。翻完再接著建立排版用的路徑即可。
func convertCoordinateSystem(context: CGContextRef){
    CGContextSetTextMatrix(context, CGAffineTransformIdentity)
    CGContextTranslateCTM(context, 0, self.height)
    CGContextScaleCTM(context, 1.0, -1.0)
    // 也可以寫成矩陣相乘:
    //let transform = CGAffineTransform(a: 1, b: 0, c: 0, d: -1, tx: 0, ty:self.bounds.size.height)
    //CGContextConcatCTM(context, transform)
}
設定文字樣式
這一段用 NSMutableAttributedString 決定字級、顏色、底線與行距,可依需求自行調整。這裡刻意讓不同片段使用不同字級,方便觀察排版結果。
func settingTextAndAttribute()->NSMutableAttributedString{
    let attrString = "人的智慧掌握著三把鑰匙,一把開啟數字,一把開啟字母,一把開啟音符。知識、思想、幻想就在其中。人生的價值,並不是用時間,而是用深度去衡量的。人們常覺得準備的階段是在浪費時間,只有當真正機會來臨,而自己沒有能力把握的時候,才能覺悟自己平時沒有準備才是浪費了時間。"
    let mutableAttributeString = NSMutableAttributedString(string: attrString)
    mutableAttributeString.addAttribute(NSFontAttributeName, value: UIFont.systemFontOfSize(20), range: NSMakeRange(0, mutableAttributeString.length))
    mutableAttributeString.addAttributes([NSFontAttributeName:UIFont.systemFontOfSize(25), NSForegroundColorAttributeName:UIColor.redColor()], range: NSMakeRange(0, 33))
    mutableAttributeString.addAttributes([NSFontAttributeName:UIFont.systemFontOfSize(15), NSUnderlineStyleAttributeName: 1], range: NSMakeRange(33, 36))
    let style = NSMutableParagraphStyle()
    style.lineSpacing = 6
    mutableAttributeString.addAttributes([NSParagraphStyleAttributeName:style], range: NSMakeRange(0, mutableAttributeString.length))
    return mutableAttributeString
}
掛上 CTRunDelegate,插入圖片佔位符
這是整篇的關鍵。回呼結構體 CTRunDelegateCallbacks 決定代理要實作哪些方法。要理解尺寸怎麼算,先記住 CTRun 的座標系:以 origin 為原點,基線就是通過原點的 x 軸,ascent 是頂線到基線的距離,descent 是底線到基線的距離。我們透過代理設定這三個值,間接決定圖片佔位的大小。
func addCTRunDelegateWith(imageStr:String, indentifier:String, insertIndex:Int, attribute:NSMutableAttributedString){
    var imageName = imageStr
    var imageCallback = CTRunDelegateCallbacks(
        version: kCTRunDelegateVersion1,
        dealloc: { (refCon) -> Void in print("RunDelegate dealloc!") },
        getAscent: { (refCon) -> CGFloat in return 100 },
        getDescent: { (refCon) -> CGFloat in return 0 },
        getWidth: { (refCon) -> CGFloat in return 100 }
    )
    //1:建立代理,決定留給圖片的空間大小
    let runDelegate = CTRunDelegateCreate(&imageCallback, &imageName)
    //2:用一個空格當載體
    let imgString = NSMutableAttributedString(string:" ")
    //3:把 delegate 綁到這個空格上
    imgString.addAttribute(kCTRunDelegateAttributeName as String, value: runDelegate!, range: NSMakeRange(0, 1))
    //4:額外綁一個自訂屬性,之後靠它辨識「這個 run 是哪張圖」
    imgString.addAttribute(indentifier, value: imageName, range: NSMakeRange(0, 1))
    //5:插到指定位置
    attribute.insertAttributedString(imgString, atIndex: insertIndex)
}
找出每個佔位符的實際座標
文字畫完之後,要反過來掃描 CTFrame,把圖片該出現的位置算出來。思路分四步:
1. 從 CTFrame 取出所有 CTLine,也就是每一行。
2. 取得每一行的原點,再走訪該行底下所有 CTRun。
3. 判斷這個 CTRun 是不是我們綁過 delegate 的那一個;若是,用行原點加上 run 在行內的橫向位移,就得到 run 的原點,再加上尺寸就是它的矩形。
4. 用 KVC 取出屬性字典裡的 delegate。文字沒有這個屬性,圖片有,以此作為判斷依據。
func searchImagePosition(frame: CTFrame, context: CGContextRef){
    let lines = CTFrameGetLines(frame) as Array
    var originsArray = [CGPoint](count: lines.count, repeatedValue: CGPointZero)
    //把每一行的起始座標寫進陣列
    CTFrameGetLineOrigins(frame, CFRangeMake(0, 0), &originsArray)

    //逐一走訪每一行
    for i in 0..<lines.count {
        let line = lines[i] as! CTLineRef
        var lineAscent = CGFloat(), lineDescent = CGFloat(), lineLeading = CGFloat()
        let lineOrigin = originsArray[i]
        let runs = CTLineGetGlyphRuns(line) as! [CTRunRef]

        for j in 0..<runs.count {
            let run = runs[j]
            let attributes = CTRunGetAttributes(run) as! NSDictionary
            let delegate = attributes.valueForKey(kCTRunDelegateAttributeName)
            if delegate != nil {
                var runAscent = CGFloat(), runDescent = CGFloat()
                let width = CGFloat(CTRunGetTypographicBounds(run, CFRangeMake(0, 0), &runAscent, &runDescent, nil))
                let runRect = CGRectMake(lineOrigin.x, lineOrigin.y - runAscent, width, runAscent + runDescent)
                showImageToContextWith(runRect, context: context, attributes: attributes)
            }
        }
    }
}
把圖片畫上去
能進到這個方法,代表 delegate 存在,也就是找到圖片了。接著從屬性字典取出先前存好的名稱:本地圖片直接取用並繪製,同時把 frame 記到陣列裡,供後續點擊判斷使用;網路圖片則先用佔位圖墊上,再用 NSURLSession 下載,回來後呼叫 setNeedsDisplay 重繪。
func showImageToContextWith(runRect: CGRect, context: CGContextRef, attributes:NSDictionary){
    let image:UIImage?
    let imageDrawRect = CGRectMake(runRect.origin.x, runRect.origin.y, 100, 100)
    imageFrameArr.addObject(NSValue.init(CGRect: imageDrawRect))

    if let imageName = attributes.objectForKey(ImageName) as? String {
        //本地圖片,直接畫
        image = UIImage(named: imageName as String)
        CGContextDrawImage(context, imageDrawRect, image?.CGImage)
    } else if let urlImageName = attributes.objectForKey(UrlImageName) as? String {
        //網路圖片:先佔位,下載完再重繪
        if self.image == nil {
            image = UIImage(named:"")
            if let url = NSURL(string: urlImageName) {
                let request = NSURLRequest(URL: url)
                NSURLSession.sharedSession().dataTaskWithRequest(request, completionHandler: { (data, resp, error) -> Void in
                    if let data = data {
                        dispatch_sync(dispatch_get_main_queue(), { () -> Void in
                            self.image = UIImage(data: data)
                            self.setNeedsDisplay()
                        })
                    }
                }).resume()
            }
        } else {
            image = self.image
        }
        CGContextDrawImage(context, imageDrawRect, image?.CGImage)
    }
}
回應點擊事件
最後在 touchesBegan 裡攔截觸摸點。先判斷有沒有壓在圖片上,有的話優先消耗這個事件;沒有的話再當成文字點擊處理。
實作上有兩個細節要注意:
第一,判斷是否點到圖片,靠的是 imageFrameArr 裡預存的 frame。這裡為了示範只用陣列,實際專案應該建立資料模型,把 frame 與對應資料綁在一起,後續才有辦法做進一步的事件處理。
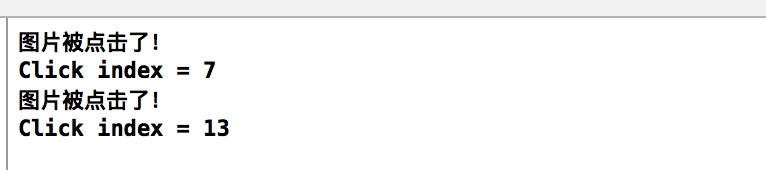
第二,取得點擊位置對應的文字,做法是取出所有 CTLine、把行起點轉換到 UIKit 座標系後與觸摸點比對,最後用 CTLineGetStringIndexForPosition 算出字串索引。
override func touchesBegan(touches: Set<UITouch>, withEvent event: UIEvent?) {
    let touch = touches.first
    let point = touch?.locationInView(self)
    if let point = point {
        //先確認是不是点在圖片上
        if self.checkIsClickImageViewWith(CGPointMake(point.x, point.y)) {
            return
        }
    }
    self.checkIsClickStrWith(point!)
}

//判斷是否點到圖片
func checkIsClickImageViewWith(point: CGPoint) -> Bool {
    for value in imageFrameArr {
        if let value = value as? NSValue {
            var imageFrame = value.CGRectValue()
            //記得把 Core Graphics 座標轉回 UIKit 座標
            imageFrame.origin.y = self.height - imageFrame.origin.y - imageFrame.size.height
            if imageFrame.contains(point) {
                print("圖片被點擊了!")
                return true
            }
        }
    }
    return false
}

//取得點擊處對應的文字位置
func checkIsClickStrWith(point: CGPoint) {
    var location = point
    let lineArr = CTFrameGetLines(ctFrame!) as NSArray
    let ctLinesArray = lineArr as Array
    var originsArray = [CGPoint](count: ctLinesArray.count, repeatedValue: CGPointZero)
    CTFrameGetLineOrigins(ctFrame!, CFRangeMake(0, 0), &originsArray)

    for i in 0..<CFArrayGetCount(lineArr) {
        let origin = originsArray[i]
        let path = CTFrameGetPath(ctFrame!)
        let rect = CGPathGetBoundingBox(path)
        //把行原點轉成 UIKit 座標系
        let y = rect.origin.y + rect.size.height - origin.y
        if location.y <= y && location.x >= origin.x {
            let line = lineArr[i] as! CTLineRef
            location.x -= origin.x
            let index = CTLineGetStringIndexForPosition(line, location)
            print("Click index = \(index)")
            break
        }
    }
}
執行後點擊圖片或文字,console 就會印出對應資訊:
CoreText 與 UIWebView 該怎麼選
日常開發中,遇到圖文混排多數人會直接丟給 UIWebView,客戶端要寫的程式確實少很多。但如果對效能有要求,自己排版仍然值得投資。
CoreText 的優勢:
佔用資源更少、渲染更快;只要有 CTFrame 就能在渲染前精準算出內容高度,而 WebView 必須等內容渲染完,甚至得靠 JavaScript 才能取得高度;CTFrame 可以在背景執行緒排版,WebView 只能在主執行緒;互動效果可以做到接近原生的細膩度,而 WebView 的互動全靠 JavaScript,連一個按鈕的按下回饋都容易出現延遲。
CoreText 的劣勢:
無法像 WebView 那樣直接支援選字複製。用 CoreText 排版,選取、複製、連結點擊這些邏輯都得自己實作,工作量明顯增加。
業界其實有不少 App 走的是 CoreText 路線,例如新浪微博、多看閱讀、猿題庫等,可見這條路在效能上的價值是被驗證過的。