
巧用 UIResponder 進行事件傳遞的實踐分享
最近一直忙著新專案,也很糾結新專案應該採用什麼樣的結構去寫才好迭代、維護。最終按自己的一些想法採用了 Controller、View、ViewHandler 的模式(有點類似 MVVM)。因為這個 Demo 是按照這個想法來寫的,所以這裡簡單說一下,就不過多討論這個了。回到主題 UIResponder 上來——在說之前,我們先看一個開發中經常遇到的圖:
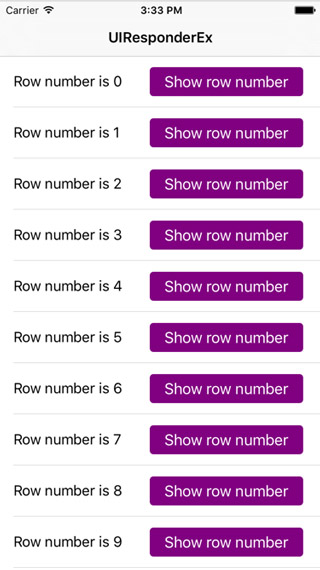
很簡單,就是在 UITableViewCell 裡放了一個 UIButton,那我們該怎麼接收這個 Button 的點擊事件呢?你第一時間可能會想到 Delegate、Block?
的確,它們都可以實現我們的需求。Delegate 我們要多寫點程式碼;Block 如果我們的事件邏輯複雜點,就會在賦值時寫很多程式碼。當然,你可以用一個簡單的 Block 把處理的業務封裝成方法,再在這裡調用這個方法,也可以把程式碼弄得簡潔點,但最重要的是一定要考慮循環引用的問題。那我們能不能用 UIResponder 傳遞這個事件,在我們想要的地方捕獲這個事件呢?我們先來看看 iOS 事件是怎麼傳遞的,看個圖:
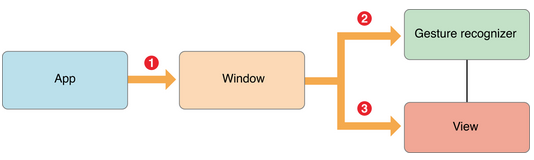
如上圖,iOS 中事件傳遞首先從 App(UIApplication)開始,接著傳遞到 Window(UIWindow),再往下傳遞到 View 之前,Window 會將事件交給 GestureRecognizer。如果在此期間 GestureRecognizer 識別了傳遞過來的事件,則該事件將不會繼續傳遞到 View,而是像我們之前說的那樣交給 Target(ViewController)進行處理。(注:詳細原理可以自己搜索學習)我們大致知道,事件產生最先識別的是 AppDelegate,然後一層層往下找事件發生在哪個 View 上,直到找到這個 View,然後看這個 View 能不能響應這個事件。那我們現在再說說響應者鏈,先看這張圖:
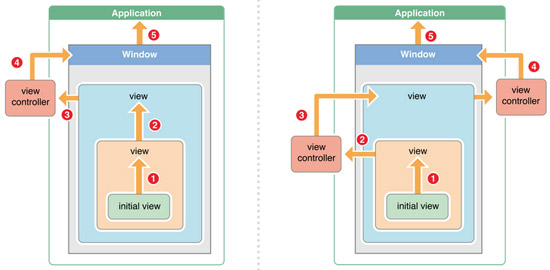
我們知道了:當觸摸事件發生,通過一層層找到這個 View,找到這個 View 後先判斷它能不能響應這個事件,如果不能,那就繼續找 nextResponder。我們看上面這張圖可以看出,如果一個 View 有 SuperView,那麼這個 View 的 nextResponder 就是它的 SuperView;如果沒有 SuperView,那麼它的 nextResponder 就是它所在的 ViewController,然後就這樣一直找下去,直到找到或拋出異常。
了解這個機制後,那我們怎麼把這個 UIButton Click 事件傳遞出來呢?我們先來給 UIResponder 添加一個自定義的事件,就讓它傳遞我們這個事件出去。
#import "UIResponder+Router.h"
@implementation UIResponder (Router)
 // eventName 只是作個標記,當我們需要在一個頁面傳遞個事件時我們可以進行區分,userInfo 為了省勁就沒有封裝,你可以針對性再封裝下
- (void)routerEventWithName:(NSString *)eventName userInfo:(NSDictionary *)userInfo {
         [[self nextResponder] routerEventWithName:eventName userInfo:userInfo];
 }
@end
那我們怎麼進行傳遞呢?那就是我們手動地去讓響應者鏈傳遞這個事件。
我們先看下工程的程式碼檔案:
View
#import "TestView.h"
#import "TestViewTableDataSource.h"
@implementation TestView {
    UITableView *_tableView;
 }
 - (instancetype)initWithController:(SBBaseViewController *)controller {
    self = [super initWithController:controller];
    if (self) {
        [self setup];
    }
        return self;
 }
 - (void)setup {
    _tableView = [[UITableView alloc] initWithFrame:CGRectZero style:UITableViewStylePlain];
    _tableView.delegate = self;
    _tableView.rowHeight = 60;
    _tableView.translatesAutoresizingMaskIntoConstraints = NO;
    [_tableView registerClass:[TestViewTableCell class] forCellReuseIdentifier:@"cell"];
    [self addSubview:_tableView];
    [self addConstraints:[NSLayoutConstraint constraintsWithVisualFormat:@"H:|-0-[_tableView]-0-|" options:0 metrics:nil views:NSDictionaryOfVariableBindings(_tableView)]];
    [self addConstraints:[NSLayoutConstraint constraintsWithVisualFormat:@"V:|-0-[_tableView]-0-|" options:0 metrics:nil views:NSDictionaryOfVariableBindings(_tableView)]];
    }
- (void)setHandler:(SBBaseHandler *)handler {
[super setHandler:handler]; // 把 tableViewDataSource 分離出去
TestViewTableDataSource *tableViewDataSoure = [[TestViewTableDataSource alloc] initWithTableView:_tableView];
_tableView.dataSource = tableViewDataSoure; self.handler.tableDataSource = tableViewDataSoure;
}
- (void)didLoad {
[self.handler loadData];
}Controller
#import "TestViewController.h"
#import "TestView.h"
#import "TestViewHandler.h"
@interface TestViewController ()
@end
@implementation TestViewController
- (void)loadView {
    [super loadView];
    TestView *view = [[TestView alloc]initWithController:self];
    TestViewHandler *handler = [[TestViewHandler alloc] init];
    view.handler = handler;    self.view = view;
 }
 - (void)viewDidLoad {
    [super viewDidLoad];    // Do any additional setup after loading the view.
    self.title = @"UIResponderEx";
 }
 - (void)didReceiveMemoryWarning {
    [super didReceiveMemoryWarning];    // Dispose of any resources that can be recreated.
 }
@end
Handler
#import "TestViewHandler.h"
@implementation TestViewHandler
- (void)loadData {
    NSMutableArray *datasource = [NSMutableArray arrayWithCapacity:10];
    for (int i = 0; i< 10; ++i) {
        [datasource addObject:[NSString stringWithFormat:@"Row number is %d",i]];
    }
    self.tableDataSource.dataSouce = [datasource copy];
 }
@end
TableDataSource
#import "SBBaseTableDataSource.h"
 @interface TestViewTableDataSource : SBBaseTableDataSource
@end
// 這裡為了省勁就沒有用單獨檔案去寫,最好還是建兩個新檔案去比較好
 @interface TestViewTableCell : UITableViewCell
 @end
#import "TestViewTableDataSource.h"
#import "UIResponder+Router.h"
@implementation TestViewTableDataSource
- (id)initWithTableView:(UITableView *)tableView {
    self = [super initWithTableView:tableView];
    if (self) {
    }
    return self;
 }
  - (void)setDataSouce:(NSArray *)dataSouce {
    [super setDataSouce:dataSouce];
    [self.tableView reloadData];
 }
 - (NSInteger)numberOfSectionsInTableView:(UITableView *)tableView {
    return 1;
 }
 - (NSInteger)tableView:(UITableView *)tableView numberOfRowsInSection:(NSInteger)section {
    return self.dataSouce.count;
 }
 - (UITableViewCell *)tableView:(UITableView *)tableView cellForRowAtIndexPath:(NSIndexPath *)indexPath {
    TestViewTableCell *cell = [tableView dequeueReusableCellWithIdentifier:@"cell"];
    cell.textLabel.text = self.dataSouce[indexPath.row];    return cell;
 }
@end
@implementation TestViewTableCell
- (instancetype)initWithStyle:(UITableViewCellStyle)style reuseIdentifier:(NSString *)reuseIdentifier {
    self = [super initWithStyle:style reuseIdentifier:reuseIdentifier];
    if (self) {
        [self setup];
    }
    return self;
 }
 - (void)setup {
    UIButton *showNumberButton = [UIButton buttonWithType:UIButtonTypeCustom];
    [showNumberButton setTitle:@"Show row number" forState:UIControlStateNormal];
    showNumberButton.backgroundColor = [UIColor purpleColor];
    showNumberButton.layer.cornerRadius = 4;
    showNumberButton.layer.masksToBounds = YES;
    showNumberButton.translatesAutoresizingMaskIntoConstraints = NO;
    [showNumberButton addTarget:self action:@selector(showNumberButtonClick:) forControlEvents:UIControlEventTouchUpInside];
    [self.contentView addSubview:showNumberButton];
    [self.contentView addConstraints:[NSLayoutConstraint constraintsWithVisualFormat:@"H:[showNumberButton(180)]-20-|" options:0 metrics:nil views:NSDictionaryOfVariableBindings(showNumberButton)]];
    [self.contentView addConstraint:[NSLayoutConstraint constraintWithItem:showNumberButton attribute:NSLayoutAttributeCenterY relatedBy:NSLayoutRelationEqual toItem:self.contentView attribute:NSLayoutAttributeCenterY multiplier:1.0 constant:0]];
 }    //關鍵程式碼就在這裡, 我們在 button click 事件中我再讓傳遞一個事件給響應者鏈,讓響應者鏈傳出去
 - (void)showNumberButtonClick:(id)sender {
    // 我們在這個 Click 事件中去手動讓響應者傳遞一個事件
    [self.nextResponder routerEventWithName:@"showNumber" userInfo:@{@"object":self.textLabel.text}];
 }
@end
主要的程式碼差不多就是這些了。至於它們的基類都是自己封裝好一部分,還不怎麼完善,都是一些自己的想法,就不貼程式碼了,稍後把這個 Demo 放出來。有興趣的可以下載來看看,如果有好的想法請聯繫我:lsb332@163.com。
我們先來看看在 View 中捕獲下事件。在 .m 檔案我們導入 UIResponder+Router.h 頭檔案,然後實現我們自定義的方法。
#import "UIResponder+Router.h"
#pragma UIResponder(Router)
- (void)routerEventWithName:(NSString *)eventName userInfo:(NSDictionary *)userInfo {
    UIAlertView *alertView = [[UIAlertView alloc] initWithTitle:@"View中捕獲" message:userInfo[@"object"] delegate:nil cancelButtonTitle:@"OK" otherButtonTitles: nil];
    [alertView show];
 }
手動傳遞事件的程式碼 TableDataSource 已經貼出來過了,這裡就不貼了。
我們看下結果:
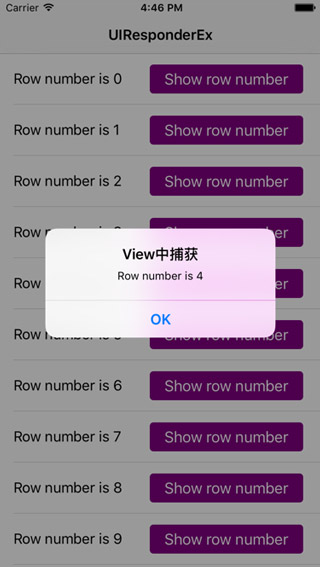
我們再來看看在 UIViewController 捕獲,程式碼就不貼了,看下結果好了:
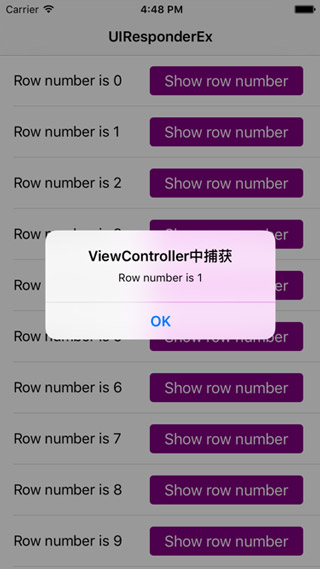
總結
最重要的思想就是:在響應事件方法中,我們再主動地傳遞給響應者鏈一個事件,然後在我們合適的地方去響應這個事件。
這也是拋磚引玉,自己理解的還很膚淺,現在寫出來也算是自己學習的一個筆記吧。這個處理方法也是自己在集成環信中發現的,自己去摸索學習下。
Demo 地址:https://github.com/lsb332/UIResponderEX。
在這裡再說一下自己的專案結構:為了減輕 UIViewController 的重量、實行真正的 MVC,把 View 分出來了,從而使 ViewController 只負責 View 的顯示、傳承等。因為我們專案經常會用到 TableView,為了不使 View 太重,再次把它分離出去,使 TableView 的 dataSource 在 TableViewSource 檔案中去實現;然後又給 View 建了一個 Handler,用來處理業務邏輯、網絡請求等;然後又把 Handler 繼承一個網絡請求的類,這樣就可以處理網絡的請求了。如果 Handler 處理完數據後,可以透過 Block 回調給 View,或者直接把數據傳遞給 TableViewSource 就可以直接刷新數據,不用再回調給 View。這裡只是簡單地說一下,有興趣的可以到工程裡看看,還處在起步階段,如果覺得成熟了再寫一篇文章說說吧。