
iOS 學習筆記(27):攝像頭拍照與錄像實作
編輯:iOS 程式設計技術
一、攝像頭
在 iOS 中,使用手機攝像頭有以下兩種方法:
UIImagePickerController拍照和視頻錄制
- 優點:使用方便,功能強大。
- 缺點:高度封裝性,無法實現一些自定義工作。
AVFoundation框架實現
- 優點:靈活性強,提供了很多現成的輸入設備和輸出設備,還有很多底層內容可供開發者使用。
- 缺點:需要和底層打交道,學習難度大,使用複雜。
平常使用 UIImagePickerController 基本就能滿足需求,功能確實強大;但它也有不好的一點——由於高度封裝,若要做某些自定義工作就比較複雜,例如想做出一款類似美顏相機的拍照界面就比較難實現,這時就要考慮用 AVFoundation 框架來實現。
二、UIImagePickerController
UIImagePickerController 繼承於 UINavigationController,屬於 UIKit 框架,可以實現圖片選取、拍照、錄制視頻等功能,使用起來十分方便。
1. 常用屬性:
@property (nonatomic) UIImagePickerControllerSourceType sourceType; /* 拾取源類型枚舉 */
typedef NS_ENUM(NSInteger, UIImagePickerControllerSourceType) {
    UIImagePickerControllerSourceTypePhotoLibrary,   // 照片庫
    UIImagePickerControllerSourceTypeCamera,         // 攝像頭
    UIImagePickerControllerSourceTypeSavedPhotosAlbum // 相簿
};

/* 媒體類型,預設情況下此陣列包含 kUTTypeImage,表示拍照;
   如果要錄像,必須設置為 kUTTypeVideo(視頻不帶聲音)或 kUTTypeMovie(視頻帶聲音) */
@property (nonatomic, copy) NSArray<NSString *> *mediaTypes;

@property (nonatomic) NSTimeInterval videoMaximumDuration; // 視頻最大錄制時長,預設 10s
@property (nonatomic) UIImagePickerControllerQualityType videoQuality; // 視頻質量

@property (nonatomic) BOOL showsCameraControls;          /* 是否顯示攝像頭控制面板,預設 YES */
@property (nonatomic, strong) UIView *cameraOverlayView; /* 攝像頭上覆蓋的視圖 */
@property (nonatomic) CGAffineTransform cameraViewTransform; /* 攝像頭形變 */
@property (nonatomic) UIImagePickerControllerCameraCaptureMode cameraCaptureMode; /* 捕捉模式 */
@property (nonatomic) UIImagePickerControllerCameraDevice cameraDevice; /* 攝像頭設備 */
@property (nonatomic) UIImagePickerControllerCameraFlashMode cameraFlashMode; /* 閃光燈模式 */
2. 常用物件方法:
- (void)takePicture;        // 拍照
- (BOOL)startVideoCapture;  // 開始錄制視頻
- (void)stopVideoCapture;   // 停止錄制視頻
3. 代理方法:
/* 媒體獲取完成會調用 */
- (void)imagePickerController:(UIImagePickerController *)picker didFinishPickingMediaWithInfo:(NSDictionary<NSString *, id> *)info;
/* 取消獲取會調用 */
- (void)imagePickerControllerDidCancel:(UIImagePickerController *)picker;
4. 擴展函數,用於保存到相簿:
/* 保存圖片到相簿 */
void UIImageWriteToSavedPhotosAlbum(UIImage *image, id completionTarget, SEL completionSelector, void *contextInfo);
// 保存圖片的回調方法通常為:
- (void)image:(UIImage *)image didFinishSavingWithError:(NSError *)error contextInfo:(void *)contextInfo;

/* 判斷是否能保存視頻到相簿 */
BOOL UIVideoAtPathIsCompatibleWithSavedPhotosAlbum(NSString *videoPath);

/* 保存視頻到相簿 */
void UISaveVideoAtPathToSavedPhotosAlbum(NSString *videoPath, id completionTarget, SEL completionSelector, void *contextInfo);
// 保存視頻的回調方法通常為:
- (void)video:(NSString *)videoPath didFinishSavingWithError:(NSError *)error contextInfo:(void *)contextInfo;
5. 使用攝像頭的步驟:
- 建立
UIImagePickerController物件。 - 指定拾取源,拍照和錄像都需使用攝像頭。
- 指定攝像頭設備,是前置還是後置。
- 設置媒體類型,媒體類型定義在
MobileCoreServices.framework中。 - 指定攝像頭捕捉模式,錄像必須先設置媒體類型再設置捕捉模式。
- 展示
UIImagePickerController,通常以模態彈出形式打開。 - 拍照或錄像結束後,在代理方法中展示或保存照片或視頻。
6. 具體實例程式碼:
#import "ViewController.h"
#import <MobileCoreServices/MobileCoreServices.h>

@interface ViewController () <UIImagePickerControllerDelegate, UINavigationControllerDelegate>
@property (strong, nonatomic) UIImagePickerController *pickerController; // 拾取控制器
@property (strong, nonatomic) IBOutlet UIImageView *showImageView;       // 顯示圖片
@end

@implementation ViewController

- (void)viewDidLoad {
    [super viewDidLoad];
    [self initPickerController];
}

/* 初始化拾取控制器 */
- (void)initPickerController {
    UIImagePickerController *pickerController = [[UIImagePickerController alloc] init];
    pickerController.sourceType = UIImagePickerControllerSourceTypeCamera; // 拾取源為攝像頭
    pickerController.cameraDevice = UIImagePickerControllerCameraDeviceRear; // 後置攝像頭
    pickerController.editing = YES;
    pickerController.delegate = self;
    self.pickerController = pickerController;
}

#pragma mark - UI 點擊
/* 點擊拍照 */
- (IBAction)imagePicker:(id)sender {
    self.pickerController.mediaTypes = @[(NSString *)kUTTypeImage];
    self.pickerController.cameraCaptureMode = UIImagePickerControllerCameraCaptureModePhoto;
    [self presentViewController:self.pickerController animated:YES completion:nil];
}

/* 點擊錄像 */
- (IBAction)videoPicker:(id)sender {
    self.pickerController.mediaTypes = @[(NSString *)kUTTypeMovie];
    self.pickerController.cameraCaptureMode = UIImagePickerControllerCameraCaptureModeVideo;
    self.pickerController.videoQuality = UIImagePickerControllerQualityTypeHigh;
    [self presentViewController:self.pickerController animated:YES completion:nil];
}

#pragma mark - 代理方法
/* 拍照或錄像成功,都會調用 */
- (void)imagePickerController:(UIImagePickerController *)picker didFinishPickingMediaWithInfo:(NSDictionary<NSString *, id> *)info {
    NSString *mediaType = [info objectForKey:UIImagePickerControllerMediaType];
    if ([mediaType isEqualToString:(NSString *)kUTTypeImage]) { // 拍照
        UIImage *image = [info objectForKey:UIImagePickerControllerOriginalImage];
        UIImageWriteToSavedPhotosAlbum(image, self, @selector(image:didFinishSavingWithError:contextInfo:), nil);
    } else if ([mediaType isEqualToString:(NSString *)kUTTypeMovie]) { // 錄像
        NSURL *url = [info objectForKey:UIImagePickerControllerMediaURL];
        NSString *path = url.path;
        if (UIVideoAtPathIsCompatibleWithSavedPhotosAlbum(path)) {
            UISaveVideoAtPathToSavedPhotosAlbum(path, self, @selector(video:didFinishSavingWithError:contextInfo:), nil);
        }
    }
    [self dismissViewControllerAnimated:YES completion:nil];
}

/* 取消拍照或錄像會調用 */
- (void)imagePickerControllerDidCancel:(UIImagePickerController *)picker {
    [self dismissViewControllerAnimated:YES completion:nil];
}

#pragma mark - 保存圖片或視頻完成的回調
- (void)image:(UIImage *)image didFinishSavingWithError:(NSError *)error contextInfo:(void *)contextInfo {
    self.showImageView.image = image;
    self.showImageView.contentMode = UIViewContentModeScaleToFill;
}
- (void)video:(NSString *)videoPath didFinishSavingWithError:(NSError *)error contextInfo:(void *)contextInfo {
    NSLog(@"保存視頻完成");
}
@end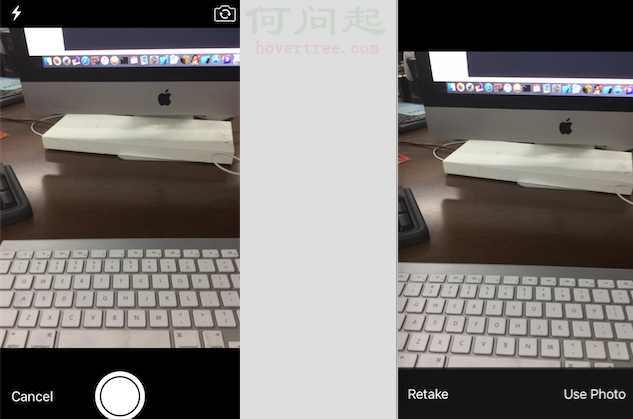


功能十分強大,基本滿足一般需求,使用起來也很簡單。
三、AVFoundation 的拍照錄像
首先了解下 AVFoundation 做拍照和錄像的相關類:
AVCaptureSession:媒體捕捉會話,負責把捕獲到的音視頻數據輸出到輸出設備上,一個會話可以有多個輸入輸出。AVCaptureVideoPreviewLayer:相機拍攝預覽圖層,是CALayer的子類,可實時查看拍照或錄像效果。
AVCaptureDevice:輸入設備,包括麥克風、攝像頭等,可以設置一些物理設備的屬性。AVCaptureDeviceInput:設備輸入數據管理物件,管理輸入數據。AVCaptureOutput:設備輸出數據管理物件,管理輸出數據,通常使用它的子類:AVCaptureAudioDataOutput // 輸出音頻管理物件,輸出數據為 NSData AVCaptureStillImageOutput // 輸出圖片管理物件,輸出數據為 NSData AVCaptureVideoDataOutput // 輸出視頻管理物件,輸出數據為 NSData /* 輸出文件管理物件,輸出數據以文件形式輸出 */ AVCaptureFileOutput { AVCaptureAudioFileOutput // 輸出是音頻文件 AVCaptureMovieFileOutput // 輸出是視頻文件 }
拍照或錄像的一般步驟為:
- 建立
AVCaptureSession物件。 - 使用
AVCaptureDevice的類方法獲得要使用的設備。 - 利用輸入設備
AVCaptureDevice建立並初始化AVCaptureDeviceInput物件。 - 初始化輸出數據管理物件,看具體輸出什麼數據決定使用哪個
AVCaptureOutput子類。 - 將
AVCaptureDeviceInput、AVCaptureOutput添加到媒體會話管理物件AVCaptureSession中。 - 建立視頻預覽圖層
AVCaptureVideoPreviewLayer並指定媒體會話,添加圖層到顯示容器中。 - 呼叫媒體會話
AVCaptureSession的startRunning開始捕獲、stopRunning停止捕捉。 - 將捕獲的音頻或視頻數據輸出到指定文件。
拍照使用實例如下:
#import "ViewController.h"
#import <AVFoundation/AVFoundation.h>

@interface ViewController ()
@property (strong, nonatomic) AVCaptureSession *session;         // 媒體管理會話
@property (strong, nonatomic) AVCaptureDeviceInput *captureInput; // 輸入數據物件
@property (strong, nonatomic) AVCaptureStillImageOutput *imageOutput; // 輸出數據物件
@property (strong, nonatomic) AVCaptureVideoPreviewLayer *captureLayer; // 視頻預覽圖層
@property (strong, nonatomic) IBOutlet UIButton *captureBtn;      // 拍照按鈕
@property (strong, nonatomic) IBOutlet UIButton *openCaptureBtn;  // 打開攝像頭按鈕
@end

@implementation ViewController

- (void)viewDidLoad {
    [super viewDidLoad];
    [self initCapture];
    self.openCaptureBtn.hidden = NO;
    self.captureBtn.hidden = YES;
}

/* 初始化攝像頭 */
- (void)initCapture {
    // 1. 建立媒體管理會話
    AVCaptureSession *session = [[AVCaptureSession alloc] init];
    self.session = session;
    if ([session canSetSessionPreset:AVCaptureSessionPreset1280x720]) {
        session.sessionPreset = AVCaptureSessionPreset1280x720;
    }
    // 2. 獲取後置攝像頭設備物件
    AVCaptureDevice *device = nil;
    for (AVCaptureDevice *camera in [AVCaptureDevice devicesWithMediaType:AVMediaTypeVideo]) {
        if (camera.position == AVCaptureDevicePositionBack) {
            device = camera;
        }
    }
    if (!device) { return; }
    // 3. 建立輸入數據物件
    NSError *error = nil;
    AVCaptureDeviceInput *captureInput = [[AVCaptureDeviceInput alloc] initWithDevice:device error:&error];
    if (error) { return; }
    self.captureInput = captureInput;
    // 4. 建立輸出數據物件
    AVCaptureStillImageOutput *imageOutput = [[AVCaptureStillImageOutput alloc] init];
    [imageOutput setOutputSettings:@{ AVVideoCodecKey: AVVideoCodecJPEG }];
    self.imageOutput = imageOutput;
    // 5. 添加輸入、輸出物件到會話中
    if ([session canAddInput:captureInput]) { [session addInput:captureInput]; }
    if ([session canAddOutput:imageOutput]) { [session addOutput:imageOutput]; }
    // 6. 建立視頻預覽圖層
    AVCaptureVideoPreviewLayer *videoLayer = [[AVCaptureVideoPreviewLayer alloc] initWithSession:session];
    self.view.layer.masksToBounds = YES;
    videoLayer.frame = self.view.bounds;
    videoLayer.videoGravity = AVLayerVideoGravityResizeAspectFill;
    [self.view.layer insertSublayer:videoLayer below:self.captureBtn.layer];
    self.captureLayer = videoLayer;
}

#pragma mark - UI 點擊
/* 點擊拍照按鈕 */
- (IBAction)takeCapture:(id)sender {
    AVCaptureConnection *connection = [self.imageOutput connectionWithMediaType:AVMediaTypeVideo];
    [self.imageOutput captureStillImageAsynchronouslyFromConnection:connection completionHandler:^(CMSampleBufferRef imageDataSampleBuffer, NSError *error) {
        NSData *imageData = [AVCaptureStillImageOutput jpegStillImageNSDataRepresentation:imageDataSampleBuffer];
        UIImage *image = [UIImage imageWithData:imageData];
        UIImageWriteToSavedPhotosAlbum(image, nil, nil, nil);
        self.captureLayer.hidden = YES;
        self.captureBtn.hidden = YES;
        self.openCaptureBtn.hidden = NO;
        [self.session stopRunning];
    }];
}

/* 點擊打開攝像頭按鈕 */
- (IBAction)openCapture:(id)sender {
    self.captureLayer.hidden = NO;
    self.captureBtn.hidden = NO;
    self.openCaptureBtn.hidden = YES;
    [self.session startRunning];
}
@end
錄像的操作差不多,下面程式碼以上面的基礎進行修改:
- 比拍照多了一個音頻輸入,並改變輸出數據物件的類。
- 需要處理視頻輸出的代理方法。
- 錄制的方法是在輸出數據物件上。
1. 獲取音頻輸入數據物件以及視頻輸出數據物件
// 獲取麥克風設備物件
AVCaptureDevice *device = [AVCaptureDevice devicesWithMediaType:AVMediaTypeAudio].firstObject;
if (!device) { return; }
NSError *error = nil;
AVCaptureDeviceInput *audioInput = [[AVCaptureDeviceInput alloc] initWithDevice:device error:&error];
if (error) { return; }
// 建立視頻文件輸出物件
AVCaptureMovieFileOutput *movieOutput = [[AVCaptureMovieFileOutput alloc] init];
self.movieOutput = movieOutput;
2. 添加進媒體管理會話中
if ([session canAddInput:captureInput]) {
    [session addInput:captureInput];
    [session addInput:audioInput]; // 添加音頻輸入
    AVCaptureConnection *connection = [movieOutput connectionWithMediaType:AVMediaTypeVideo];
    if ([connection isVideoStabilizationSupported]) {
        connection.preferredVideoStabilizationMode = AVCaptureVideoStabilizationModeAuto; // 防抖動
    }
}
if ([session canAddOutput:movieOutput]) {
    [session addOutput:movieOutput];
}
3. 點擊錄像按鈕
if (!self.movieOutput.isRecording) {
    NSString *outputPath = [NSTemporaryDirectory() stringByAppendingString:@"myMovie.mov"];
    NSURL *url = [NSURL fileURLWithPath:outputPath]; // 記住是文件 URL
    [self.movieOutput startRecordingToOutputFileURL:url recordingDelegate:self];
} else {
    [self.movieOutput stopRecording];
}
4. 處理錄制代理 AVCaptureFileOutputRecordingDelegate
/* 開始錄制會調用 */
- (void)captureOutput:(AVCaptureFileOutput *)captureOutput didStartRecordingToOutputFileAtURL:(NSURL *)fileURL fromConnections:(NSArray *)connections {
    NSLog(@"開始錄制");
}
/* 錄制完成會調用 */
- (void)captureOutput:(AVCaptureFileOutput *)captureOutput didFinishRecordingToOutputFileAtURL:(NSURL *)outputFileURL fromConnections:(NSArray *)connections error:(NSError *)error {
    NSLog(@"完成錄制");
    NSString *path = outputFileURL.path;
    if (UIVideoAtPathIsCompatibleWithSavedPhotosAlbum(path)) {
        UISaveVideoAtPathToSavedPhotosAlbum(path, nil, nil, nil);
    }
}
四、iOS 音頻視頻使用總結

以上表格我沒有全部講,主要講 AVFoundation 框架,裡面還有非常多內容可以學習,這個框架非常強大,有時間也可以再深入學習。iOS 對於多媒體支持相當靈活和完善,具體開發過程到底如何選擇,以上表格僅供參考。
程式碼 Demo 點這裡:LearnDemo 裡面的 CaptureDemo。
如果有什麼問題可以在下方評論區留言,我會積極響應的!O(∩_∩)O 哈!
- 上一篇文章: iOS 學習筆記(28):系統服務之短信與郵件
- 下一篇文章: 操作系統筆記:進程與線程的核心概念