
iOS 學習筆記(28):系統服務之短信與郵件
一、系統應用
在開發某些應用時,我們可能希望能夠呼叫 iOS 系統內建的電話、短信、郵件、瀏覽器應用,或直接呼叫已安裝的第三方應用,這該如何實現呢?
這裡統一使用 UIApplication 的一個物件方法來實現:
// 打開不同的系統應用
- (void)openUrl:(NSURL *)url;
那怎麼區分我是要打電話還是發短信呢?之前我們學網路時,URL 最前面使用的是 https://;使用本地文件時前面就變成 file:// 了,這就是 URL 的協議。我們就是透過控制 URL 的協議,來打開不同的應用。
下面列出了一些系統應用的 URL 協議:
tel://和tel::打電話,沒有提示直接撥打telprompt://和telprompt::打電話,撥打前有提示使用者是否撥打sms://和sms::發短信mailto://和mailto::發郵件https://和http::打開瀏覽器
下面是具體實例演示:
1. 有提示的打電話
// 打電話
- (void)telpromptTest {
    NSString *phoneNumber = @"18500138888";
    // 這種方式會提示使用者確認是否撥打電話
    NSString *urlStr = [NSString stringWithFormat:@"telprompt://%@", phoneNumber];
    NSURL *url = [NSURL URLWithString:urlStr];
    UIApplication *application = [UIApplication sharedApplication];
    [application openURL:url];
}
2. 發短信
// 發送短信
- (void)sendMessageTest {
    NSString *phoneNumber = @"18500138888";
    NSString *urlStr = [NSString stringWithFormat:@"sms://%@", phoneNumber];
    NSURL *url = [NSURL URLWithString:urlStr];
    UIApplication *application = [UIApplication sharedApplication];
    [application openURL:url];
}
3. 發郵件
// 發送郵件
- (void)sendEmailTest {
    NSString *mailAddress = @"850192964@qq.com";
    NSString *urlStr = [NSString stringWithFormat:@"mailto://%@", mailAddress];
    NSURL *url = [NSURL URLWithString:urlStr];
    UIApplication *application = [UIApplication sharedApplication];
    [application openURL:url];
}
4. 打開瀏覽器
// 瀏覽網頁
- (void)browserTest {
    NSString *urlStr = @"https://www.baidu.com";
    NSURL *url = [NSURL URLWithString:urlStr];
    UIApplication *application = [UIApplication sharedApplication];
    [application openURL:url];
}
上面打開的是系統應用,實際上 openUrl 的功能是:只要是系統已安裝的應用程式都能打開。比如你開發了一個應用 A,如果使用者機器上已安裝此應用,並希望在應用 B 中直接打開 A,也可以用 openUrl 實現,不過要進行一些配置。
配置第三方應用步驟:
- 修改應用 A 的
info.plist檔,添加URL types節點。 - 在該節點下,配置具體協議
URL Schemes以及應用 A 的唯一標識URL identifier,如下圖:
在應用 A 的
AppDelegate檔中處理一個代理方法:/* 當被其他應用程式透過 URL 打開時就會調用 */ -(BOOL)application:(UIApplication *)application openURL:(NSURL *)url sourceApplication:(NSString *)sourceApplication annotation:(id)annotation { NSLog(@"url:%@", url); NSLog(@"source:%@", sourceApplication); NSLog(@"params:%@", [url host]); return YES; // 是否打開 }
配置應用 A 完成後,就可以在應用 B 中使用 openUrl 打開應用 A 了:
// 打開第三方應用
- (void)thirdPartyApplicationTest {
    NSString *urlStr = @"cmj://myparams";
    NSURL *url = [NSURL URLWithString:urlStr];
    UIApplication *application = [UIApplication sharedApplication];
    if (![application canOpenURL:url]) {
        NSLog(@"無法打開 \"%@\",請確保此應用已經正確安裝.", url);
        return;
    }
    [application openURL:url];
}
二、系統服務
呼叫系統內建應用來發送短信、郵件相當簡單,但這樣操作也存在一些弊端:
當你點擊了發送短信(或郵件)操作之後,直接啟動了系統的短信(或郵件)應用程式,我們的應用此時已處於一種掛起狀態,發送完之後無法自動回到應用界面。
如果想要在應用程式內部完成這些操作,則可以利用 iOS 中的 MessageUI.framework,它提供了關於短信和郵件的 UI 介面供開發者在應用程式內部呼叫。它提供了現成的短信和郵件編輯界面,開發人員只需透過程式設計的方式給短信和郵件控制器設置對應參數即可。
1、短信
在 MessageUI.framework 中使用 MFMessageComposeViewController 來發短信。
使用步驟:
導入
MessageUI.framework,並添加頭檔:#import <MessageUI/MessageUI.h>- 建立
MFMessageComposeViewController物件。 - 設置收件人、信息正文等內容屬性,設置代理
messageComposeDelegate。 - 以模態彈出該視圖控制器。
處理代理方法,獲取發送狀態:
/* 發送完成會調用,不管成功與否 */
-(void)messageComposeViewController:(MFMessageComposeViewController *)controller didFinishWithResult:(MessageComposeResult)result;
使用實例:
#import "KCSendMessageViewController.h"
#import <MessageUI/MessageUI.h>

@interface KCSendMessageViewController () <MFMessageComposeViewControllerDelegate>
@property (weak, nonatomic) IBOutlet UITextField *receivers;   // 收信人文本框
@property (weak, nonatomic) IBOutlet UITextField *body;        // 信息正文文本框
@property (weak, nonatomic) IBOutlet UITextField *subject;     // 主題文本框
@property (weak, nonatomic) IBOutlet UITextField *attachments; // 附件文本框
@end

@implementation KCSendMessageViewController

- (IBAction)sendMessageClick:(UIButton *)sender {
    // 如果不能發送文本信息,就直接返回
    if (![MFMessageComposeViewController canSendText]) {
        return;
    }
    MFMessageComposeViewController *messageController = [[MFMessageComposeViewController alloc] init];
    messageController.recipients = [self.receivers.text componentsSeparatedByString:@","];
    messageController.body = self.body.text;
    // 注意這裡不是 delegate 而是 messageComposeDelegate
    messageController.messageComposeDelegate = self;
    if ([MFMessageComposeViewController canSendSubject]) {
        messageController.subject = self.subject.text;
    }
    if ([MFMessageComposeViewController canSendAttachments]) {
        NSArray *attachments = [self.attachments.text componentsSeparatedByString:@","];
        if (attachments.count > 0) {
            for (NSString *attachment in attachments) {
                NSString *path = [[NSBundle mainBundle] pathForResource:attachment ofType:nil];
                NSURL *url = [NSURL fileURLWithPath:path];
                [messageController addAttachmentURL:url withAlternateFilename:attachment];
            }
        }
    }
    [self presentViewController:messageController animated:YES completion:nil];
}

/* 發送完成,不管成功與否 */
-(void)messageComposeViewController:(MFMessageComposeViewController *)controller didFinishWithResult:(MessageComposeResult)result {
    switch (result) {
        case MessageComposeResultSent:
            NSLog(@"發送成功.");
            break;
        case MessageComposeResultCancelled:
            NSLog(@"取消發送.");
            break;
        default:
            NSLog(@"發送失敗.");
            break;
    }
    [self dismissViewControllerAnimated:YES completion:nil];
}
@end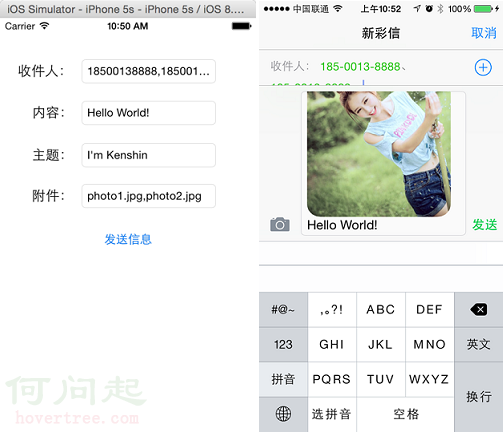
2. 郵件
在 MessageUI.framework 中使用 MFMailComposeViewController 來發郵件。
使用步驟(和發短信相似):
導入
MessageUI.framework,並添加頭檔:#import <MessageUI/MessageUI.h>- 建立
MFMailComposeViewController物件。 - 設置收件人、抄送人、正文等內容屬性,設置代理
mailComposeDelegate。 - 以模態彈出該視圖控制器。
處理代理方法,獲取發送狀態:
/* 發送完成會調用,不管成功與否 */
-(void)mailComposeController:(MFMailComposeViewController *)controller didFinishWithResult:(MFMailComposeResult)result error:(NSError *)error;
實例:
#import "KCSendEmailViewController.h"
#import <MessageUI/MessageUI.h>

@interface KCSendEmailViewController () <MFMailComposeViewControllerDelegate>
@property (weak, nonatomic) IBOutlet UITextField *toTecipients;  // 收件人
@property (weak, nonatomic) IBOutlet UITextField *ccRecipients;  // 抄送人
@property (weak, nonatomic) IBOutlet UITextField *bccRecipients; // 密送人
@property (weak, nonatomic) IBOutlet UITextField *subject;       // 主題
@property (weak, nonatomic) IBOutlet UITextField *body;          // 正文
@property (weak, nonatomic) IBOutlet UITextField *attachments;   // 附件
@end

@implementation KCSendEmailViewController

- (IBAction)sendEmailClick:(UIButton *)sender {
    // 判斷當前是否能夠發送郵件
    if ([MFMailComposeViewController canSendMail]) {
        return;
    }
    MFMailComposeViewController *mailController = [[MFMailComposeViewController alloc] init];
    // 注意這裡不是 delegate,而是 mailComposeDelegate
    mailController.mailComposeDelegate = self;
    NSArray *recipients = [self.toTecipients.text componentsSeparatedByString:@","];
    [mailController setToRecipients:recipients];
    if (self.ccRecipients.text.length > 0) {
        [mailController setCcRecipients:[self.ccRecipients.text componentsSeparatedByString:@","]];
    }
    if (self.bccRecipients.text.length > 0) {
        [mailController setBccRecipients:[self.bccRecipients.text componentsSeparatedByString:@","]];
    }
    [mailController setSubject:self.subject.text];
    [mailController setMessageBody:self.body.text isHTML:YES];
    if (self.attachments.text.length > 0) {
        NSArray *attachments = [self.attachments.text componentsSeparatedByString:@","];
        for (NSString *attachment in attachments) {
            NSString *file = [[NSBundle mainBundle] pathForResource:attachment ofType:nil];
            NSData *data = [NSData dataWithContentsOfFile:file];
            // 第一個參數是附件數據,第二個參數是 mimeType,jpg 圖片對應 image/jpeg
            [mailController addAttachmentData:data mimeType:@"image/jpeg" fileName:attachment];
        }
    }
    [self presentViewController:mailController animated:YES completion:nil];
}

/* 發送完成會調用,不管成功與否 */
-(void)mailComposeController:(MFMailComposeViewController *)controller didFinishWithResult:(MFMailComposeResult)result error:(NSError *)error {
    switch (result) {
        case MFMailComposeResultSent:
            NSLog(@"發送成功.");
            break;
        case MFMailComposeResultSaved:
            NSLog(@"郵件已保存.");
            break;
        case MFMailComposeResultCancelled:
            NSLog(@"取消發送.");
            break;
        default:
            NSLog(@"發送失敗.");
            break;
    }
    if (error) {
        NSLog(@"發送郵件過程中發生錯誤,錯誤信息:%@", error.localizedDescription);
    }
    [self dismissViewControllerAnimated:YES completion:nil];
}
@end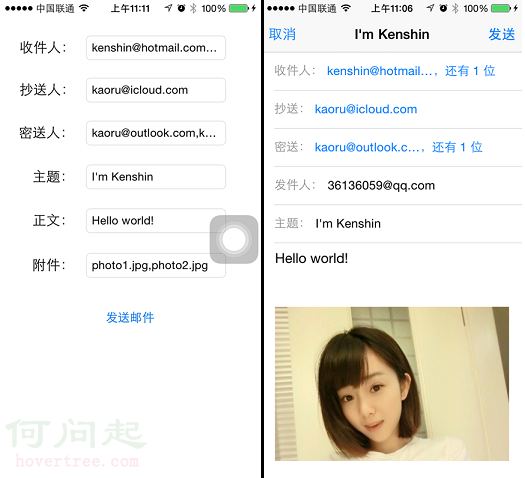
如果有什麼問題可以在下方評論區中提出,求關注!O(∩_∩)O 哈!
- 上一篇文章: iOS 開發:UITableView 滾動優化與自訂 Cell
- 下一篇文章: iOS 學習筆記(27):攝像頭拍照與錄像實作