
你真的了解 UIScrollView 嗎?屬性、代理與實戰全解
UIScrollView 是 iOS 裡使用頻率最高的容器之一——UITableView、UICollectionView、UITextView 全都是它的子類。但很多人對它的理解停留在「能滾就行」,一旦遇到嵌套滾動、懸停吸頂、下拉放大、循環輪播這些需求就容易卡住。
下面從屬性、代理到實戰,系統梳理一遍。
一、核心屬性速覽
@interface UIScrollView : UIView <NSCoding>

// 滾動位置:內容左上角與 scrollView 左上角的間距
@property(nonatomic) CGPoint contentOffset;   // 默認 CGPointZero

// 內容尺寸,決定滾動範圍
@property(nonatomic) CGSize contentSize;      // 默認 CGSizeZero

// 在四周增加額外滾動區域,常用於避免內容被其他控件遮擋
@property(nonatomic) UIEdgeInsets contentInset;

@property(nullable, nonatomic, weak) id<UIScrollViewDelegate> delegate;

// 是否鎖定單一方向的滾動
@property(nonatomic, getter=isDirectionalLockEnabled) BOOL directionalLockEnabled; // 默認 NO

// 是否啟用彈簧效果
@property(nonatomic) BOOL bounces;            // 默認 YES

// 始終允許某方向彈簧。
// 當 ContentSize.height < ScrollView.height 時,垂直方向默認是沒有彈簧效果的,
// 設為 YES 可以讓這種情況也保留彈簧
@property(nonatomic) BOOL alwaysBounceVertical;   // 默認 NO
@property(nonatomic) BOOL alwaysBounceHorizontal; // 默認 NO

// 整頁翻動
@property(nonatomic, getter=isPagingEnabled) BOOL pagingEnabled;   // 默認 NO

// 是否可滾動
@property(nonatomic, getter=isScrollEnabled) BOOL scrollEnabled;   // 默認 YES

// 滾動條顯示與樣式
@property(nonatomic) BOOL showsHorizontalScrollIndicator;  // 默認 YES
@property(nonatomic) BOOL showsVerticalScrollIndicator;    // 默認 YES
@property(nonatomic) UIEdgeInsets scrollIndicatorInsets;   // 只有下邊距和右邊距有效
@property(nonatomic) UIScrollViewIndicatorStyle indicatorStyle; // 默認 Default(灰色)

// 手指放開後的減速率
@property(nonatomic) CGFloat decelerationRate NS_AVAILABLE_IOS(3_0);

// 動畫滾動到指定偏移
- (void)setContentOffset:(CGPoint)contentOffset animated:(BOOL)animated;

// 滾動使某個 rect 剛好可見(取最近的邊),完全可見時不做任何事
- (void)scrollRectToVisible:(CGRect)rect animated:(BOOL)animated;

// 短暫閃一下滾動條,通常在滾回頂部時調用
- (void)flashScrollIndicators;

// 以下三個為只讀狀態
@property(nonatomic, readonly, getter=isTracking) BOOL tracking;       // 已觸摸但可能還沒拖動
@property(nonatomic, readonly, getter=isDragging) BOOL dragging;       // 正在拖動
@property(nonatomic, readonly, getter=isDecelerating) BOOL decelerating; // 松手後仍在滾動

// 是否延遲觸屏手勢處理,默認 YES。
// 設為 YES 時,系統先判斷是否發生滾動,再決定要不要把事件給子視圖
@property(nonatomic) BOOL delaysContentTouches;

// 當 scrollView 上有子視圖時,若 canCancelContentTouches 為 YES,
// 手指在子視圖上移動會讓 scrollView 給子視圖發送 touchCancel;
// 若為 NO,則全部交給子視圖處理
@property(nonatomic) BOOL canCancelContentTouches;   // 默認 YES

- (BOOL)touchesShouldBegin:(NSSet<UITouch *> *)touches withEvent:(nullable UIEvent *)event inContentView:(UIView *)view;
- (BOOL)touchesShouldCancelInContentView:(UIView *)view;

// 縮放
@property(nonatomic) CGFloat minimumZoomScale;   // 默認 1.0
@property(nonatomic) CGFloat maximumZoomScale;   // 默認 1.0
@property(nonatomic) CGFloat zoomScale;          // 默認 1.0
- (void)setZoomScale:(CGFloat)scale animated:(BOOL)animated NS_AVAILABLE_IOS(3_0);
- (void)zoomToRect:(CGRect)rect animated:(BOOL)animated NS_AVAILABLE_IOS(3_0);
@property(nonatomic) BOOL bouncesZoom;           // 默認 YES,允許手勢中超出範圍再回彈
@property(nonatomic, readonly, getter=isZooming) BOOL zooming;
@property(nonatomic, readonly, getter=isZoomBouncing) BOOL zoomBouncing;

// 是否支持點擊狀態欄自動滾回頂部,默認 YES
@property(nonatomic) BOOL scrollsToTop;

// 內建手勢
@property(nonatomic, readonly) UIPanGestureRecognizer *panGestureRecognizer NS_AVAILABLE_IOS(5_0);
@property(nullable, nonatomic, readonly) UIPinchGestureRecognizer *pinchGestureRecognizer NS_AVAILABLE_IOS(5_0);

// 拖動時鍵盤的處理方式,默認 None(不處理)
@property(nonatomic) UIScrollViewKeyboardDismissMode keyboardDismissMode NS_AVAILABLE_IOS(7_0);

@end
二、幾個實用知識點
知識點 1:三個「Size」和「Offset」的關係
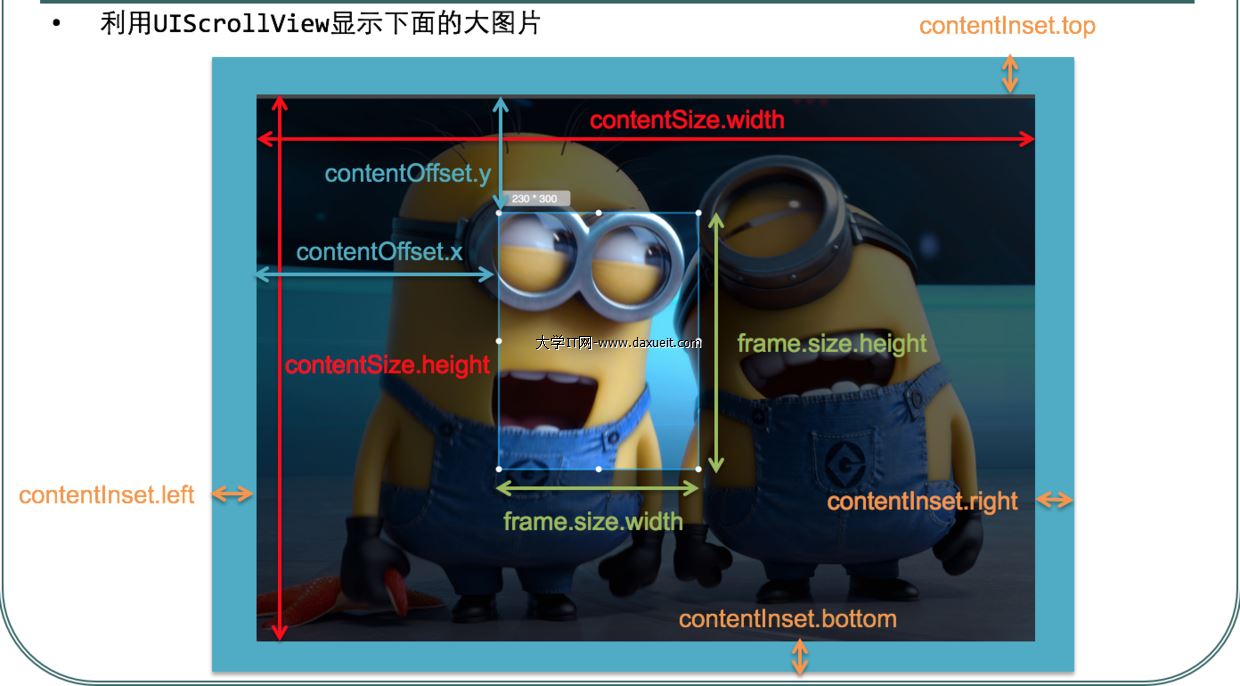
bounds 不變,滾動的本質是改變 bounds.origin;contentSize 決定可滾動的總範圍;contentOffset 就是當前 bounds.origin 的讀寫便捷接口。contentInset 則相當於在內容四周加了一圈緩衝帶。
知識點 2:滾不動的三個常見原因
1. 沒有設置 contentSize(默認 CGSizeZero,自然無處可滾)
2. scrollEnabled = NO
3. 沒有接收到觸摸事件:userInteractionEnabled = NO
知識點 3:iOS 7 的自動內邊距
iOS 7 之後,導航控制器會自動為其中的 scrollView 頂部添加 64pt 的內邊距。如果不想讓內容被下推,可以關掉:
self.automaticallyAdjustsScrollViewInsets = NO;三、實戰一:滑動視圖
@interface RootViewController () <UIScrollViewDelegate>
@end

@implementation RootViewController

- (void)viewDidLoad {
    [super viewDidLoad];
    self.view.backgroundColor = [UIColor yellowColor];

    // 內容超過一屏時就需要滾動視圖
    UIScrollView *scrollView = [[UIScrollView alloc] initWithFrame:self.view.frame];
    [scrollView setBackgroundColor:[UIColor orangeColor]];
    [self.view addSubview:scrollView];

    // 關鍵:設置內容區域大小,決定可滾動範圍
    scrollView.contentSize = CGSizeMake(CGRectGetWidth(self.view.frame) * 4,
                                        CGRectGetHeight(self.view.frame));

    NSArray *imageArr = @[[UIImage imageNamed:@"woman1.jpg"],
                          [UIImage imageNamed:@"woman2.jpg"],
                          [UIImage imageNamed:@"woman3.jpg"],
                          [UIImage imageNamed:@"woman4.jpg"]];

    for (int i = 0; i < 4; i++) {
        UILabel *label = [[UILabel alloc] initWithFrame:CGRectMake(CGRectGetWidth(self.view.frame) * i, 0,
                                                                   CGRectGetWidth(self.view.frame),
                                                                   CGRectGetHeight(self.view.frame))];
        label.text = [NSString stringWithFormat:@"這是志南的第%d夫人", i + 1];
        label.font = [UIFont systemFontOfSize:30];
        label.textAlignment = NSTextAlignmentCenter;

        UIImageView *imageView = [[UIImageView alloc] initWithImage:imageArr[i]];
        imageView.frame = CGRectMake(CGRectGetWidth(self.view.frame) * i, 0,
                                     CGRectGetWidth(self.view.frame),
                                     CGRectGetHeight(self.view.frame));

        [scrollView addSubview:imageView];
        [scrollView addSubview:label];
    }

    scrollView.pagingEnabled = YES;                 // 整頁翻動
    scrollView.showsHorizontalScrollIndicator = YES; // 橫向滾動條
    scrollView.bounces = NO;                        // 關閉邊界回彈
    scrollView.delegate = self;
}

#pragma mark - 代理方法

// 將要開始拖拽
- (void)scrollViewWillBeginDragging:(UIScrollView *)scrollView {
    NSLog(@"---%s", __func__);
}

// 已開始滾動,滾動過程中會持續調用
- (void)scrollViewDidScroll:(UIScrollView *)scrollView {
    // 滾動的子視圖本身 frame 不變,
    // 真正發生變化的是 scrollView(也就是它們的父視圖)的 bounds.origin
    CGPoint offSet = scrollView.contentOffset;
    NSLog(@"偏移量-----%f", offSet.x);
    float x = scrollView.bounds.origin.x;
    NSLog(@"bounds------%f", x);
}

// 將要開始減速
- (void)scrollViewWillBeginDecelerating:(UIScrollView *)scrollView {
    NSLog(@"--%s", __func__);
}

// 完全靜止
- (void)scrollViewDidEndDecelerating:(UIScrollView *)scrollView {
    NSLog(@"%s", __func__);
}

@end這段代碼裡最值得記住的一句是:滾動的本質是改變 scrollView 自身的 bounds.origin,子視圖的 frame 從頭到尾沒變。理解這一點,很多「子視圖位置對不上」的問題都能想明白。
四、實戰二:UIScrollView 與 UIPageControl 配合
- (void)viewDidLoad {
    [super viewDidLoad];
    self.view.backgroundColor = [UIColor grayColor];

    self.userGuideScrollView = [[UIScrollView alloc] initWithFrame:CGRectMake(0, 0,
                                self.view.frame.size.width, self.view.frame.size.height)];
    self.userGuideScrollView.contentSize = CGSizeMake(self.view.frame.size.width * 11,
                                                      self.view.frame.size.height);
    self.userGuideScrollView.pagingEnabled = YES;
    self.userGuideScrollView.delegate = self;
    self.userGuideScrollView.userInteractionEnabled = YES;
    self.userGuideScrollView.showsHorizontalScrollIndicator = NO;

    for (int i = 1; i <= 11; i++) {
        UIImageView *imageView = [[UIImageView alloc] initWithImage:
                                  [UIImage imageNamed:[NSString stringWithFormat:@"image%d", i]]];
        imageView.frame = CGRectMake((i - 1) * self.view.frame.size.width, 0,
                                     self.view.frame.size.width, self.view.frame.size.height);
        [self.userGuideScrollView addSubview:imageView];
    }
    [self.view addSubview:self.userGuideScrollView];

    self.scrollPageControl = [[UIPageControl alloc] init];
    _scrollPageControl.frame = CGRectMake(0, self.view.frame.size.height - 60,
                                          self.view.frame.size.width, 30);
    _scrollPageControl.numberOfPages = 11;
    _scrollPageControl.currentPage = 0;
    _scrollPageControl.pageIndicatorTintColor = [UIColor blueColor];
    _scrollPageControl.currentPageIndicatorTintColor = [UIColor yellowColor];
    [_scrollPageControl addTarget:self action:@selector(scrollPageControlAction:)
                 forControlEvents:UIControlEventValueChanged];
    [self.view addSubview:_scrollPageControl];
}

// pageControl 驅動 scrollView
- (void)scrollPageControlAction:(UIPageControl *)sender {
    CGSize viewSize = _userGuideScrollView.frame.size;
    CGRect rect = CGRectMake(sender.currentPage * viewSize.width, 0,
                             viewSize.width, viewSize.height);
    [_userGuideScrollView scrollRectToVisible:rect animated:YES];
}

// scrollView 反向驅動 pageControl
- (void)scrollViewDidEndDecelerating:(UIScrollView *)scrollView {
    int index = abs(scrollView.contentOffset.x / scrollView.frame.size.width);
    _scrollPageControl.currentPage = index;
}這裡的關鍵是雙向同步:點擊小圓點時由 pageControl 調用 scrollRectToVisible:animated: 驅動滾動;用戶滑動結束後,在 scrollViewDidEndDecelerating: 裡根據 contentOffset.x 反推頁碼。
五、UIScrollViewDelegate 全量代理方法
@protocol UIScrollViewDelegate <NSObject>

@optional

// 只要滾動了就會觸發(高頻調用,注意不要在裡面做重活)
- (void)scrollViewDidScroll:(UIScrollView *)scrollView;

// 縮放過程中持續調用
- (void)scrollViewDidZoom:(UIScrollView *)scrollView NS_AVAILABLE_IOS(3_2);

// 開始拖拽
- (void)scrollViewWillBeginDragging:(UIScrollView *)scrollView;

// 將要結束拖拽,可通過 targetContentOffset 修改最終停留位置
- (void)scrollViewWillEndDragging:(UIScrollView *)scrollView
                     withVelocity:(CGPoint)velocity
                targetContentOffset:(inout CGPoint *)targetContentOffset NS_AVAILABLE_IOS(5_0);

// 結束拖拽,decelerate 表示之後是否還會減速
- (void)scrollViewDidEndDragging:(UIScrollView *)scrollView willDecelerate:(BOOL)decelerate;

// 將要開始減速
- (void)scrollViewWillBeginDecelerating:(UIScrollView *)scrollView;

// 減速停止
- (void)scrollViewDidEndDecelerating:(UIScrollView *)scrollView;

// 代碼觸發的滾動動畫結束(即 setContentOffset:animated: 完成時)
- (void)scrollViewDidEndScrollingAnimation:(UIScrollView *)scrollView;

// 指定哪個子視圖參與縮放,必須是 scrollView 的 subview
- (nullable UIView *)viewForZoomingInScrollView:(UIScrollView *)scrollView;

// 即將開始縮放
- (void)scrollViewWillBeginZooming:(UIScrollView *)scrollView withView:(nullable UIView *)view NS_AVAILABLE_IOS(3_2);

// 縮放完成
- (void)scrollViewDidEndZooming:(UIScrollView *)scrollView withView:(nullable UIView *)view atScale:(CGFloat)scale;

// 是否允許點擊狀態欄回到頂部,返回 NO 可關閉默認行為
- (BOOL)scrollViewShouldScrollToTop:(UIScrollView *)scrollView;

// 已滾動到頂部
- (void)scrollViewDidScrollToTop:(UIScrollView *)scrollView;

@end
六、兩個高頻效果
效果 1:控件懸停吸頂
需求:scrollView 往上拖到某個位置時,某個子控件固定懸停在該處;往下拉時它又跟着一起走。
思路:在 scrollViewDidScroll: 中根據 contentOffset.y 判斷。超過臨界值時,把控件從 scrollView 移到 self.view 上並固定 frame;回到臨界值以內時,再移回 scrollView 成為其子視圖。
效果 2:頂部圖片下拉放大
思路:同樣在 scrollViewDidScroll: 裡,當 offset 為負(下拉)時,按比例調整頂部 imageView 的 transform。
- (void)scrollViewDidScroll:(UIScrollView *)scrollView {
    CGFloat imageH = self.imageView.frame.size.height;
    CGFloat offsetY = scrollView.contentOffset.y;

    // 懸停效果:超過圖片高度時把紅色控件掛到控制器 view 上並固定 Y
    if (offsetY >= imageH) {
        CGRect redF = self.redView.frame;
        redF.origin.y = 0;
        self.redView.frame = redF;
        [self.view addSubview:self.redView];
    } else {
        // 未超過則放回 scrollView,Y 為圖片高度
        CGRect redF = self.redView.frame;
        redF.origin.y = 140;
        self.redView.frame = redF;
        [self.scrollView addSubview:self.redView];
    }

    // 下拉放大頂部圖片
    CGFloat scale = 1 - (offsetY / 70);
    scale = (scale >= 1) ? scale : 1;
    self.imageView.transform = CGAffineTransformMakeScale(scale, scale);
}
七、循環輪播 + 縮放的完整實現

#define ScreenWight [UIScreen mainScreen].bounds.size.width
#define ScreenHeight [UIScreen mainScreen].bounds.size.height
@interface ViewController () <UIScrollViewDelegate>
@property (nonatomic, retain) UIScrollView *scrollView;
@property (nonatomic, retain) UIPageControl *pageControl;
@property (nonatomic, assign) BOOL flag; // 標記當前是否已放大
@end- (void)loadView {
[super loadView];
self.scrollView = [[UIScrollView alloc] initWithFrame:self.view.frame];
self.scrollView.contentSize = CGSizeMake(8 * ScreenWight, ScreenHeight);
[self.view addSubview:_scrollView];
self.scrollView.pagingEnabled = YES;
// 初始偏移到第 2 頁(第 1 頁位置放的是「最後一張」的障眼法)
self.scrollView.contentOffset = CGPointMake(ScreenWight, 0);
self.scrollView.delegate = self;
for (NSInteger i = 1; i < 7; i++) {
// 為什麼要在大 scrollView 裡再套小 scrollView?
// 因為縮放時協議方法不只會改變 imageView 的尺寸,
// 還會順帶改寫 scrollView 的 contentSize,導致原有的滾動效果錯亂。
// 解法:大 scrollView 負責水平滾動,小 scrollView 負責縮放,
// 這樣縮放只會改動小 scrollView 的 contentSize。
UIScrollView *tempScrollView = [[UIScrollView alloc] initWithFrame:
CGRectMake(ScreenWight * i, 0, ScreenWight, ScreenHeight)];
tempScrollView.contentSize = CGSizeMake(ScreenWight, ScreenHeight);
tempScrollView.showsVerticalScrollIndicator = NO;
tempScrollView.showsHorizontalScrollIndicator = NO;
tempScrollView.minimumZoomScale = 0.5f;
tempScrollView.maximumZoomScale = 3.0f;
tempScrollView.delegate = self;
[self.scrollView addSubview:tempScrollView];
UIImageView *imageView = [[UIImageView alloc] initWithFrame:
CGRectMake(0, 0, ScreenWight, ScreenHeight)];
NSString *imageName = [NSString stringWithFormat:@"%ld.JPG", i];
imageView.image = [UIImage imageNamed:imageName];
[tempScrollView addSubview:imageView];
// 双击放大:記得先打開 userInteractionEnabled(默認是關閉的)
imageView.userInteractionEnabled = YES;
UITapGestureRecognizer *tapGesture = [[UITapGestureRecognizer alloc]
initWithTarget:self action:@selector(didTapImageView:)];
tapGesture.numberOfTapsRequired = 2;
[imageView addGestureRecognizer:tapGesture];
}
// 最前面再放一張「最後一張」,配合滾動結束時重置 offset 實現無限循環
UIScrollView *frontScroll = [[UIScrollView alloc] initWithFrame:CGRectMake(0, 0, ScreenWight, ScreenHeight)];
frontScroll.contentSize = CGSizeMake(ScreenWight, ScreenHeight);
[self.scrollView addSubview:frontScroll];
UIImageView *frontImageView = [[UIImageView alloc] initWithFrame:self.view.frame];
frontImageView.image = [UIImage imageNamed:@"6.JPG"];
[frontScroll addSubview:frontImageView];
// 最後面放一張「第一張」
UIScrollView *lastScroll = [[UIScrollView alloc] initWithFrame:
CGRectMake(7 * ScreenWight, 0, ScreenWight, ScreenHeight)];
lastScroll.contentSize = CGSizeMake(ScreenWight, ScreenHeight);
[self.scrollView addSubview:lastScroll];
UIImageView *lastImageView = [[UIImageView alloc] initWithFrame:self.view.frame];
lastImageView.image = [UIImage imageNamed:@"1.JPG"];
[lastScroll addSubview:lastImageView];
self.pageControl = [[UIPageControl alloc] initWithFrame:CGRectMake(100, 600, 175, 30)];
self.pageControl.numberOfPages = 6;
[self.view addSubview:_pageControl];
[self.pageControl addTarget:self action:@selector(didClickedPageControl:)
forControlEvents:UIControlEventValueChanged];
}#pragma mark - 計算放大後要顯示的矩形區域
- (CGRect)zoomRectByScale:(CGFloat)scale Center:(CGPoint)center {
CGRect zoomRect;
zoomRect.size.width = ScreenWight / scale;
zoomRect.size.height = ScreenHeight / scale;
zoomRect.origin.x = center.x * (1 - 1 / scale);
zoomRect.origin.y = center.y * (1 - 1 / scale);
return zoomRect;
}#pragma mark - 双击放大/還原
- (void)didTapImageView:(UITapGestureRecognizer *)tap {
// 通過 tap.view.superview 拿到當前點擊的小 scrollView
// (小 scrollView 沒有設屬性,用這種方式取最方便)
UIScrollView *scroll = (UIScrollView *)tap.view.superview;
if (_flag == NO) {
CGRect newRect = [self zoomRectByScale:3.0 Center:[tap locationInView:tap.view]];
[scroll zoomToRect:newRect animated:YES];
_flag = YES;
} else {
[scroll setZoomScale:1 animated:YES];
_flag = NO;
}
}#pragma mark - 縮放代理
- (UIView *)viewForZoomingInScrollView:(UIScrollView *)scrollView {
// 返回哪個 view,它就跟着 scrollView 一起縮放;
// 同時 scrollView 的 contentSize 會被設為該 view 的大小
return scrollView.subviews.firstObject;
}#pragma mark - 滾動結束:還原比例 + 實現循環 + 同步頁碼
- (void)scrollViewDidEndDecelerating:(UIScrollView *)scrollView {
// 先把所有小 scrollView 的比例還原
for (UIScrollView *tempScroll in scrollView.subviews) {
if ([tempScroll isKindOfClass:[UIScrollView class]]) {
tempScroll.zoomScale = 1.0;
}
}
// 循環播放的關鍵:滑到頭尾時瞬間跳回另一端
if (scrollView.contentOffset.x == 0) {
self.scrollView.contentOffset = CGPointMake(6 * ScreenWight, 0);
}
if (scrollView.contentOffset.x == ScreenWight * 7) {
self.scrollView.contentOffset = CGPointMake(ScreenWight, 0);
}
// 同步分頁控件
NSInteger pageNum = (long)(scrollView.contentOffset.x - ScreenWight) / ScreenWight;
self.pageControl.currentPage = pageNum;
}#pragma mark - 分頁控件驅動滾動
- (void)didClickedPageControl:(UIPageControl *)pageControl {
CGPoint newPoint = CGPointMake((pageControl.currentPage + 1) * ScreenWight, 0);
[self.scrollView setContentOffset:newPoint animated:YES];
}循環播放的實現要點是「首尾各放一張對稱的圖 + 滾動結束時瞬移 offset」。之所以要瞬移而不是動畫,是因為用戶感知不到這一瞬間的跳變,而動畫反而會露出破綻。
八、枚舉與常量
1. UIScrollViewIndicatorStyle
typedef NS_ENUM(NSInteger, UIScrollViewIndicatorStyle) {
    UIScrollViewIndicatorStyleDefault,  // 默認,灰色
    UIScrollViewIndicatorStyleBlack,    // 黑色
    UIScrollViewIndicatorStyleWhite     // 白色
};
2. UIScrollViewKeyboardDismissMode
typedef NS_ENUM(NSInteger, UIScrollViewKeyboardDismissMode) {
    UIScrollViewKeyboardDismissModeNone,        // 默認,不做處理
    UIScrollViewKeyboardDismissModeOnDrag,      // 一開始拖動就收起鍵盤
    UIScrollViewKeyboardDismissModeInteractive  // 鍵盤跟着手指滑動,也可反向推回
} NS_ENUM_AVAILABLE_IOS(7_0);

// 使用示例:
// self.scrollView.keyboardDismissMode = UIScrollViewKeyboardDismissModeOnDrag;
// self.scrollView.keyboardDismissMode = UIScrollViewKeyboardDismissModeInteractive;
Interactive 這個模式在聊天類 App 裡體驗很好——用戶可以從鍵盤上方(scrollView 未被遮擋的部分)往下滑把鍵盤帶走,後悔了再滑回來即可。
3. decelerationRate
// 手指滑動抬起後的減速速率
UIKIT_EXTERN const CGFloat UIScrollViewDecelerationRateNormal NS_AVAILABLE_IOS(3_0);
UIKIT_EXTERN const CGFloat UIScrollViewDecelerationRateFast   NS_AVAILABLE_IOS(3_0);
Fast 會讓滾動更快停下,適合需要精準定位的場景;Normal 則更接近系統默認的舒適手感。
- 上一篇文章: iOS 直播實踐:實時網速監控模組實現
- 下一篇文章: iOS 中獲取 App 圖標與啟動圖片的文件名稱