
iOS 實作:讓 UITableView 支援滑動刪除 Cell
編輯:iOS 相關資訊
前言
「左滑出現刪除按鈕」是 iOS 清單最經典的互動之一。要讓 UITableView 支援這個手勢,關鍵是實作兩個 delegate 方法,並且記得同步更新你的資料來源陣列——只刪畫面上的列而不動資料,是新手最常踩的坑。
標頭檔
#import <UIKit/UIKit.h>

@interface ZYViewController : UIViewController <UITableViewDelegate, UITableViewDataSource>

@property (nonatomic, strong) UITableView *myTableView;
@property (nonatomic, strong) NSMutableArray *arryOfRows;

@end
建立列表與資料
@synthesize myTableView;
@synthesize arryOfRows;

- (void)viewDidLoad
{
    [super viewDidLoad];
    self.view.backgroundColor = [UIColor whiteColor];

    myTableView = [[UITableView alloc] initWithFrame:self.view.bounds
                                               style:UITableViewStylePlain];
    self.myTableView.delegate = self;
    myTableView.dataSource = self;
    self.myTableView.autoresizingMask = UIViewAutoresizingFlexibleWidth | UIViewAutoresizingFlexibleHeight;

    arryOfRows = [[NSMutableArray alloc] initWithObjects:@"a", @"b", @"c", nil];
    [self.view addSubview:myTableView];
}

- (CGFloat)tableView:(UITableView *)tableView heightForRowAtIndexPath:(NSIndexPath *)indexPath {
    return 80.0f;
}

// 列數直接跟著資料來源走
- (NSInteger)tableView:(UITableView *)tableView numberOfRowsInSection:(NSInteger)section {
    return [self.arryOfRows count];
}

- (UITableViewCell *)tableView:(UITableView *)tableView cellForRowAtIndexPath:(NSIndexPath *)indexPath {
    UITableViewCell *result = nil;
    if ([tableView isEqual:myTableView]) {
        static NSString *tableViewCellIdentifier = @"MyCells";
        result = [tableView dequeueReusableCellWithIdentifier:tableViewCellIdentifier];
        if (result == nil) {
            result = [[UITableViewCell alloc] initWithStyle:UITableViewCellStyleDefault
                                           reuseIdentifier:tableViewCellIdentifier];
        }
        result.textLabel.text = [arryOfRows objectAtIndex:indexPath.row];
    }
    return result;
}

// 指定每一列的編輯風格;預設 UITableViewCellEditingStyleNone 代表不可刪除
- (UITableViewCellEditingStyle)tableView:(UITableView *)tableView
           editingStyleForRowAtIndexPath:(NSIndexPath *)indexPath {
    UITableViewCellEditingStyle result = UITableViewCellEditingStyleNone;
    if ([tableView isEqual:myTableView]) {
        result = UITableViewCellEditingStyleDelete;
    }
    return result;
}

// 切換進入/退出編輯模式
- (void)setEditing:(BOOL)editing animated:(BOOL)animated {
    [super setEditing:editing animated:animated];
    [self.myTableView setEditing:editing animated:animated];
}

// 真正執行刪除動作
- (void)tableView:(UITableView *)tableView
commitEditingStyle:(UITableViewCellEditingStyle)editingStyle
forRowAtIndexPath:(NSIndexPath *)indexPath {
    if (editingStyle == UITableViewCellEditingStyleDelete) {
        if (indexPath.row < [self.arryOfRows count]) {
            // 順序很重要:先更新資料來源,再更新 UI
            [self.arryOfRows removeObjectAtIndex:indexPath.row];
            [tableView deleteRowsAtIndexPaths:[NSArray arrayWithObject:indexPath]
                           withRowAnimation:UITableViewRowAnimationLeft];
        }
    }
}
執行結果
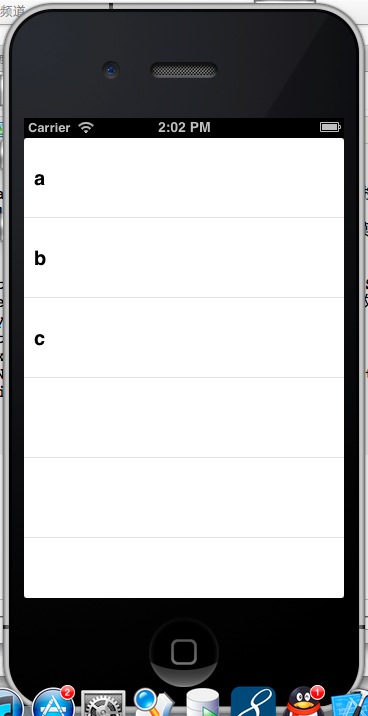
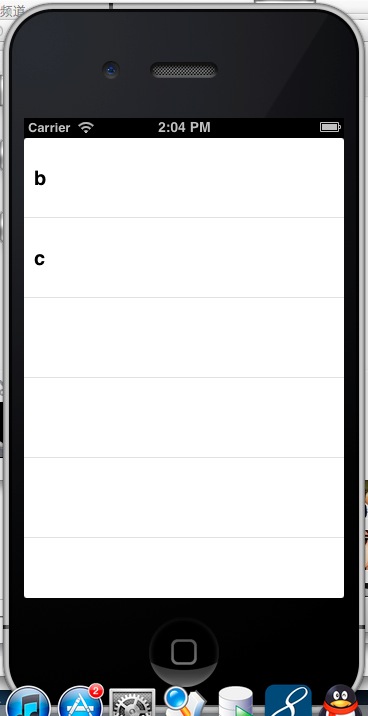
如果 commitEditingStyle:forRowAtIndexPath: 中只呼叫了 deleteRowsAtIndexPaths: 卻沒有同步移除陣列元素,或是順序顛倒,App 就會在下次刷新時因為「列數與資料筆數不符」而崩潰。這是最常見的錯誤訊息來源,值得特別留意。
另外,若你希望一次進入編輯模式後可以批次勾選刪除,可以在導航列右側放一個編輯切換按鈕:
self.navigationItem.rightBarButtonItem =
    [[UIBarButtonItem alloc] initWithBarButtonSystemItem:UIBarButtonSystemItemEdit
                                                target:self
                                                action:@selector(toggleEdit:)];
- 上一篇文章: iOS 控件實作:UITableView 分組列表與多樣化列高
- 下一篇文章: iOS 技巧:把圖片放進導航欄標題位置