
iOS 控件實作:UITableView 分組列表與多樣化列高
編輯:iOS 相關資訊
前言
UITableView 是一個可捲動的分段清單:表格被切分成多個 Section,每個 Section 再切成若干列,每一列的樣式也能自行客製。它繼承了 UIScrollView 的垂直捲動能力,而列數、列高與每列內容全部由 dataSource 決定。
標頭檔
#import <UIKit/UIKit.h>

@interface ZYViewController : UIViewController <UITableViewDelegate, UITableViewDataSource>

@property (nonatomic, strong) UITableView *myTableView;

@end
建立列表並實作資料來源
@synthesize myTableView;

- (void)viewDidLoad
{
    [super viewDidLoad];
    self.view.backgroundColor = [UIColor whiteColor];

    // UITableViewStylePlain 為平鋪樣式;UITableViewStyleGrouped 為分組樣式
    myTableView = [[UITableView alloc] initWithFrame:self.view.bounds
                                               style:UITableViewStylePlain];
    self.myTableView.delegate = self;
    myTableView.dataSource = self;
    self.myTableView.autoresizingMask = UIViewAutoresizingFlexibleWidth | UIViewAutoresizingFlexibleHeight;
    [self.view addSubview:myTableView];
}

// 自訂每一列的高度
- (CGFloat)tableView:(UITableView *)tableView heightForRowAtIndexPath:(NSIndexPath *)indexPath {
    CGFloat result = 20.0f;
    if ([tableView isEqual:self.myTableView]) {
        result = 80.0f;
    }
    return result;
}

// Section 數量
- (NSInteger)numberOfSectionsInTableView:(UITableView *)tableView {
    NSInteger result = 0;
    if ([tableView isEqual:myTableView]) {
        result = 3;
    }
    return result;
}

// 每個 Section 的列數,示範三組各自不同
- (NSInteger)tableView:(UITableView *)tableView numberOfRowsInSection:(NSInteger)section {
    NSInteger result = 0;
    if ([tableView isEqual:myTableView]) {
        switch (section) {
            case 0: result = 3; break;
            case 1: result = 5; break;
            case 2: result = 8; break;
        }
    }
    return result;
}

// 每一列的內容
- (UITableViewCell *)tableView:(UITableView *)tableView cellForRowAtIndexPath:(NSIndexPath *)indexPath {
    UITableViewCell *result = nil;
    if ([tableView isEqual:myTableView]) {
        static NSString *tableViewCellIdentifier = @"MyCells";
        result = [tableView dequeueReusableCellWithIdentifier:tableViewCellIdentifier];
        if (result == nil) {
            result = [[UITableViewCell alloc] initWithStyle:UITableViewCellStyleDefault
                                           reuseIdentifier:tableViewCellIdentifier];
        }
        result.textLabel.text = [NSString stringWithFormat:@"Section %ld, Cell %ld",
                                 (long)indexPath.section, (long)indexPath.row];
    }
    return result;
}

// 點擊某一列時觸發
- (void)tableView:(UITableView *)tableView didSelectRowAtIndexPath:(NSIndexPath *)indexPath {
    if ([tableView isEqual:myTableView]) {
        NSLog(@"%@", [NSString stringWithFormat:@"Cell %ld in Section %ld is selected",
                      (long)indexPath.row, (long)indexPath.section]);
    }
}
執行結果
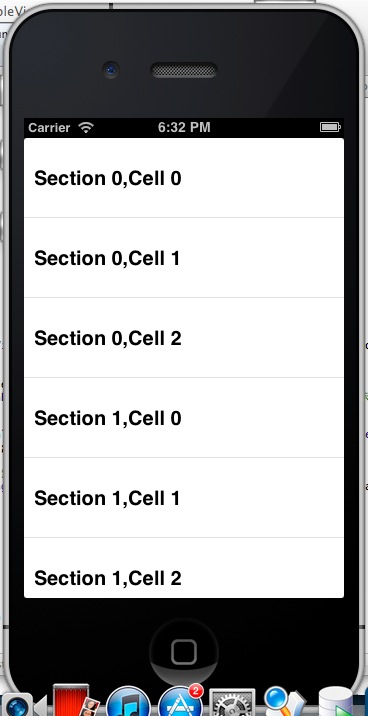
點擊後主控台的輸出:
Cell 4 in Section 1 is selected
Cell 0 in Section 2 is selected
Cell 1 in Section 2 is selected
幾個實務重點
dequeueReusableCellWithIdentifier: 是效能關鍵。UITableView 只會保留螢幕上可見的少量 cell 實例,透過識別碼回收再利用,避免大量建立物件導致捲動卡頓。因此每個 cell 的內容都必須在 cellForRowAtIndexPath: 中完整重設,不能假設它是乾淨的。
另外,heightForRowAtIndexPath: 會在每次需要配置列高時被呼叫。若高度固定,比較好的做法是实现 estimatedRowHeight 並省略 delegate 方法,讓系統自行快取,能明顯改善長列表的捲動流暢度。