
iOS 手勢實作:用 UIPanGestureRecognizer 做出拖曳效果
編輯:iOS 相關資訊
一、前言
拖曳是最直覺的觸控互動之一。iOS 提供了 UIPanGestureRecognizer 專門處理平移手勢,只要把手指移動的座標套到視圖的 center 上,物件就會跟著手指跑。
二、程式碼實作
@synthesize helloWorldLabel;
@synthesize panGestureRecognizer;

- (void)viewDidLoad
{
    [super viewDidLoad];
    self.view.backgroundColor = [UIColor whiteColor];

    // 建立一個標籤作為拖曳對象
    CGRect labelFrame = CGRectMake(0.0f,   /* X */
                                   0.0f,   /* Y */
                                   150.0f, /* 寬 */
                                   100.0f);/* 高 */
    self.helloWorldLabel = [[UILabel alloc] initWithFrame:labelFrame];
    self.helloWorldLabel.text = @"Hello World";
    self.helloWorldLabel.backgroundColor = [UIColor blackColor];
    self.helloWorldLabel.textColor = [UIColor whiteColor];
    self.helloWorldLabel.textAlignment = NSTextAlignmentCenter;

    // 關鍵:userInteractionEnabled 預設為 NO 的話,手勢不會被觸發
    self.helloWorldLabel.userInteractionEnabled = YES;

    [self.view addSubview:self.helloWorldLabel];

    // 建立拖曳手勢識別器
    self.panGestureRecognizer =
        [[UIPanGestureRecognizer alloc] initWithTarget:self
                                                action:@selector(handlePanGestures:)];

    // 限定只用單指操作
    self.panGestureRecognizer.minimumNumberOfTouches = 1;
    self.panGestureRecognizer.maximumNumberOfTouches = 1;

    // 注意:手勢是加在 label 身上,而不是整個 view
    [self.helloWorldLabel addGestureRecognizer:self.panGestureRecognizer];
}

- (void)handlePanGestures:(UIPanGestureRecognizer *)paramSender
{
    // 只在手勢進行中更新位置,結束或失敗時就不再追著手指跑
    if (paramSender.state != UIGestureRecognizerStateEnded &&
        paramSender.state != UIGestureRecognizerStateFailed) {

        // 取得手指在父視圖座標系中的位置
        CGPoint location = [paramSender locationInView:paramSender.view.superview];
        paramSender.view.center = location;
    }
}
三、兩個容易忽略的細節
userInteractionEnabled 必須為 YES。UILabel、UIImageView 這類顯示用的控件預設不接收互動事件,不開這個開關,手勢根本觸發不了。這是最常見的「手勢沒反應」原因。
locationInView: 傳的是 superview。如果傳 paramSender.view,得到的座標會隨視圖自身移動而不斷改變,造成位置錯亂。傳父視圖才能拿到穩定的座標系。而 paramSender.view.center = location 之所以能直接指派,是因為 center 也是在父視圖座標系中表達的。
四、執行結果
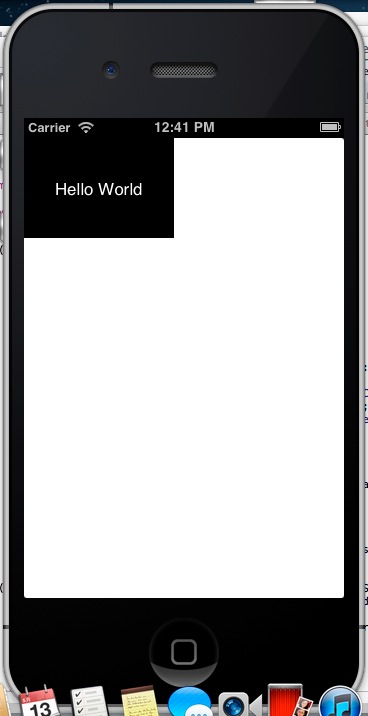
拖曳前的位置:
拖曳之後:
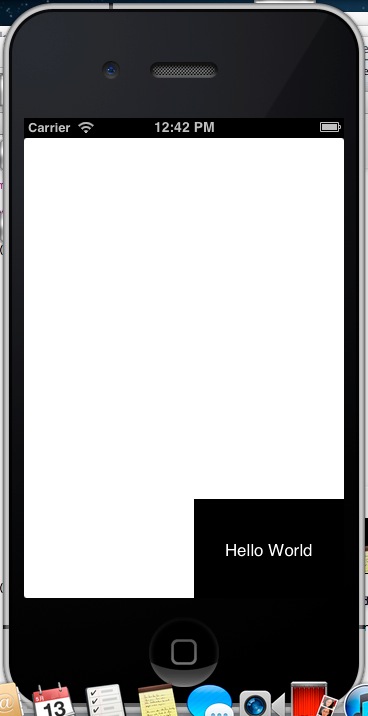
五、進階變化
這個範例是「物件中心黏著手指」,也可以改成品對位移:在 UIGestureRecognizerStateBegan 時用 translationInView: 記下基準點,之後每次回呼就把位移量累加到初始 center 上。這種寫法在物件初始位置不在左上角、或需要邊界限制時更可控。若要加入慣性甩動效果,則可在 StateEnded 時讀取 velocityInView:,再交給 UIDynamicAnimator 或自寫的 CADisplayLink 動畫處理減速。