
iOS 開發:plist 檔案的讀取與寫入完整教學
做 iOS 開發時,plist 幾乎是必經之路。它的全名是 Property List(屬性列表),是一種存放序列化物件的檔案格式,副檔名為 .plist,內容以 XML 描述。由於結構簡單、可讀性高,常被用來保存使用者設定或隨 App 一起打包的靜態資訊。
一、建立專案並認識既有 plist
開一個名為 Plistdemo 的專案。建立完成後,專案裡就能找到系統產生的 plist 檔,打開來會看到表格式的編輯介面:
在檔案上按右鍵選擇以原始碼方式開啟(Open As → Source Code),就能看到它其實是一份 XML:
二、新增自己的 plist
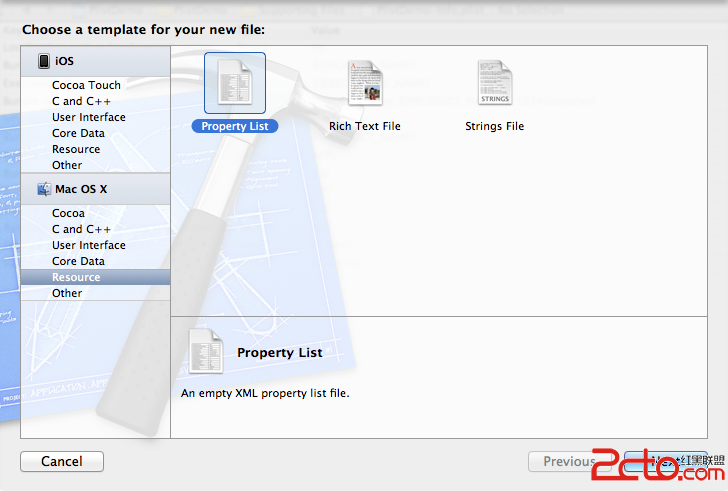
用 Command + N,或 File → New → New File,選擇 Mac OS X 底下的 Property List,命名為 plistdemo。
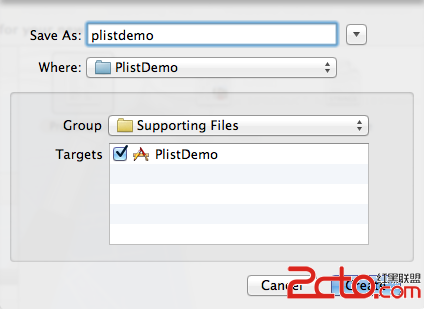
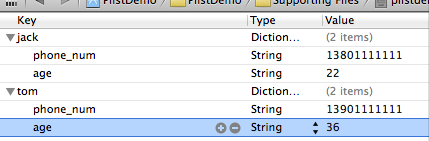
打開 plistdemo,在空白处按右鍵選 Add Row 新增一筆資料;在這筆資料上再按右鍵,把 Value Type 改為 Dictionary,然後點加號往這個 Dictionary 裡補上子鍵值。這裡示範存入姓名對應的手機號碼與年齡。
編輯完成後,用原始碼檢視會長這樣:
<?xml version="1.0" encoding="UTF-8"?>
<!DOCTYPE plist PUBLIC "-//Apple//DTD PLIST 1.0//EN" "https://www.apple.com/DTDs/PropertyList-1.0.dtd">
<plist version="1.0">
<dict>
    <key>jack</key>
    <dict>
        <key>phone_num</key>
        <string>13801111111</string>
        <key>age</key>
        <string>22</string>
    </dict>
    <key>tom</key>
    <dict>
        <key>phone_num</key>
        <string>13901111111</string>
        <key>age</key>
        <string>36</string>
    </dict>
</dict>
</plist>
三、讀取 plist 內容
讀取只需要兩行:先用 pathForResource:ofType: 取得 bundle 中的檔案路徑,再用 initWithContentsOfFile: 直接反序列化成字典物件。
- (void)viewDidLoad
{
    [super viewDidLoad];

    // 取得 plist 在 bundle 中的完整路徑
    NSString *plistPath = [[NSBundle mainBundle] pathForResource:@"plistdemo" ofType:@"plist"];

    // 直接反序列化為 NSMutableDictionary
    NSMutableDictionary *data = [[NSMutableDictionary alloc] initWithContentsOfFile:plistPath];
    NSLog(@"%@", data);
}
執行後 console 會印出:
PlistDemo[6822:f803] {
    jack = {
        age = 22;
        "phone_num" = 13801111111;
    };
    tom = {
        age = 36;
        "phone_num" = 13901111111;
    };
}
四、寫入 plist
開發過程中常需要把設定、遊戲存檔或離線資料落地,這時就得自己寫檔。要特別注意的是:bundle 是唯讀的,寫入的檔案會落在 App 的沙盒目錄裡,實務上多選 Documents。
- (void)viewDidLoad
{
    [super viewDidLoad];

    // 1. 先從 bundle 讀出既有資料
    NSString *plistPath = [[NSBundle mainBundle] pathForResource:@"plistdemo" ofType:@"plist"];
    NSMutableDictionary *data = [[NSMutableDictionary alloc] initWithContentsOfFile:plistPath];
    NSLog(@"%@", data);

    // 2. 新增一筆內容
    [data setObject:@"add some content" forKey:@"c_key"];

    // 3. 取得 App 沙盒的 Documents 目錄
    NSArray *paths = NSSearchPathForDirectoriesInDomains(NSDocumentDirectory, NSUserDomainMask, YES);
    NSString *documentsPath = [paths objectAtIndex:0];

    // 4. 組出完整檔案路徑
    NSString *filename = [documentsPath stringByAppendingPathComponent:@"test.plist"];

    // 5. 寫入磁碟
    [data writeToFile:filename atomically:YES];

    // 6. 立刻讀回來驗證是否真的寫成功
    NSMutableDictionary *verify = [[NSMutableDictionary alloc] initWithContentsOfFile:filename];
    NSLog(@"%@", verify);
}
最後那步「寫完立刻讀回來」是很值得保留的習慣,能在開發階段提早抓到路徑錯誤或權限問題。
五、什麼時候該用 plist
plist 適合結構固定、資料量不大的設定型資訊。若資料需要頻繁查詢、關聯或大量寫入,就該改用 SQLite 或 Core Data;若只是零散的鍵值設定,NSUserDefaults 會比手動管理 plist 更省事。