
用 UIWebView 打造一個簡易網頁瀏覽器
UIWebView 是 iOS SDK 裡歷史最悠久的內嵌瀏覽器元件,雖然如今已被 WKWebView 取代,但理解它的載入流程、delegate 回調與高度自適應技巧,對維護老專案仍有現實意義。本文動手做一個能輸入網址、帶載入提示與錯誤提醒的簡易瀏覽器。
成品大致如下:

一、封裝一個載入方法
loadRequest: 接受一個 NSURLRequest,先把字串轉成 NSURL 再包裝即可。在 UIWebViewDemoViewController 中定義:
- (void)loadWebPageWithString:(NSString *)urlString
{
    NSURL *url = [NSURL URLWithString:urlString];
    NSLog(@"%@", urlString);

    NSURLRequest *request = [NSURLRequest requestWithURL:url];
    [webView loadRequest:request];
}
二、搭建界面
在 xib 上擺三個元件:一個地址欄 UITextField、一個觸發按鈕 UIButton、一個承載網頁的 UIWebView。
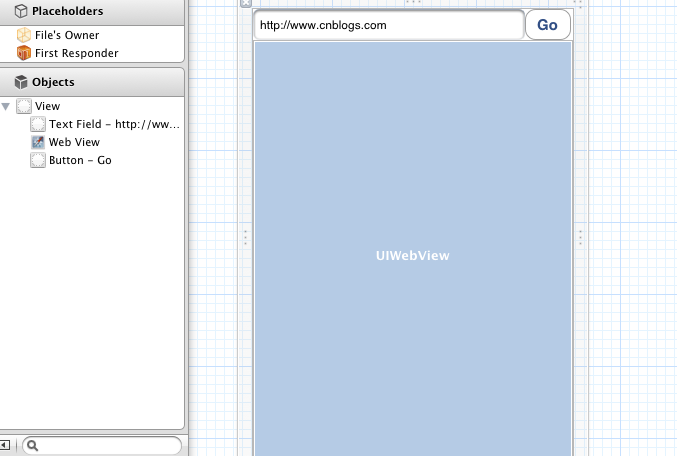
在控制器中宣告對應的出口與動作:
@interface UIWebViewDemoViewController : UIViewController <UIWebViewDelegate>
{
    IBOutlet UIWebView    *webView;
    IBOutlet UITextField  *textField;
    UIActivityIndicatorView *activityIndicatorView;
}

- (IBAction)buttonPress:(id)sender;
- (void)loadWebPageWithString:(NSString *)urlString;
@end
回到 Interface Builder 用連線把它們關聯起來。
三、初始化設定
scalesPageToFit 讓桌面版頁面能縮放適配;delegate 必須設為 self,否則後續回調完全不會觸發。順帶把載入指示器放到視圖正中央。
- (void)viewDidLoad
{
    [super viewDidLoad];

    webView.scalesPageToFit = YES;
    webView.delegate = self;

    activityIndicatorView = [[UIActivityIndicatorView alloc]
        initWithFrame:CGRectMake(0.0f, 0.0f, 32.0f, 32.0f)];
    [activityIndicatorView setCenter:self.view.center];
    [activityIndicatorView setActivityIndicatorViewStyle:UIActivityIndicatorViewStyleWhite];
    [self.view addSubview:activityIndicatorView];

    [self buttonPress:nil];
}
四、三個關鍵 delegate 方法
UIWebView 的載入生命週期由三個回調構成:
webViewDidStartLoad:—— 開始載入。webViewDidFinishLoad:—— 載入完成。webView:didFailLoadWithError:—— 載入失敗。
把指示器的啟動與停止放進前兩個方法,用戶就能得到明確的等待回饋:
- (void)webViewDidStartLoad:(UIWebView *)webView
{
    [activityIndicatorView startAnimating];
}

- (void)webViewDidFinishLoad:(UIWebView *)webView
{
    [activityIndicatorView stopAnimating];
}
按鈕的行為非常單純:先收起鍵盤,再把地址欄內容交給載入方法。
- (IBAction)buttonPress:(id)sender
{
    [textField resignFirstResponder];
    [self loadWebPageWithString:textField.text];
}
失敗時給出提示,避免使用者盯著白屏發愣:
- (void)webView:(UIWebView *)webView didFailLoadWithError:(NSError *)error
{
    UIAlertView *alterview = [[UIAlertView alloc] initWithTitle:@""
                                                        message:[error localizedDescription]
                                                       delegate:nil
                                              cancelButtonTitle:nil
                                              otherButtonTitles:@"OK", nil];
    [alterview show];
    [alterview release];
}
五、進階:讓 UIWebView 的高度隨內容伸縮
把網頁塞進 UITableView 的表頭時,最惱人的就是不知道內容到底有多高。解法是監聽 scrollView 的 contentSize,內容一變就重算 frame。
[activityWebView.scrollView addObserver:self
                            forKeyPath:@"contentSize"
                               options:NSKeyValueObservingOptionNew
                               context:nil];
在 KVO 回調裡透過 JavaScript 取得實際文件高度,再更新 frame:
- (void)observeValueForKeyPath:(NSString *)keyPath
                      ofObject:(id)object
                        change:(NSDictionary *)change
                       context:(void *)context
{
    if ([keyPath isEqualToString:@"contentSize"]) {
        webViewHeight = [[activityWebView stringByEvaluatingJavascriptFromString:
                          @"document.body.offsetHeight"] floatValue];

        CGRect newFrame = activityWebView.frame;
        newFrame.size.height = webViewHeight;
        activityWebView.frame = newFrame;

        [mainTableView setTableHeaderView:activityWebView];
    }
}
收尾工作不能省:頁面消失前必須移除观察者,否則一退出就閃退。
- (void)viewWillDisappear:(BOOL)animated
{
    [super viewWillDisappear:animated];
    [activityWebView.scrollView removeObserver:self
                                   forKeyPath:@"contentSize"
                                      context:nil];
}
小結
整個簡易瀏覽器的骨架就是「一個載入方法 + 三個 delegate + 一個指示器」。真正需要留心的是細節:delegate 別忘了設、KVO 別忘了移除、錯誤要有提示。如果今天重寫,建議直接改用 WKWebView,它在記憶體與執行緒模型上都健康得多。