
iOS 手勢實作:打造可上下滑動的抽屜效果
編輯:iOS 開發綜合
Android 有現成的 SlidingDrawer 元件,iOS 則得自己攢。不過原理並不複雜:本質上就是一個 UIView 的位移,加上手勢判斷與動畫收尾。本文實作一個可以拖曳、也可以點擊切換的上下抽屜。
效果預覽
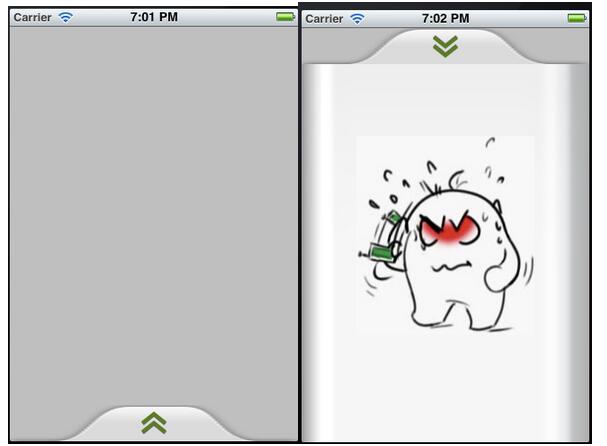
DrawerView.h
先定義兩個狀態,並把需要的元件與方法宣告出來。這裡刻意保留 arrow(箭頭)、contentView(內容區)、parentView(容器)三個成員,讓抽屜自己管理自己的版面。
#import <UIKit/UIKit.h>

typedef enum {
    DrawerViewStateUp = 0,    // 展開
    DrawerViewStateDown       // 收合
} DrawerViewState;

@interface DrawerView : UIView <UIGestureRecognizerDelegate>
{
    UIImageView *arrow;          // 拖曳提示箭頭
    CGPoint upPoint;             // 展開時的中心點
    CGPoint downPoint;           // 收合時的中心點
    UIView *parentView;          // 抽屜所處的容器
    UIView *contentView;         // 抽屜裡顯示的內容
    DrawerViewState drawState;   // 目前狀態
}

- (id)initWithView:(UIView *)contentview parentView:(UIView *)parentview;
- (void)handlePan:(UIPanGestureRecognizer *)recognizer;
- (void)handleTap:(UITapGestureRecognizer *)recognizer;
- (void)transformArrow:(DrawerViewState)state;

@property (nonatomic, retain) UIView *parentView;
@property (nonatomic, retain) UIView *contentView;
@property (nonatomic, retain) UIImageView *arrow;
@property (nonatomic) DrawerViewState drawState;

@end
DrawerView.m
#import "DrawerView.h"

@implementation DrawerView

@synthesize contentView, parentView, drawState, arrow;

- (id)initWithView:(UIView *)contentview parentView:(UIView *)parentview {
    self = [super initWithFrame:CGRectMake(0, 0,
                                           contentview.frame.size.width,
                                           contentview.frame.size.height + 40)];
    if (self) {
        contentView = contentview;
        parentView = parentview;

        // 容器必須開啟互動,否則手勢收不到
        [parentView setUserInteractionEnabled:YES];

        // 內容區背景
        UIImage *drawer_bg = [UIImage imageNamed:@"drawer_content.png"];
        UIImageView *view_bg = [[UIImageView alloc] initWithImage:drawer_bg];
        [view_bg setFrame:CGRectMake(0, 40, contentview.frame.size.width, contentview.bounds.size.height + 40)];
        [self addSubview:view_bg];

        // 頂部拖曳條背景
        UIImage *drawer_handle = [UIImage imageNamed:@"drawer_handlepng.png"];
        UIImageView *view_handle = [[UIImageView alloc] initWithImage:drawer_handle];
        [view_handle setFrame:CGRectMake(0, 0, contentview.frame.size.width, 40)];
        [self addSubview:view_handle];

        // 箭頭
        UIImage *drawer_arrow = [UIImage imageNamed:@"drawer_arrow.png"];
        arrow = [[UIImageView alloc] initWithImage:drawer_arrow];
        [arrow setFrame:CGRectMake(0, 0, 28, 28)];
        arrow.center = CGPointMake(contentview.frame.size.width / 2, 20);
        [self addSubview:arrow];

        // 嵌入內容 view
        [contentView setFrame:CGRectMake(0, 40, contentview.frame.size.width, contentview.bounds.size.height + 40)];
        [self addSubview:contentView];

        // 拖曳手勢
        UIPanGestureRecognizer *panRcognize = [[UIPanGestureRecognizer alloc] initWithTarget:self action:@selector(handlePan:)];
        panRcognize.delegate = self;
        [panRcognize setEnabled:YES];
        [panRcognize delaysTouchesEnded];
        [panRcognize cancelsTouchesInView];
        [self addGestureRecognizer:panRcognize];

        // 點擊手勢
        UITapGestureRecognizer *tapRecognize = [[UITapGestureRecognizer alloc] initWithTarget:self action:@selector(handleTap:)];
        tapRecognize.numberOfTapsRequired = 1;
        tapRecognize.delegate = self;
        [tapRecognize setEnabled:YES];
        [tapRecognize delaysTouchesBegan];
        [tapRecognize cancelsTouchesInView];
        [self addGestureRecognizer:tapRecognize];

        // 計算兩個端點:收合位置在容器下方,展開位置在容器內
        downPoint = CGPointMake(parentview.frame.size.width / 2,
                                parentview.frame.size.height + contentview.frame.size.height / 2 - 40);
        upPoint   = CGPointMake(parentview.frame.size.width / 2,
                                parentview.frame.size.height - contentview.frame.size.height / 2 - 40);

        self.center = downPoint;
        drawState = DrawerViewStateDown;
    }
    return self;
}

#pragma mark - UIGestureRecognizer Handles

// 拖曳處理
- (void)handlePan:(UIPanGestureRecognizer *)recognizer {
    CGPoint translation = [recognizer translationInView:parentView];

    // 夾在兩個端點之間,避免拖過頭
    if (self.center.y + translation.y < upPoint.y) {
        self.center = upPoint;
    } else if (self.center.y + translation.y > downPoint.y) {
        self.center = downPoint;
    } else {
        self.center = CGPointMake(self.center.x, self.center.y + translation.y);
    }

    // 關鍵:清掉已套用的位移,否則下一個回呼會重複累加
    [recognizer setTranslation:CGPointMake(0, 0) inView:parentView];

    // 放手後吸附到最近的端點
    if (recognizer.state == UIGestureRecognizerStateEnded) {
        [UIView animateWithDuration:0.75 delay:0.15 options:UIViewAnimationOptionCurveEaseOut animations:^{
            if (self.center.y < downPoint.y * 4 / 5) {
                self.center = upPoint;
                [self transformArrow:DrawerViewStateUp];
            } else {
                self.center = downPoint;
                [self transformArrow:DrawerViewStateDown];
            }
        } completion:nil];
    }
}

// 點擊切換
- (void)handleTap:(UITapGestureRecognizer *)recognizer {
    [UIView animateWithDuration:0.75 delay:0.15 options:UIViewAnimationOptionTransitionCurlUp animations:^{
        if (drawState == DrawerViewStateDown) {
            self.center = upPoint;
            [self transformArrow:DrawerViewStateUp];
        } else {
            self.center = downPoint;
            [self transformArrow:DrawerViewStateDown];
        }
    } completion:nil];
}

// 箭頭方向
- (void)transformArrow:(DrawerViewState)state {
    [UIView animateWithDuration:0.3 delay:0.35 options:UIViewAnimationOptionCurveEaseOut animations:^{
        if (state == DrawerViewStateUp) {
            arrow.transform = CGAffineTransformMakeRotation(M_PI);
        } else {
            arrow.transform = CGAffineTransformMakeRotation(0);
        }
    } completion:^(BOOL finish) {
        drawState = state;
    }];
}

@end
幾個實作上的關鍵點
setTranslation:CGPointZero 是必須的。UIPanGestureRecognizer 回傳的是「自上次回呼以來的累積位移」。如果不歸零,第二次回呼就會把前面所有的位移再走一遍,抽屜會飛出螢幕。這是所有拖曳手勢最容易忽略的一行。
端點夾取讓手感更實在。拖到頂或拖到底就固定不動,比讓使用者拖到無限遠再彈回來自然得多。
箭頭動畫延遲 0.35 秒啟動。抽屜位移用 0.75 秒,箭頭在 0.35 秒後開始轉,視覺上會跟著抽屜的節奏走,而不是各轉各的。
如果想再進一步,可以把 upPoint / downPoint 改成依 contentView 高度動態計算(現在寫死了 40 的上限),並在旋轉或尺寸變更時重新更新這兩個端點,抽屜就能自適應不同螢幕了。