
iOS 音訊播放實作:AVAudioPlayer 完整用法拆解
要在 iOS App 裡加入播放聲音的能力,最經典的選擇莫過於 AVFoundation 框架中的 AVAudioPlayer。它的 API 簡潔、控制粒度細,特別適合播放隨 App 一起打包的本地音檔。以下用一個完整的 Objective-C 範例,走過從框架匯入、介面配置到播放控制、記憶體釋放的每一步。
一、事前準備
第一步是把 AVFoundation.framework 加入專案,否則編譯階段會找不到相關符號。接著新增一個繼承自 UIViewController 的類別,這裡取名 FirstVC,並在 AppDelegate.m 中把它設為根視圖控制器:
#import "AppDelegate.h"
#import "FirstVC.h"

@implementation AppDelegate

- (void)dealloc
{
    [_window release];
    [super dealloc];
}

- (BOOL)application:(UIApplication *)application didFinishLaunchingWithOptions:(NSDictionary *)launchOptions
{
    self.window = [[[UIWindow alloc] initWithFrame:[[UIScreen mainScreen] bounds]] autorelease];

    FirstVC *firstVC = [[FirstVC alloc] init];
    self.window.rootViewController = firstVC;
    [firstVC release];

    self.window.backgroundColor = [UIColor whiteColor];
    [self.window makeKeyAndVisible];
    return YES;
}
二、宣告播放器與輔助元件
在 FirstVC.h 中除了 UIKit,還必須引入 AVFoundation 的頭檔,並宣告遵循 AVAudioPlayerDelegate。這裡一併把進度條、音量滑桿與計時器規劃進去:
#import <UIKit/UIKit.h>

// 想使用封裝好的音訊類別,框架與頭檔兩者缺一不可
#import <AVFoundation/AVFoundation.h>

@interface FirstVC : UIViewController <AVAudioPlayerDelegate>
{
    AVAudioPlayer *avAudioPlayer;   // 播放器本體
    UIProgressView *progressV;      // 播放進度
    UISlider *volumeSlider;         // 音量控制
    NSTimer *timer;                 // 監控播放進度
}
@end
三、在 viewDidLoad 中完成初始化
播放之前必須先有音檔。把歌曲像加入圖片一樣直接拖進專案即可,這裡範例使用「輕音樂 - 薩克斯回家.mp3」。接著建立三顆控制按鈕、讀取 bundle 中的檔案、準備播放器,並加上進度條、音量滑桿與靜音開關:
- (void)viewDidLoad
{
    [super viewDidLoad];

    // 播放
    UIButton *button = [UIButton buttonWithType:UIButtonTypeRoundedRect];
    [button setFrame:CGRectMake(100, 100, 60, 40)];
    [button setTitle:@"Play" forState:UIControlStateNormal];
    [button addTarget:self action:@selector(play) forControlEvents:UIControlEventTouchUpInside];
    [self.view addSubview:button];

    // 暫停
    UIButton *button1 = [UIButton buttonWithType:UIButtonTypeRoundedRect];
    [button1 setFrame:CGRectMake(100, 150, 60, 40)];
    [button1 setTitle:@"pause" forState:UIControlStateNormal];
    [button1 addTarget:self action:@selector(pause) forControlEvents:UIControlEventTouchUpInside];
    [self.view addSubview:button1];

    // 停止
    UIButton *button2 = [UIButton buttonWithType:UIButtonTypeRoundedRect];
    [button2 setFrame:CGRectMake(100, 200, 60, 40)];
    [button2 setTitle:@"stop" forState:UIControlStateNormal];
    [button2 addTarget:self action:@selector(stop) forControlEvents:UIControlEventTouchUpInside];
    [self.view addSubview:button2];

    // 從 bundle 讀取音檔,字串是檔名,後面是格式
    NSString *string = [[NSBundle mainBundle] pathForResource:@"輕音樂 - 薩克斯回家" ofType:@"mp3"];
    NSURL *url = [NSURL fileURLWithPath:string];

    // 初始化播放器並掛上音檔
    avAudioPlayer = [[AVAudioPlayer alloc] initWithContentsOfURL:url error:nil];
    avAudioPlayer.delegate = self;

    // 初始音量可為 0~1,此處沿用預設
    // avAudioPlayer.volume = 1;

    // -1 代表無限循環
    avAudioPlayer.numberOfLoops = -1;

    // 預播放,可降低首次播放的延遲
    [avAudioPlayer prepareToPlay];

    // 進度條
    progressV = [[UIProgressView alloc] initWithFrame:CGRectMake(20, 50, 200, 20)];
    [self.view addSubview:progressV];
    [progressV release];

    // 每 0.1 秒更新一次進度
    timer = [NSTimer scheduledTimerWithTimeInterval:0.1 target:self
                                           selector:@selector(playProgress)
                                           userInfo:nil repeats:YES];

    // 音量滑桿
    volumeSlider = [[UISlider alloc] initWithFrame:CGRectMake(20, 70, 200, 20)];
    [volumeSlider addTarget:self action:@selector(volumeChange)
           forControlEvents:UIControlEventValueChanged];
    volumeSlider.minimumValue = 0.0f;
    volumeSlider.maximumValue = 10.0f;
    volumeSlider.value = 5.0f;
    [self.view addSubview:volumeSlider];
    [volumeSlider release];

    // 靜音開關,預設開啟
    UISwitch *swith = [[UISwitch alloc] initWithFrame:CGRectMake(100, 20, 60, 40)];
    [swith addTarget:self action:@selector(onOrOff:) forControlEvents:UIControlEventValueChanged];
    swith.on = YES;
    [self.view addSubview:swith];
    [swith release];
}
四、對應的控制方法
播放、暫停、停止三者差異在於:stop 會把播放位置歸零,下次播放等於從頭開始;pause 則保留目前位置。進度條的算法是「已播放時間 ÷ 總時長」,剛好落在 0 到 1 之間,可以直接餵給 UIProgressView。
// 播放
- (void)play
{
    [avAudioPlayer play];
}

// 暫停
- (void)pause
{
    [avAudioPlayer pause];
}

// 停止:先把目前播放時間歸零
- (void)stop
{
    avAudioPlayer.currentTime = 0;
    [avAudioPlayer stop];
}

// 進度條:以播放百分比赋值
- (void)playProgress
{
    progressV.progress = avAudioPlayer.currentTime / avAudioPlayer.duration;
}

// 靜音開關
- (void)onOrOff:(UISwitch *)sender
{
    avAudioPlayer.volume = sender.on;
}

// 音量控制
- (void)volumeChange
{
    avAudioPlayer.volume = volumeSlider.value;
}

// 播放完成後的代理回呼,必須設定 delegate 才會觸發
- (void)audioPlayerDidFinishPlaying:(AVAudioPlayer *)player successfully:(BOOL)flag
{
    [timer invalidate];   // 讓計時器失效,停止更新進度
}
如果還想讓使用者直接拖曳決定播放位置,只要再補一顆 UISlider,在 value 變化的回呼裡設定 avAudioPlayer.currentTime 即可。
五、別忘了釋放記憶體
- (void)dealloc
{
    [avAudioPlayer release];
    [progressV release];
    [volumeSlider release];
    [timer release];
    [super dealloc];
}
全部完成後,畫面大致如下:
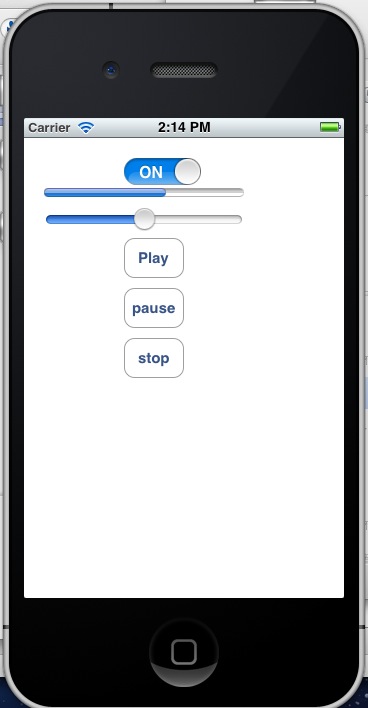
六、想播放網路音樂?
AVAudioPlayer 天生不支援串流,也就是說它沒辦法一邊下載一邊播放。實務上的做法是先把檔案抓下來存到本地,再用檔案路徑初始化播放器:
NSString *urlStr = @"https://…………xxx.mp3";
NSURL *url = [[NSURL alloc] initWithString:urlStr];
NSData *audioData = [NSData dataWithContentsOfURL:url];

// 存到 Documents 目錄
NSString *docDirPath = [NSSearchPathForDirectoriesInDomains(NSDocumentDirectory, NSUserDomainMask, YES) objectAtIndex:0];
NSString *filePath = [NSString stringWithFormat:@"%@/%@.mp3", docDirPath, @"temp"];
[audioData writeToFile:filePath atomically:YES];

// 播放剛存下的檔案
NSURL *fileURL = [NSURL fileURLWithPath:filePath];
player = [[AVAudioPlayer alloc] initWithContentsOfURL:fileURL error:nil];
[player play];
這裡有個容易踩到的坑:player 必須是類別的成員變數。在 ARC 環境下若宣告成區域變數,方法執行結束、脫離作用域後物件立刻被回收,音樂自然也停了——這個問題當初讓我卡了很久。另外,如果不想落地存檔,也可以改用 AVAudioPlayer 的 initWithData:error: 版本,直接用 NSData 初始化。
七、實作過程中常見的狀況
1. 莫名其妙的 All Exception 斷點。啟用 All Exception 斷點後,每次初始化都會停下來,但既沒有潰毀也沒有錯誤資訊,因為那並不是 Objective-C 的例外。編輯斷點、把類型從 All 改為 Objective-C 即可,這個中斷不影響程式運行。
2. 完全沒有聲音。多數情況是沒有設定 AVAudioSession 的播放類別,特別是裝置靜音鍵打開時。在 AppDelegate.m 的 application:didFinishLaunchingWithOptions: 補上這一行:
[[AVAudioSession sharedInstance] setCategory:AVAudioSessionCategoryPlayback error:nil];
- 上一篇文章: iOS 模擬電子書首頁:打造書架布局效果
- 下一篇文章: 微信 JSSDK 多圖串行上傳實作,並修正 iOS 端一直卡在載入的問題