
iOS 實作:把文字轉成漸層彩色圖片並存進相簿
編輯:iOS 開發綜合
本文實作一個小功能:輸入文字後,把它渲染成一張漸層彩色的文字圖片,字體與配色都可切換。
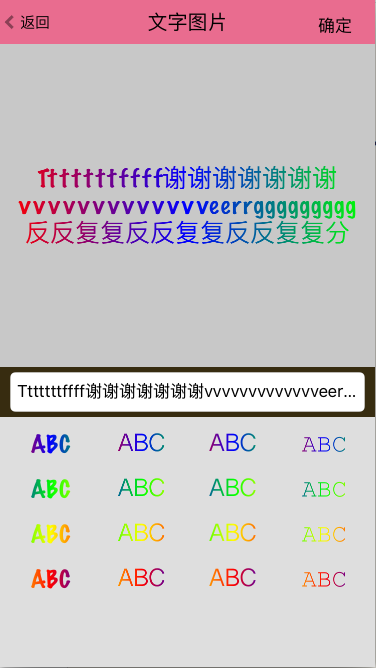
核心手法:用 CAGradientLayer 當 mask
關鍵技巧是:建立一個 CAGradientLayer,然後把 label 的 layer 設為它的 mask。這樣漸層只會顯示在文字像素的位置,看起來就像文字本身被漸層填滿。因為 mask 會自動隨文字內容變形,所以文字一改,漸層範圍也得跟著重算。
-(void)setupContentView {
    UIView *contentView = [[UIView alloc] initWithFrame:CGRectMake(0, 44, ScreenWidth, ScreenHight - 44 - 300)];
    [self.view addSubview:contentView];

    UITapGestureRecognizer *tapGesture = [[UITapGestureRecognizer alloc] initWithTarget:self action:@selector(tapGestureAction:)];
    [contentView addGestureRecognizer:tapGesture];

    self.topContentView = contentView;
    self.topContentView.backgroundColor = [UIColor clearColor];

    UILabel *label = [[UILabel alloc] init];
    label.numberOfLines = 0;
    label.text = @"ABC";
    label.frame = [self calculateContextLabelFrameWithTitle:@"ABC"];
    label.center = CGPointMake(contentView.bounds.size.width / 2, contentView.bounds.size.height / 2);
    label.font = [UIFont fontWithName:self.fontNameArray[0] size:25];
    label.textAlignment = NSTextAlignmentCenter;
    label.backgroundColor = [UIColor clearColor];
    [contentView addSubview:label];
    self.contentLabel = label;

    // 漸層層:水平方向由左至右
    self.gradientLayer = [CAGradientLayer layer];
    self.gradientLayer.frame = CGRectMake(label.frame.origin.x, label.frame.origin.y,
                                          label.frame.size.width, label.frame.size.height);
    self.gradientLayer.backgroundColor = [UIColor clearColor].CGColor;
    self.gradientLayer.startPoint = CGPointMake(0, 0.5);
    self.gradientLayer.endPoint   = CGPointMake(1, 0.5);
    self.gradientLayer.colors = self.grandentArr[0];
    [contentView.layer addSublayer:self.gradientLayer];

    // 關鍵:用 label 的 layer 作為漸層的遮罩
    self.gradientLayer.mask = self.contentLabel.layer;
    self.contentLabel.frame = self.gradientLayer.bounds;
}
文字改變時,重新計算漸層的 frame:
-(void)textFieldTextChange:(NSNotification *)notice {
    self.contentLabel.text = self.textField.text;
    [self reCalculateGradientLayerFrame];
}
下半部:字體與配色選擇區
-(void)setupBottomView {
    UIView *bottomView = [[UIView alloc] initWithFrame:CGRectMake(0, ScreenHight - 300, ScreenWidth, 300)];
    bottomView.backgroundColor = JGCOLOR(222, 222, 222);
    [self.view addSubview:bottomView];
    self.bottomContentView = bottomView;

    // 文字輸入框
    UIView *textContentView = [[UIView alloc] init];
    textContentView.frame = CGRectMake(0, 0, bottomView.bounds.size.width, 50);
    [bottomView addSubview:textContentView];
    textContentView.backgroundColor = JGCOLOR(55, 44, 16);

    UITextField *textField = [[UITextField alloc] init];
    textField.borderStyle = UITextBorderStyleRoundedRect;
    textField.frame = CGRectMake(10, 5, textContentView.bounds.size.width - 20,
                                 textContentView.bounds.size.height - 10);
    [textContentView addSubview:textField];
    self.textField = textField;

    // 4 × 4 的預覽格:4 種字體 × 4 種配色
    CGFloat orgY = 60, orgx = 10, space = 10;
    CGFloat width  = (ScreenWidth - orgx * 2 - 3 * space) / 4;
    CGFloat height = 35;

    for (int i = 0; i < 16; i++) {
        UIView *vw = [[UIView alloc] initWithFrame:CGRectMake(
            orgx + (i % 4) * width  + (i % 4) * space,
            orgY + (i / 4) * height + (i / 4) * space,
            width, height)];
        vw.backgroundColor = [UIColor clearColor];
        vw.tag = i + 1;
        [self.bottomContentView addSubview:vw];

        UITapGestureRecognizer *tapGesture = [[UITapGestureRecognizer alloc] initWithTarget:self action:@selector(viewTap:)];
        [vw addGestureRecognizer:tapGesture];

        UILabel *label = [[UILabel alloc] initWithFrame:vw.bounds];
        label.textAlignment = NSTextAlignmentCenter;
        label.text = @"ABC";
        label.font = [UIFont fontWithName:self.fontNameArray[i % 4] size:25];
        label.backgroundColor = [UIColor clearColor];
        [vw addSubview:label];

        CAGradientLayer *grandient = [CAGradientLayer layer];
        grandient.frame = CGRectMake(label.frame.origin.x, label.frame.origin.y,
                                     label.frame.size.width, label.frame.size.height);
        grandient.backgroundColor = [UIColor clearColor].CGColor;
        grandient.startPoint = CGPointMake(0, 0.5);
        grandient.endPoint   = CGPointMake(1, 0.5);
        grandient.colors = self.grandentArr[i / 4];
        [vw.layer addSublayer:grandient];
        grandient.mask = label.layer;
        label.frame = grandient.bounds;
    }
}
把畫面轉為圖片
-(void)getTitleImg {
    // 1. 先把整個容器渲染成 UIImage
    UIGraphicsBeginImageContext(self.topContentView.frame.size);
    CGContextRef context = UIGraphicsGetCurrentContext();

    if ([[UIDevice currentDevice].systemVersion floatValue] >= 7.0) {
        [self.topContentView drawViewHierarchyInRect:self.topContentView.frame afterScreenUpdates:YES];
    } else {
        [self.topContentView.layer renderInContext:context];
    }

    UIImage *img = UIGraphicsGetImageFromCurrentImageContext();
    UIGraphicsEndImageContext();

    // 2. 依漸層範圍裁切出文字區域(記得加上 44pt 的導航列偏移)
    CGImageRef newImgRef = CGImageCreateWithImageInRect(img.CGImage,
        CGRectMake(self.gradientLayer.frame.origin.x,
                   self.gradientLayer.frame.origin.y + 44,
                   self.gradientLayer.frame.size.width,
                   self.gradientLayer.frame.size.height));

    // 3. 依 Retina 解析度重新繪製,避免模糊
    UIGraphicsBeginImageContextWithOptions(self.gradientLayer.frame.size, NO, [UIScreen mainScreen].scale);
    context = UIGraphicsGetCurrentContext();
    CGContextTranslateCTM(context, 0, self.gradientLayer.frame.size.height);
    CGContextScaleCTM(context, 1, -1);     // 翻轉 Y 軸,讓圖片方向正確
    CGContextDrawImage(context, CGRectMake(0, 0, self.gradientLayer.frame.size.width,
                                           self.gradientLayer.frame.size.height), newImgRef);
    UIImage *newImg = UIGraphicsGetImageFromCurrentImageContext();
    UIGraphicsEndImageContext();

    // 4. 存入相簿
    ALAssetsLibrary *library = [[ALAssetsLibrary alloc] init];
    [library writeImageToSavedPhotosAlbum:newImg.CGImage
                                 metadata:nil
                          completionBlock:^(NSURL *assetURL, NSError *error) {
        if (error) { JGLog(@"寫入出錯"); }
    }];
}
幾個實作細節值得說明:
為什麼要翻轉 Y 軸?CGContextDrawImage 的座標系原點在左下,而 UIKit 在左上,若不翻轉,畫出來會上下顛倒。
為什麼要重新繪製而非直接用 CGImage?CGImageCreateWithImageInRect 產出的是以像素為單位、不帶 scale 資訊的圖,直接存到相簿在 Retina 螢幕上會看起來偏小。用 UIGraphicsBeginImageContextWithOptions 並帶入螢幕 scale 重畫一次,解析度才會正確。
關於 ALAssetsLibrary。這個 API 在 iOS 9 之後已被標記棄用,新專案請改用 Photos 框架的 PHPhotoLibrary,並在 Info.plist 補上 NSPhotoLibraryAddUsageDescription(僅「新增」相簿權限,比完整存取權更容易取得使用者同意)。
以上就是本文的全部內容,希望對大家的學習有所幫助。