UITableView 完整攻略:資料源、代理、重複利用與自訂 Cell
編輯:iOS 開發綜合
可以說,每個 iOS 工程裡都有 UITableView。它看似簡單,但真正把細節吃透的人並不多。本文從基本結構一路談到自訂 Cell 與效能機制,把它當成一份可反查的參考筆記。
一、基本認識
UITableView 有兩種預設風格:UITableViewStylePlain(不分組)與 UITableViewStyleGrouped(分組)。
它的資料模型只有「行」的概念,沒有「列」。每一行就是一個 UITableViewCell。系統預設提供四種 cell 樣式:
typedef NS_ENUM(NSInteger, UITableViewCellStyle) {
    UITableViewCellStyleDefault,   // 左側顯示 textLabel(不顯示 detailTextLabel),imageView 可選
    UITableViewCellStyleValue1,    // 左側 textLabel、右側 detailTextLabel(預設藍色),imageView 可選
    UITableViewCellStyleValue2,    // 左側依序顯示 textLabel(預設藍色)與 detailTextLabel,imageView 可選
    UITableViewCellStyleSubtitle   // 左上 textLabel、左下 detailTextLabel(預設灰色),imageView 可選
};
二、UITableViewDataSource:決定「顯示什麼」
資料源協議的唯一職責,就是回答 tableView 的提問:這裡該放什麼資料。
#pragma mark 常用資料源方法

#pragma mark 回傳分組數量
- (NSInteger)numberOfSectionsInTableView:(UITableView *)tableView

#pragma mark 回傳每一組的行數
- (NSInteger)tableView:(UITableView *)tableView numberOfRowsInSection:(NSInteger)section

#pragma mark 回傳每一行的 cell
- (UITableViewCell *)tableView:(UITableView *)tableView cellForRowAtIndexPath:(NSIndexPath *)indexPath

#pragma mark 回傳每一組的抬頭標題
- (NSString *)tableView:(UITableView *)tableView titleForHeaderInSection:(NSInteger)section

#pragma mark 回傳每一組的尾端說明
- (NSString *)tableView:(UITableView *)tableView titleForFooterInSection:(NSInteger)section
呼叫順序是固定的:先問分組數 → 再問每組行數 → 建立索引 → 最後逐行索取 cell。這裡有個關鍵點:cellForRowAtIndexPath: 只會為目前畫面上看得見的那些行產生 cell,這正是後面重複利用機效能成立的前提。
三、UITableViewDelegate:決定「怎麼顯示、怎麼響應」
#pragma mark 常用代理方法

#pragma mark 設定分組抬頭高度
- (CGFloat)tableView:(UITableView *)tableView heightForHeaderInSection:(NSInteger)section

#pragma mark 設定行高(每一行都可以不同)
- (CGFloat)tableView:(UITableView *)tableView heightForRowAtIndexPath:(NSIndexPath *)indexPath

#pragma mark 設定分組尾端高度
- (CGFloat)tableView:(UITableView *)tableView heightForFooterInSection:(NSInteger)section

#pragma mark 點擊了某一行
- (void)tableView:(UITableView *)tableView didSelectRowAtIndexPath:(NSIndexPath *)indexPath

#pragma mark 自訂分組抬頭視圖
- (UIView *)tableView:(UITableView *)tableView viewForHeaderInSection:(NSInteger)section;

#pragma mark 自訂分組尾端視圖
- (UIView *)tableView:(UITableView *)tableView viewForFooterInSection:(NSInteger)section;
四、刷新列表
資料變了,畫面不會自己更新,得由你告訴 tableView。可以整表刷新,也可以只動特定區域——後者效能更好,也更容易搭配動畫。
#pragma mark 刷新整個表格
- (void)reloadData;

#pragma mark 刷新指定的行
- (void)reloadRowsAtIndexPaths:(NSArray *)indexPaths withRowAnimation:(UITableViewRowAnimation)animation;

#pragma mark 刷新指定的分組
- (void)reloadSections:(NSIndexSet *)sections withRowAnimation:(UITableViewRowAnimation)animation;

#pragma mark 刪除後刷新指定的行
- (void)deleteRowsAtIndexPaths:(NSArray *)indexPaths withRowAnimation:(UITableViewRowAnimation)animation;

#pragma mark 新增後刷新指定的行
- (void)insertRowsAtIndexPaths:(NSArray *)indexPaths withRowAnimation:(UITableViewRowAnimation)animation;
五、Cell 重複利用機制
UITableView 內部有一個緩衝池,專門回收與複用 cell。它的運作前提是「所見即所得」:只有畫面上看得見的 cell 才真正存在物件實例。具體表現是:
- 需要顯示新的 cell 時,先從緩衝池撈一個回來重新配置;池子裡沒有,才真的建立新物件。
- 當某個 cell 滑出可見區域,就會被回收進緩衝池。
- 因此即使資料量高達上萬筆,記憶體中同時存在的 cell 數量仍然有限,記憶體壓力大幅下降。
#pragma mark 在 tableView:cellForRowAtIndexPath: 中使用重複利用機制

// 由於此方法呼叫頻繁,識別字宣告為靜態變數有助於效能
static NSString *cellIdentifier = @"UITableViewCellIdentifierKey1";

// 先嘗試從緩衝池取得
UITableViewCell *cell = [tableView dequeueReusableCellWithIdentifier:cellIdentifier];

// 池子裡沒有,才建立新的
if (!cell) {
    cell = [[UITableViewCell alloc] initWithStyle:UITableViewCellStyleValue1 reuseIdentifier:cellIdentifier];
}
六、系統預設的 Cell
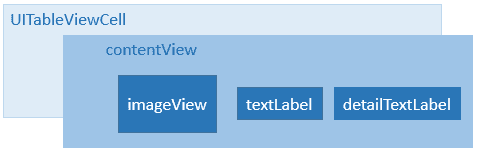
老實說,系統自帶的四種樣式彈性太低,實務上幾乎一定會走自訂路線。
七、自訂 Cell 的基本流程
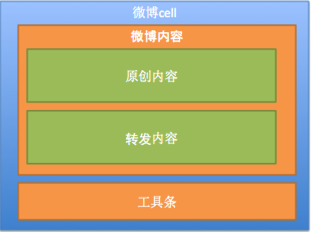
- 建立一個類別 XXXTableViewCell,繼承 UITableViewCell。
- 重寫
-(id)initWithStyle:reuseIdentifier:,在其中加入子控制項。 - 最好再重寫 layoutSubviews,統一安排子控制項的 frame。
- 回到
tableView:cellForRowAtIndexPath:,用重複利用機制取出這個自訂 cell,並完成資料配置。
八、順帶談談 MVC
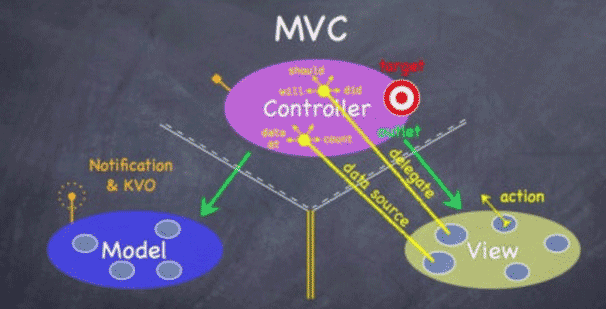
UITableView 是理解 MVC 最好的教材:Model 是資料,View 是 table 與 cell,Controller 則透過 dataSource 與 delegate 兩個協議把兩者黏起來。把資料讀取、格式化、網路請求這些工作往外挪,Controller 才不會膨脹成難以維護的巨物。