
iOS 視圖切換三板斧:TabBar、Navigation 與模態呈現
編輯:iOS 開發綜合
App 裡的畫面轉換,基本上跑不出這三種模式。它們解決的是同一個問題——「我要怎麼從這個畫面走到另一個畫面」——但邏輯與適用情境完全不同。分清楚它們,架構就不容易亂。
一、三種切換方式速覽
- UITabBarController(分頁控制器):平行管理各個功能分區。
- UINavigationController(導航控制器):以堆疊(push/pop)管理畫面的層級關係。
- 模態視窗(Modal):從螢幕下方彈出,暫時搶走使用者的完整注意力。
二、UITabBarController:頁籤式切換
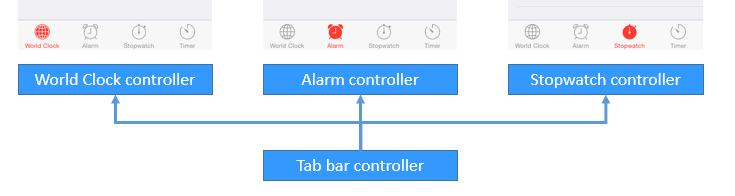
這個控制器的存在就是為了「點頁籤換畫面」。它內建一個 UITabBar 元件,使用者點擊上面的項目即可切換。值得注意的是,UITabBarController 本身不呈現任何內容,它是一個純粹的容器控制器。
為了降低耦合,每個子視圖的標題與圖示都由子視圖自己準備,也就是透過各自的 tabBarItem 來描述,控制器只負責排列與切換。
幾個容易踩到的細節
- UITabBarController 會一次初始化所有子控制器,但預設只會載入第一個控制器的視圖,其餘等到被切到才真正建立畫面。
- 每個視圖控制器都有
tabBarController屬性,可用來反查自己所在的 UITabBarController。 - 每個視圖控制器都有
tabBarItem屬性,用來控制頁籤上的顯示資訊。 tabBarItem的 image 必須是 png 格式並開啟 alpha 通道,否則無法正常顯示。- UITabBarController 通常就是整個 App 的 rootViewController,必須在 window 顯示之前建立完成。
建立步驟
- 建立一個 UITabBarController 物件。
- 為每個頁籤建立對應的 viewController。
- 透過 viewControllers 屬性把這些 viewController 一次加入。
- 把 UITabBarController 設為 window.rootViewController,然後讓 window 顯示出來。
// a. 初始化 tabBar 控制器
UITabBarController *tabBarVC = [[UITabBarController alloc] init];
self.window.rootViewController = tabBarVC;

// b. 建立各個子控制器
UIViewController *c1 = [[UIViewController alloc] init];
c1.view.backgroundColor = [UIColor greenColor];
c1.tabBarItem.title = @"消息";
c1.tabBarItem.image = [UIImage imageNamed:@"tab_recent_nor"];
c1.tabBarItem.badgeValue = @"123";

UIViewController *c2 = [[UIViewController alloc] init];
c2.view.backgroundColor = [UIColor brownColor];
c2.tabBarItem.title = @"聯繫人";
c2.tabBarItem.image = [UIImage imageNamed:@"tab_buddy_nor"];

UIViewController *c3 = [[UIViewController alloc] init];
c3.tabBarItem.title = @"動態";
c3.tabBarItem.image = [UIImage imageNamed:@"tab_qworld_nor"];

UIViewController *c4 = [[UIViewController alloc] init];
c4.tabBarItem.title = @"設置";
c4.tabBarItem.image = [UIImage imageNamed:@"tab_me_nor"];

// c. 一次加入所有子控制器
tabBarVC.viewControllers = @[c1, c2, c3, c4];

// d. 設為主視窗並顯示
[self.window makeKeyAndVisible];
UITabBarControllerDelegate
想要攔截「某一頁不允許被切換」,用這個代理方法:
#pragma mark 控制 TabBarItem 能不能被選中
- (BOOL)tabBarController:(UITabBarController *)tabBarController shouldSelectViewController:(UIViewController *)viewController;
若想主動切換目前顯示的畫面,有三種做法:改 selectedIndex、改 selectedViewController,或直接替換 viewControllers 陣列。
三、UINavigationController:堆疊式導航
- 子控制器以堆疊形式存放,只有堆疊頂端那一個會顯示在畫面上。
- 進入下一層用 push,返回上一層用 pop。
- 必須有一個根控制器作為堆疊起點。
- 子控制器可透過
navigationController屬性反查所屬的導航控制器。 - 導航列 navigationBar 由每個子控制器的
navigationItem各自控制。

UINavigationItem 在 MVC 裡屬於 Model,負責封裝要呈現在 navigationBar 上的資料:
title:標題文字titleView:自訂標題視圖leftBarButtonItem:左側按鈕rightBarButtonItem:右側按鈕
返回按鈕標題的優先順序
下一層畫面左上角的返回按鈕,文字取決於以下順序,找到就用:
- 上一層
backBarButtonItem的標題 - 上一層
navigationItem的標題 - 上一層視圖控制器的標題
常用方法
#pragma mark 壓棧:把控制器推入堆疊
- (void)pushViewController:(UIViewController *)viewController animated:(BOOL)animated;

#pragma mark 出棧:把堆疊頂端彈出
- (void)popViewControllerAnimated:(BOOL)animated;

#pragma mark 連續出棧,直到堆疊頂端是指定的控制器
- (void)popToViewController:(UIViewController *)viewController animated:(BOOL)animated;

#pragma mark 連續出棧,直到回到根控制器
- (void)popToRootViewControllerAnimated:(BOOL)animated;
四、模態視窗
需要一段獨立流程(例如登入、編輯、分享)時,模態呈現是最合適的選擇。它會從螢幕下方彈出,在關閉之前,背後的畫面無法操作。
#pragma mark 從下方彈出指定的視圖控制器,賦予模態
- (void)presentViewController:(UIViewController *)viewControllerToPresent animated:(BOOL)flag completion:(void (^)(void))completion;

#pragma mark 關閉模態視窗(在模態控制器中呼叫)
- (void)dismissViewControllerAnimated:(BOOL)flag completion:(void (^)(void))completion;
選用的判斷很簡單:同層功能並列用 TabBar,有父子層級關係用 Navigation,需要打斷當前流程用 Modal。混用才是混亂的來源。