
iOS 實現左右兩個 TableView 聯動
編輯:iOS 開發綜合
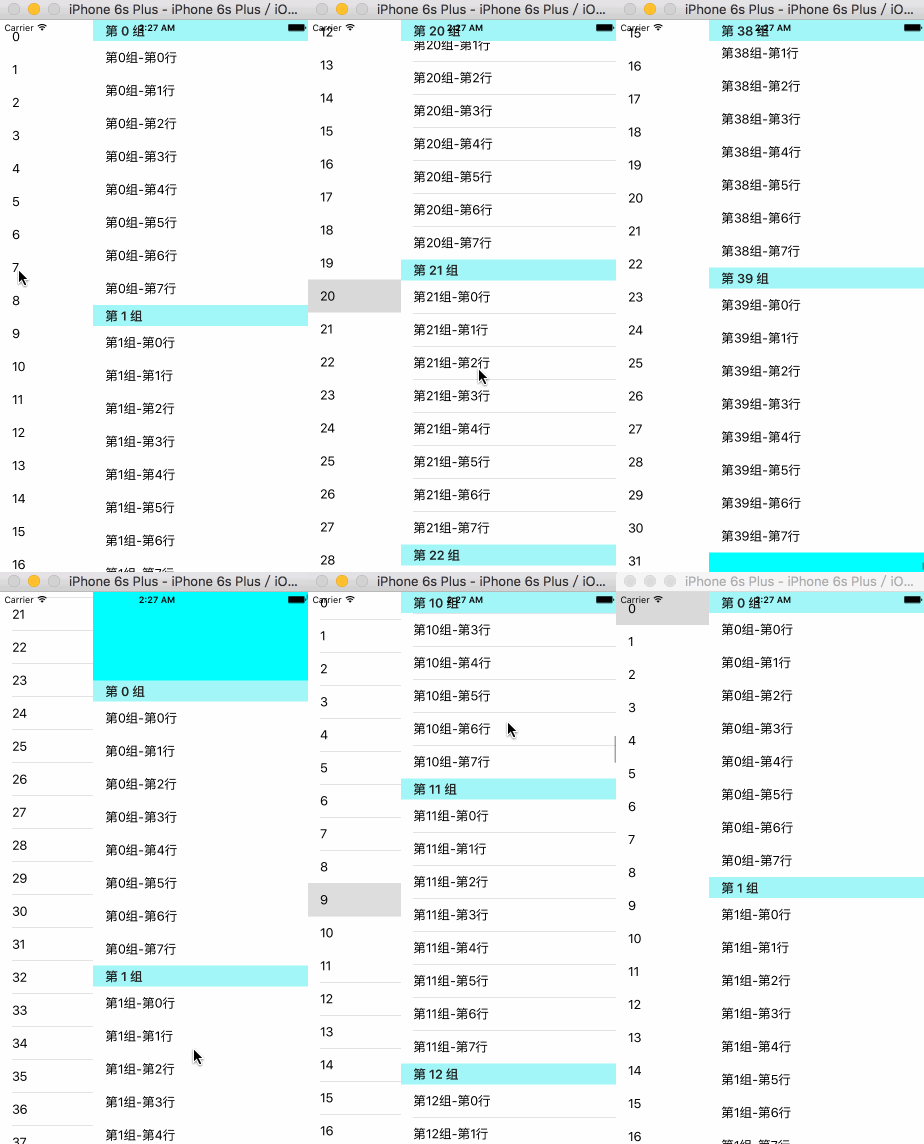
一、效果預覽
二、結構解析
左側是一個只有一欄的 tableView,每一列對應右側的一個 section;右側則是多 section 的詳細清單。兩個列表的聯動可以拆成兩個方向:
- 點擊左側 cell,右側滾到對應 section。
- 滑動右側,左側滾到對應列。
三、點擊左側 → 右側滾動
#pragma mark - 點擊 cell 的delegate 方法
- (void)tableView:(UITableView *)tableView didSelectRowAtIndexPath:(NSIndexPath *)indexPath {
    if (tableView == self.leftTableView) {
        // 左側第 indexPath.row 列,對應右側第 indexPath.row 個 section 的首列
        NSIndexPath *moveToIndexPath = [NSIndexPath indexPathForRow:0 inSection:indexPath.row];
        [self.rightTableView selectRowAtIndexPath:moveToIndexPath
                                        animated:YES
                                  scrollPosition:UITableViewScrollPositionTop];
        // 取消選中效果,避免看起來像被點擊過
        [self.rightTableView deselectRowAtIndexPath:moveToIndexPath animated:YES];
    }
}
四、滑動右側 → 左側滾動
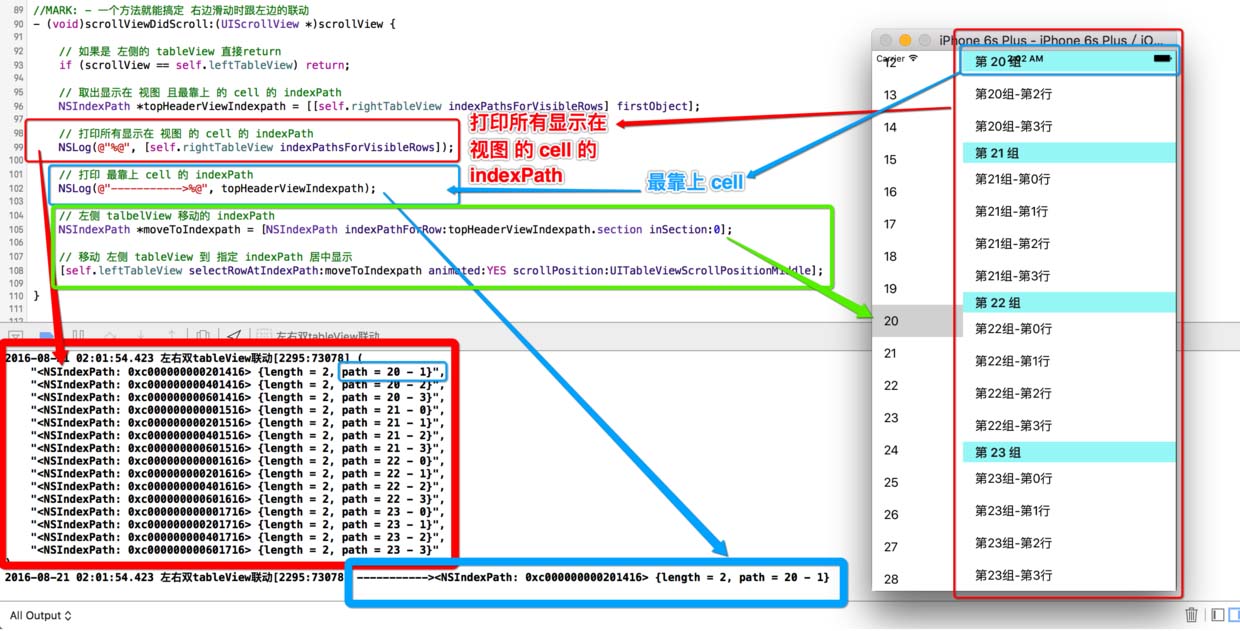
關鍵是 indexPathsForVisibleRows:它回傳目前畫面上所有可見 cell 的 indexPath,取它的 firstObject 就是最上方那一列,其 section 正是左側該對應的列號。
#pragma mark - 一個方法解決右側滑動時與左側的聯動
- (void)scrollViewDidScroll:(UIScrollView *)scrollView {
    // 左側滾動時直接返回,避免無限循環
    if (scrollView == self.leftTableView) return;

    // 取畫面上最靠上的可見 cell
    NSIndexPath *topHeaderViewIndexpath =
        [[self.rightTableView indexPathsForVisibleRows] firstObject];

    // 對應到左側的列
    NSIndexPath *moveToIndexpath =
        [NSIndexPath indexPathForRow:topHeaderViewIndexpath.section inSection:0];

    // 讓左側滾到該列並置中
    [self.leftTableView selectRowAtIndexPath:moveToIndexpath
                                   animated:YES
                             scrollPosition:UITableViewScrollPositionMiddle];
}
五、警告:不要用這兩個方法判斷
網路上常見有人用 willDisplayHeaderView 與 didEndDisplayingHeaderView 來追蹤 section 變化,實測準確度不足,聯動會出現偏移:
#pragma mark - UITableViewDelegate
//- (void)tableView:(UITableView *)tableView willDisplayHeaderView:(UIView *)view
//                                        forSection:(NSInteger)section {
//      headerView 即將顯示 —— 不準確
//}

//- (void)tableView:(UITableView *)tableView didEndDisplayingHeaderView:(UIView *)view
//                                        forSection:(NSInteger)section {
//      headerView 已經顯示 —— 不準確
//}
六、完整範例程式碼
//
//  ViewController.m
//  左右雙 tableView 聯動
//
#import "ViewController.h"

#define leftTableWidth  [UIScreen mainScreen].bounds.size.width * 0.3
#define rightTableWidth [UIScreen mainScreen].bounds.size.width * 0.7
#define ScreenWidth  [UIScreen mainScreen].bounds.size.width
#define ScreenHeight [UIScreen mainScreen].bounds.size.height

#define leftCellIdentifier  @"leftCellIdentifier"
#define rightCellIdentifier @"rightCellIdentifier"

@interface ViewController () <UITableViewDataSource, UITableViewDelegate>
@property (nonatomic, weak) UITableView *leftTableView;
@property (nonatomic, weak) UITableView *rightTableView;
@end

@implementation ViewController

- (void)viewDidLoad {
    [super viewDidLoad];
    [self.view addSubview:self.leftTableView];
    [self.view addSubview:self.rightTableView];
}

#pragma mark - 資料源
- (NSInteger)tableView:(UITableView *)tableView numberOfRowsInSection:(NSInteger)section {
    if (tableView == self.leftTableView) return 40;   // 左側 40 列
    return 8;                                          // 右側每個 section 8 列
}

- (NSInteger)numberOfSectionsInTableView:(UITableView *)tableView {
    if (tableView == self.leftTableView) return 1;
    return 40;                                         // 右側 40 個 section
}

- (UITableViewCell *)tableView:(UITableView *)tableView cellForRowAtIndexPath:(NSIndexPath *)indexPath {
    UITableViewCell *cell;
    if (tableView == self.leftTableView) {
        cell = [tableView dequeueReusableCellWithIdentifier:leftCellIdentifier forIndexPath:indexPath];
        cell.textLabel.text = [NSString stringWithFormat:@"%ld", indexPath.row];
    } else {
        cell = [tableView dequeueReusableCellWithIdentifier:rightCellIdentifier forIndexPath:indexPath];
        cell.textLabel.text = [NSString stringWithFormat:@"第%ld組-第%ld行",
                               indexPath.section, indexPath.row];
    }
    return cell;
}

- (NSString *)tableView:(UITableView *)tableView titleForHeaderInSection:(NSInteger)section {
    if (tableView == self.rightTableView)
        return [NSString stringWithFormat:@"第 %ld 組", section];
    return nil;
}

#pragma mark - delegate
// 一個方法搞定:右邊滑動時跟左邊的聯動
- (void)scrollViewDidScroll:(UIScrollView *)scrollView {
    if (scrollView == self.leftTableView) return;

    NSIndexPath *topHeaderViewIndexpath =
        [[self.rightTableView indexPathsForVisibleRows] firstObject];
    NSIndexPath *moveToIndexpath =
        [NSIndexPath indexPathForRow:topHeaderViewIndexpath.section inSection:0];

    [self.leftTableView selectRowAtIndexPath:moveToIndexpath
                                   animated:YES
                             scrollPosition:UITableViewScrollPositionMiddle];
}

// 點擊左側 cell,右側滾到對應位置
- (void)tableView:(UITableView *)tableView didSelectRowAtIndexPath:(NSIndexPath *)indexPath {
    if (tableView == self.leftTableView) {
        NSIndexPath *moveToIndexPath = [NSIndexPath indexPathForRow:0 inSection:indexPath.row];
        [self.rightTableView selectRowAtIndexPath:moveToIndexPath
                                        animated:YES
                                  scrollPosition:UITableViewScrollPositionTop];
        [self.rightTableView deselectRowAtIndexPath:moveToIndexPath animated:YES];
    }
}

#pragma mark - 懶加載
- (UITableView *)leftTableView {
    if (!_leftTableView) {
        UITableView *tableView = [[UITableView alloc]
            initWithFrame:CGRectMake(0, 0, leftTableWidth, ScreenHeight)];
        [self.view addSubview:tableView];
        _leftTableView = tableView;
        tableView.dataSource = self;
        tableView.delegate = self;
        [tableView registerClass:[UITableViewCell class]
          forCellReuseIdentifier:leftCellIdentifier];
        tableView.backgroundColor = [UIColor redColor];
        tableView.tableFooterView = [[UIView alloc] init];
    }
    return _leftTableView;
}

- (UITableView *)rightTableView {
    if (!_rightTableView) {
        UITableView *tableView = [[UITableView alloc]
            initWithFrame:CGRectMake(leftTableWidth, 0, rightTableWidth, ScreenHeight)];
        [self.view addSubview:tableView];
        _rightTableView = tableView;
        tableView.dataSource = self;
        tableView.delegate = self;
        [tableView registerClass:[UITableViewCell class]
          forCellReuseIdentifier:rightCellIdentifier];
        tableView.backgroundColor = [UIColor cyanColor];
        tableView.tableFooterView = [[UIView alloc] init];
    }
    return _rightTableView;
}
@end
七、兩個實務提醒
- 記得清空 footer。設定
tableFooterView為空 view,可以消除 iOS 上多餘的空白分隔線,這在分區列表中特別明顯。 - 避免 selectRow 造成的高度跳動。在 scrollViewDidScroll 中頻繁呼叫 selectRow 可能導致左側滾動不順,若需要更平順的體驗,可改用
scrollToRowAtIndexPath:atScrollPosition:animated:並把 animated 設為 NO,或直接操作 contentOffset。
八、總結
左右聯動的本質是「用一個列表的 section 去對應另一個列表的 row」,實作上僅需兩個 delegate 方法即可。這種版式在分類選單、商品詳情頁中相當常見,值得動手做一遍。若有疑問歡迎留言交流。
- 上一篇文章: iOS 實現圓形圖片的兩種方法對比
- 下一篇文章: iOS 收起虛擬鍵盤的三種實用做法