
仿知乎/途家風格:導航欄漸變與標題文字動畫實作
編輯:iOS 開發綜合
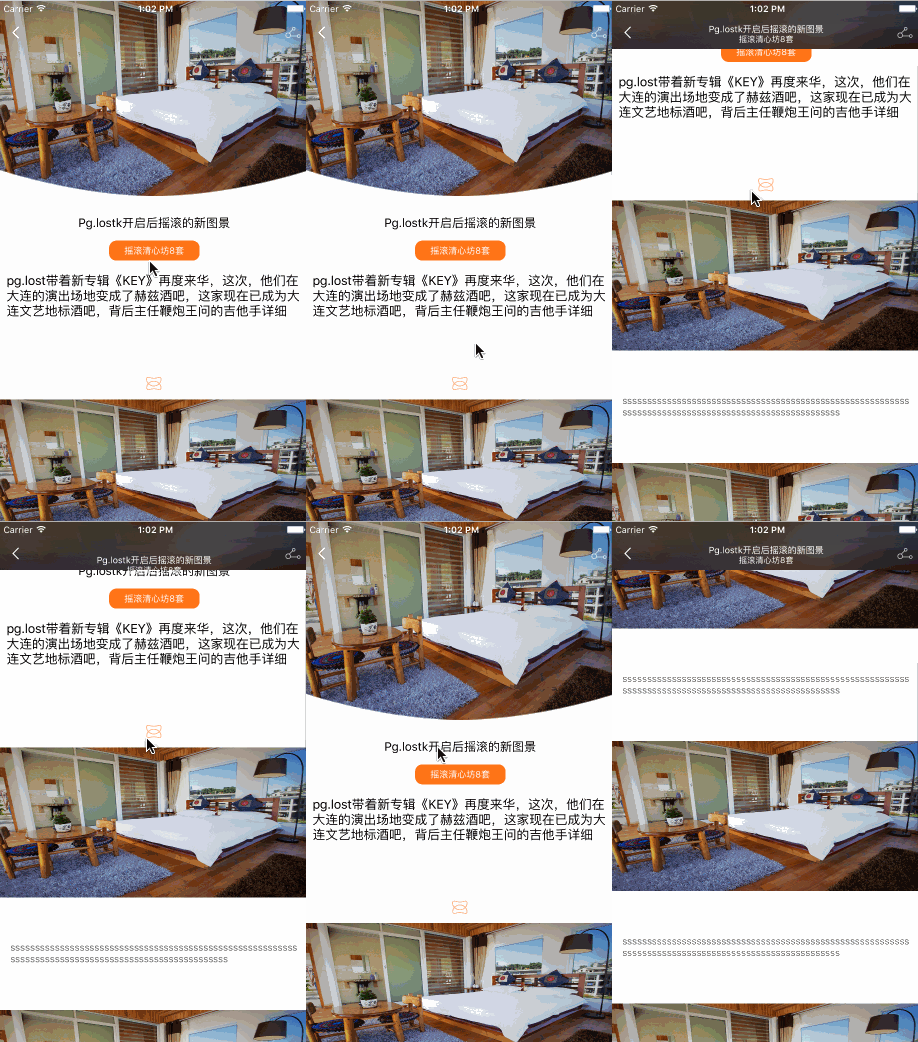
效果拆解
先把要做的行為拆清楚,再決定實作方式:
- 導航欄初始隱藏,隨著 scrollView 滾動而漸變浮現。
- 導航欄左右兩側的 navigationItem 從頭到尾都是顯示的。
- 導航欄參考途家的做法,加上毛玻璃效果,底圖是一張圖片。
- 頂部圖片支援下拉放大。
- 標題文字有進場動畫。
用系統原生的 UINavigationBar 同時滿足以上五點會相當綁手,因此更實際的做法是自製一個假的導航欄。
一、下拉放大頂部圖片
做法是讓一張 UIImageView 獨立於 tableView 之下,並在 scrollViewDidScroll 中依位移量即時更新它的高度約束。
 // 導航欄高度
#define kNavBarH 64.0f
// 頂部圖片高度
#define kHeardH 260

- (void)viewDidLoad {
    [super viewDidLoad];
    [self.view addSubview:self.scaleImageView];
    [_scaleImageView mas_makeConstraints:^(MASConstraintMaker *make) {
        make.top.mas_equalTo(0);
        make.left.equalTo(self.view.mas_left);
        make.right.equalTo(self.view.mas_right);
        make.height.mas_equalTo(kHeardH);
    }];
}

// tableView 懶加載;contentInset 讓內容避開頂圖
-(UITableView *)tableView {
    if (_tableView == nil) {
        _tableView = [[UITableView alloc] initWithFrame:self.view.bounds style:UITableViewStylePlain];
        _tableView.contentInset = UIEdgeInsetsMake(kHeardH-35, 0, 0, 0);
        _tableView.delegate = self;
        _tableView.dataSource = self;
        _tableView.separatorStyle = UITableViewCellSeparatorStyleNone;
    }
    return _tableView;
}

// 頂圖懶加載
- (UIImageView *)scaleImageView {
    if (!_scaleImageView) {
        _scaleImageView = [[UIImageView alloc] init];
        _scaleImageView.contentMode = UIViewContentModeScaleAspectFill;
        _scaleImageView.clipsToBounds = YES;
        _scaleImageView.image = [UIImage imageNamed:@"666"];
    }
    return _scaleImageView;
}

#pragma mark - UIScrollViewDelegate
- (void)scrollViewDidScroll:(UIScrollView *)scrollView {
    CGFloat offsetY = scrollView.contentOffset.y;
    CGFloat delta = offsetY - _lastOffsetY;

    CGFloat height = kHeardH - delta;
    if (height < kNavBarH) { height = kNavBarH; }   // 最小不低於導航欄

    [_scaleImageView mas_updateConstraints:^(MASConstraintMaker *make) {
        make.height.mas_equalTo(height);
    }];
}
這裡的關鍵是約束的累加關係:因為每次只更新高度而不重設 top,位移自然會被疊加上去,圖片就有「越拉越長」的手感。記得在每次滾動結束時把 _lastOffsetY 更新為當前值,否則 delta 會失準。
二、左右側按鈕常駐
直接把兩個 UIButton 加在 controller 的 view 上即可。要注意加入順序:必須在假導航欄之後加入,否則會被蓋住。
 - (void)viewDidLoad {
    [super viewDidLoad];
    [self configNavigationBar];
}

- (void)configNavigationBar {
    // 左:返回
    UIButton *backBtn = [[UIButton alloc] init];
    backBtn.frame = CGRectMake(0, 20, 44, 44);
    [backBtn setImage:[UIImage imageNamed:@"special_back"] forState:UIControlStateNormal];
    [backBtn addTarget:self action:@selector(back) forControlEvents:UIControlEventTouchUpInside];

    // 右:分享
    UIButton *shartBtn = [[UIButton alloc] init];
    shartBtn.frame = CGRectMake(SCREENWIDTH-44, 20, 44, 44);
    [shartBtn setImage:[UIImage imageNamed:@"special_share"] forState:UIControlStateNormal];
    [shartBtn addTarget:self action:@selector(shareBtnClick) forControlEvents:UIControlEventTouchUpInside];

    [self.view addSubview:backBtn];
    [self.view addSubview:shartBtn];
}

- (void)back {
    [self.navigationController popViewControllerAnimated:YES];
}
三、假導航欄、毛玻璃與文字動畫
 // 隱藏系統導航欄
- (void)viewWillAppear:(BOOL)animated {
    [super viewWillAppear:animated];
    self.navigationController.navigationBar.hidden = YES;
}

- (void)viewDidLoad {
    [super viewDidLoad];
    self.navigationController.navigationBar.hidden = YES;
    self.lastOffsetY = -kHeardH+35;

    [self.view addSubview:self.tableView];
    self.tableView.backgroundColor = [UIColor clearColor];

    [self.view addSubview:self.navigationView];
    self.navigationController.navigationBar.barStyle = UIBarStyleBlack;
}

// 假導航欄,初始 alpha 為 0
-(UIView *)navigationView {
    if (_navigationView == nil) {
        _navigationView = [[UIView alloc] init];
        _navigationView.frame = CGRectMake(0, 0, SCREENWIDTH, kNavBarH);
        _navigationView.backgroundColor = [UIColor clearColor];
        _navigationView.alpha = 0.0;
        [self setNavigationSubView];
    }
    return _navigationView;
}

// 毛玻璃 API 為 iOS 8 之後提供,更低的版本需另尋方案
-(void)setNavigationSubView {
    // 底圖
    UIImageView *bgImgView = [[UIImageView alloc] initWithFrame:_navigationView.bounds];
    bgImgView.image = [UIImage imageNamed:@"666"];
    [_navigationView addSubview:bgImgView];

    /*
     * 可選的模糊樣式:
     * UIBlurEffectStyleExtraLight / Light / Dark
     */
    UIBlurEffect *blurEffect = [UIBlurEffect effectWithStyle:UIBlurEffectStyleDark];
    UIVisualEffectView *effectView = [[UIVisualEffectView alloc] initWithEffect:blurEffect];
    effectView.frame = bgImgView.bounds;
    [bgImgView addSubview:effectView];
    effectView.alpha = 0.9f;   // 模糊強度

    // 中央文字容器,尺寸依內容動態計算
    UIView *centerTextView = [[UIView alloc] init];
    self.centerTextView = centerTextView;

    NSString *title = @"Pg.lostk開啟後搖滾的新圖景";
    NSString *desc  = @"搖滾清心坊8套";
    CGSize titleSize = [title sizeWithAttributes:@{NSFontAttributeName:[UIFont systemFontOfSize:12]}];
    CGSize descSize  = [desc  sizeWithAttributes:@{NSFontAttributeName:[UIFont systemFontOfSize:11]}];

    CGFloat centerTextViewW = titleSize.width > descSize.width ? titleSize.width : descSize.width;
    CGFloat centerTextViewH = titleSize.height + descSize.height + 10;
    CGFloat centerTextViewX = (SCREENWIDTH - centerTextViewW) / 2;
    centerTextView.frame = CGRectMake(centerTextViewX, 64, centerTextViewW, centerTextViewH);

    UILabel *titleLabel = [[UILabel alloc] init];
    titleLabel.text = title;
    titleLabel.font = [UIFont systemFontOfSize:12];
    titleLabel.textColor = [UIColor whiteColor];
    titleLabel.frame = CGRectMake(0, 5, centerTextViewW, titleSize.height);

    UILabel *descLabel = [[UILabel alloc] init];
    descLabel.textAlignment = NSTextAlignmentCenter;
    descLabel.text = desc;
    descLabel.font = [UIFont systemFontOfSize:11];
    descLabel.textColor = [UIColor whiteColor];
    descLabel.frame = CGRectMake(0, titleSize.height + 5, centerTextViewW, descSize.height);

    [centerTextView addSubview:titleLabel];
    [centerTextView addSubview:descLabel];
    [_navigationView addSubview:centerTextView];
}

// 相關屬性宣告
@property (nonatomic, strong) UIView *navigationView;    // 假導航欄
@property (nonatomic, strong) UIView *centerTextView;    // 標題文字容器
@property (assign, nonatomic) CGFloat lastOffsetY;       // 上一次的偏移量
@property (nonatomic, strong) UIImageView *scaleImageView; // 頂部圖片
核心:把動畫寫進 scrollViewDidScroll
漸變與文字位移全部由滾動比例驅動,這樣做的好處是動畫完全跟手,不像 animateWithDuration 那樣與手勢脫節。
 #pragma mark - ScrollViewDelegate
- (void)scrollViewDidScroll:(UIScrollView *)scrollView {
    CGFloat offsetY = scrollView.contentOffset.y;
    CGFloat delta = offsetY - _lastOffsetY;

    // 頂圖高度:同步更新
    CGFloat height = kHeardH - delta;
    if (height < kNavBarH) { height = kNavBarH; }

    // 文字進場:分三段處理
    CGFloat margin = 205;
    if (delta > margin && delta < margin+39) {
        self.centerTextView.y = 64 - (delta - margin);
        self.centerTextView.alpha = 1.0;
    }
    if (delta > margin+39) {
        self.centerTextView.y = 25;
        self.centerTextView.alpha = 1.0;
    }
    if (delta <= margin) {
        self.centerTextView.alpha = 0;
    }
    if (delta <= 0) {
        self.centerTextView.y = 64;
        self.centerTextView.alpha = 0.0;
    }

    [_scaleImageView mas_updateConstraints:^(MASConstraintMaker *make) {
        make.height.mas_equalTo(height);
    }];

    // 導航欄透明度:滾動比例決定,並夾在 0~1 之間
    CGFloat alpha = delta / (kHeardH - kNavBarH);
    if (alpha >= 1.0) { alpha = 1.0; }
    self.navigationView.alpha = alpha;
}
總結
這類效果看起來複雜,拆開來其實就是三件事:頂圖高度隨位移線性變化、導航欄透明度按比例插值、文字在一段特定區間內做位移與淡入。掌握了「以 delta 作為唯一驅動源」這個思路,後續要改成淡出、要加縮放、要換成視差,都只是換算式而已。
- 上一篇文章: iOS 讀取 txt 檔中文變亂碼:原因與解法
- 下一篇文章: Mac 上攔截 App Store 安裝包:取得 .pkg 檔的正確時機