
仿支付寶信用分儀表盤動畫:光點沿弧線跑一遭
編輯:iOS 開發綜合
先看成果:
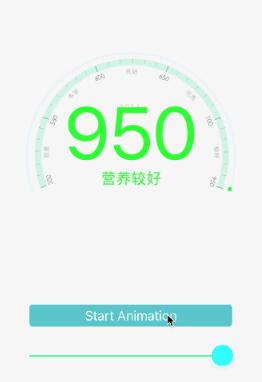
這個動畫拆開來是三件事:
1. 圓環上綠色光點沿著弧線旋轉。
2. 分數數字與提示語隨之變化。
3. 背景色跟著分數段位改變。
一、儀表盤主體 ZLDashboardView
頭檔對外只給一張背景圖與一個「從某數字跳到某數字」的方法,跳動過程中透過 TimerBlock 把目前所在的百分比段位回報出去,讓外部決定要不要換背景色。
/**
 * 依躍動數字回報百分比
 * 現在的跳動數字 → 背景顏色變化
 */
#import <UIKit/UIKit.h>

@interface ZLDashboardView : UIView

@property (nonatomic, strong) UIImage *bgImage;
@property (nonatomic, copy) void (^TimerBlock)(NSInteger);

/** 躍動數字刷新 */
- (void)refreshJumpNOFromNO:(NSString *)startNO toNO:(NSString *)toNO;

@end
實作檔。
#import "ZLDashboardView.h"
#import "UIView+Extensions.h"

#define degreesToRadians(x) (M_PI * (x) / 180.0)   // 角度轉弧度

static const CGFloat kMarkerRadius   = 5.f;    // 光點半徑
static const CGFloat kTimerInterval  = 0.03;
static const CGFloat kFastProportion = 0.9;
static const NSInteger MaxNumber     = 1000;

@interface ZLDashboardView ()
{
    CGFloat animationTime;
    NSInteger beginNO;
    NSInteger jumpCurrentNO;
    NSInteger endNO;
}

@property (nonatomic, assign) CGFloat percent;                 // 0 - 100,依躍動數字設定
@property (nonatomic, strong) CAShapeLayer *bottomLayer;       // 進度條底色
@property (nonatomic, assign) CGFloat lineWidth;               // 弧線寬度
@property (nonatomic, strong) UIImageView *markerImageView;    // 光點
@property (nonatomic, strong) UIImageView *bgImageView;        // 背景圖
@property (nonatomic, assign) CGFloat circelRadius;            // 圓直徑
@property (nonatomic, assign) CGFloat startAngle;              // 起始角
@property (nonatomic, assign) CGFloat endAngle;                // 結束角
@property (nonatomic, strong) UILabel *showLable;              // 跳躍數字
@property (nonatomic, strong) UILabel *markedLabel;            // 提示語
@property (nonatomic, strong) NSTimer *fastTimer;
@property (nonatomic, strong) NSTimer *slowTimer;
@property (nonatomic, assign) NSInteger intervalNum;
@end

@implementation ZLDashboardView

#pragma mark - Life cycle

- (instancetype)initWithFrame:(CGRect)frame {
    self = [super initWithFrame:frame];
    if (self) {
        self.backgroundColor = [UIColor clearColor];
        self.circelRadius = self.frame.size.width - 10.f;
        self.lineWidth    = 2.f;
        self.startAngle   = -200.f;
        self.endAngle     = 20.f;

        // 尺寸需依圖片調整
        self.bgImageView.frame = CGRectMake(6, 6, self.circelRadius, self.circelRadius * 2 / 3);
        self.bgImageView.backgroundColor = [UIColor clearColor];
        [self addSubview:self.bgImageView];

        [self setupCircleBg];       // 圓框
        [self setupMarkerImageView];// 光點
        [self setupJumpNOView];     // 跳躍數字與提示語
    }
    return self;
}

- (void)setupCircleBg {
    UIBezierPath *path = [UIBezierPath bezierPathWithArcCenter:CGPointMake(self.width / 2, self.height / 2)
                                                       radius:(self.circelRadius - self.lineWidth) / 2
                                                   startAngle:degreesToRadians(self.startAngle)
                                                     endAngle:degreesToRadians(self.endAngle)
                                                    clockwise:YES];
    // 底色
    self.bottomLayer = [CAShapeLayer layer];
    self.bottomLayer.frame = self.bounds;
    self.bottomLayer.fillColor = [[UIColor clearColor] CGColor];
    self.bottomLayer.strokeColor = [[UIColor colorWithRed:206.f / 256.f
                                                    green:241.f / 256.f
                                                     blue:227.f / 256.f
                                                    alpha:1.f] CGColor];
    self.bottomLayer.opacity = 0.5;
    self.bottomLayer.lineCap = kCALineCapRound;
    self.bottomLayer.lineWidth = self.lineWidth;
    self.bottomLayer.path = [path CGPath];
    [self.layer addSublayer:self.bottomLayer];

    // 整個弧度的角度總和是 |-200| + 20 = 220
    // [self createAnimationWithStartAngle:degreesToRadians(self.startAngle)
    //                            endAngle:degreesToRadians(self.startAngle + 220 * 1)];
}

- (void)setupMarkerImageView {
    if (_markerImageView) {
        return;
    }
    _markerImageView = [[UIImageView alloc] init];
    _markerImageView.backgroundColor = [UIColor clearColor];
    _markerImageView.layer.backgroundColor = [UIColor greenColor].CGColor;
    _markerImageView.layer.shadowColor  = [UIColor whiteColor].CGColor;
    _markerImageView.layer.shadowOffset = CGSizeMake(0, 0);
    _markerImageView.layer.shadowRadius = kMarkerRadius * 0.5;
    _markerImageView.layer.shadowOpacity = 1;
    _markerImageView.layer.masksToBounds = NO;
    self.markerImageView.layer.cornerRadius = self.markerImageView.frame.size.height / 2;
    [self addSubview:self.markerImageView];
    _markerImageView.frame = CGRectMake(-100, self.height, kMarkerRadius, kMarkerRadius);
}

- (void)setupJumpNOView {
    if (_showLable) {
        return;
    }
    CGFloat width  = self.circelRadius / 2 + 50;
    CGFloat height = self.circelRadius / 2 - 50;
    CGFloat xPixel = self.bgImageView.left + (self.bgImageView.width - width) * 0.5;
    CGFloat yPixel = self.circelRadius / 4;

    _showLable = [[UILabel alloc] initWithFrame:CGRectMake(xPixel, yPixel, width, height)];
    _showLable.backgroundColor = [UIColor clearColor];
    _showLable.textColor = [UIColor greenColor];
    _showLable.textAlignment = NSTextAlignmentCenter;
    _showLable.font = [UIFont systemFontOfSize:100.f];
    _showLable.text = [NSString stringWithFormat:@"%ld", jumpCurrentNO];
    [self addSubview:_showLable];

    // 提示語
    _markedLabel = [[UILabel alloc] initWithFrame:CGRectMake(xPixel, CGRectGetMaxY(_showLable.frame), width, 30)];
    _markedLabel.backgroundColor = [UIColor clearColor];
    _markedLabel.textColor = [UIColor greenColor];
    _markedLabel.textAlignment = NSTextAlignmentCenter;
    _markedLabel.font = [UIFont systemFontOfSize:20.f];
    _markedLabel.text = @"營養良好";
    [self addSubview:_markedLabel];
}

#pragma mark - Animation

- (void)createAnimationWithStartAngle:(CGFloat)startAngle endAngle:(CGFloat)endAngle {
    // 啟動定時器
    [_fastTimer setFireDate:[NSDate distantPast]];

    CAKeyframeAnimation *pathAnimation = [CAKeyframeAnimation animationWithKeyPath:@"position"];
    pathAnimation.calculationMode = kCAAnimationPaced;
    pathAnimation.fillMode = kCAFillModeForwards;
    pathAnimation.removedOnCompletion = NO;
    pathAnimation.duration = _percent * kTimerInterval;
    pathAnimation.timingFunction = [CAMediaTimingFunction functionWithName:kCAMediaTimingFunctionEaseOut];
    pathAnimation.repeatCount = 1;

    // 讓光點沿著弧線跑
    CGMutablePathRef path = CGPathCreateMutable();
    CGPathAddArc(path, NULL, self.width / 2, self.height / 2,
                 (self.circelRadius - kMarkerRadius / 2) / 2, startAngle, endAngle, 0);
    pathAnimation.path = path;
    CGPathRelease(path);

    [self.markerImageView.layer addAnimation:pathAnimation forKey:@"moveMarker"];
}

#pragma mark - Setters / Getters

/** 開始動畫,確定百分比 */
- (void)refreshJumpNOFromNO:(NSString *)startNO toNO:(NSString *)toNO {
    beginNO = 0;
    jumpCurrentNO = 0;
    endNO = [toNO integerValue];
    _percent = endNO * 100 / MaxNumber;

    NSInteger diffNum = endNO - beginNO;
    if (diffNum <= 0) {
        return;
    }
    // 依差距大小決定每次跳幾點
    if (diffNum < 100) {
        _intervalNum = 5;
    } else if (diffNum < 300) {
        _intervalNum = 15;
    } else if (diffNum <= MaxNumber) {
        _intervalNum = 10;
    }
    NSLog(@"數字間隔:%ld", _intervalNum);

    [self setupJumpThings];   // 數字

    // 依數字區間換算光點要走到的角度
    NSInteger angle = 0;
    NSInteger num = [toNO floatValue] - [startNO floatValue];
    if (num < 200) {
        angle = self.startAngle + 220 * (num / 200.0) / 5.0;
    } else if (num < 350) {
        angle = self.startAngle + 220 / 5.0 + (3 / 5.0 * 220) * (num - 200) / 150.0;
    } else {
        angle = self.startAngle + 220 / 5.0 * 4 + (220 / 5.0) * (num - 350) / 250.0;
    }

    [self createAnimationWithStartAngle:degreesToRadians(self.startAngle)
                              endAngle:degreesToRadians(angle)];
}

- (void)setBgImage:(UIImage *)bgImage {
    _bgImage = bgImage;
    self.bgImageView.image = bgImage;
}

- (UIImageView *)bgImageView {
    if (nil == _bgImageView) {
        _bgImageView = [[UIImageView alloc] init];
    }
    return _bgImageView;
}

#pragma mark - 躍動數字

- (void)setupJumpThings {
    animationTime = _percent * kTimerInterval;

    // 先快後慢,模擬儀表盤慣性
    self.fastTimer = [NSTimer timerWithTimeInterval:kTimerInterval * kFastProportion
                                            target:self
                                          selector:@selector(fastTimerAction)
                                          userInfo:nil
                                           repeats:YES];
    [[NSRunLoop currentRunLoop] addTimer:_fastTimer forMode:NSRunLoopCommonModes];

    // 快階段結束的數字
    NSInteger fastEndNO = endNO * kFastProportion;
    NSInteger fastJump = fastEndNO / _intervalNum;
    if (fastJump % _intervalNum) {
        fastJump++;
        fastEndNO += _intervalNum;
    }
    CGFloat fastTTime = fastJump * kTimerInterval * kFastProportion;

    // 剩餘要跳的次數與慢階段間隔
    NSInteger changNO = endNO - fastEndNO;
    NSInteger endJump = changNO / _intervalNum + changNO % _intervalNum;
    NSTimeInterval slowInterval = (animationTime - fastTTime) / endJump;

    self.slowTimer = [NSTimer timerWithTimeInterval:slowInterval
                                            target:self
                                          selector:@selector(slowTimerAction)
                                          userInfo:nil
                                           repeats:YES];
    [[NSRunLoop currentRunLoop] addTimer:_slowTimer forMode:NSRunLoopCommonModes];

    [_fastTimer setFireDate:[NSDate distantFuture]];
    [_slowTimer setFireDate:[NSDate distantFuture]];
}

#pragma mark 加速計時器

- (void)fastTimerAction {
    if (jumpCurrentNO >= endNO) {
        [_fastTimer invalidate];
        return;
    }
    if (jumpCurrentNO >= endNO * kFastProportion) {
        [_fastTimer invalidate];
        [_slowTimer setFireDate:[NSDate distantPast]];
        return;
    }
    [self commonTimerAction];
}

#pragma mark 減速計時器

- (void)slowTimerAction {
    if (jumpCurrentNO >= endNO) {
        [_slowTimer invalidate];
        return;
    }
    [self commonTimerAction];
}

#pragma mark 兩個計時器的共同處理:數字、顏色與提示語

- (void)commonTimerAction {
    // 每跨過百位就回報一次,讓外部換背景色
    if (jumpCurrentNO % 100 == 0 && jumpCurrentNO != 0) {
        NSInteger colorIndex = jumpCurrentNO / 100;
        dispatch_async(dispatch_get_main_queue(), ^{
            if (self.TimerBlock) {
                self.TimerBlock(colorIndex);
            }
        });
    }

    // 尾段放慢,讓停格更自然
    NSInteger changeValueBy = endNO - jumpCurrentNO;
    if (changeValueBy / 10 < 1) {
        jumpCurrentNO++;
    } else {
        jumpCurrentNO += _intervalNum;
    }
    _showLable.text = [NSString stringWithFormat:@"%ld", jumpCurrentNO];

    if (jumpCurrentNO < 350) {
        _markedLabel.text = @"營養太差";
    } else if (jumpCurrentNO <= 550) {
        _markedLabel.text = @"營養較差";
    } else if (jumpCurrentNO <= 600) {
        _markedLabel.text = @"營養中等";
    } else if (jumpCurrentNO <= 650) {
        _markedLabel.text = @"營養良好";
    } else if (jumpCurrentNO <= 700) {
        _markedLabel.text = @"營養優秀";
    } else if (jumpCurrentNO <= 950) {
        _markedLabel.text = @"營養較好";
    }
}

@end
二、在控制器裡使用
#import "ViewController.h"
#import "ZLDashboardView.h"
#import "ZLGradientView.h"
#import "UIView+Extensions.h"

#define SCREEN_WIDTH  ([[UIScreen mainScreen] bounds].size.width)
#define SCREEN_HEIGHT ([[UIScreen mainScreen] bounds].size.height)
#define MinNumber 350
#define MaxNumber 950

@interface ViewController ()
@property (nonatomic, strong) ZLDashboardView *dashboardView;
@property (nonatomic, strong) ZLGradientView  *gradientView;
@property (nonatomic, strong) UIButton        *clickBtn;
@property (nonatomic, strong) UISlider        *slider;
@end

@implementation ViewController

- (void)viewDidLoad {
    [super viewDidLoad];
    [self setupGradientView];   // 背景漸層
    [self setupCircleView];     // 儀表盤
    [self addActionButton];     // 觸發動畫的按鈕
    [self addSlideChnageValue]; // 用滑桿改分數
}

- (void)addActionButton {
    UIButton *stareButton = [UIButton buttonWithType:UIButtonTypeCustom];
    stareButton.frame = CGRectMake(10.f, self.dashboardView.bottom + 50.f, SCREEN_WIDTH - 20.f, 38.f);
    [stareButton addTarget:self action:@selector(onStareButtonClick:) forControlEvents:UIControlEventTouchUpInside];
    [stareButton setTitle:@"Start Animation" forState:UIControlStateNormal];
    [stareButton setBackgroundColor:[UIColor lightGrayColor]];
    stareButton.layer.masksToBounds = YES;
    stareButton.layer.cornerRadius = 4.f;
    [self.view addSubview:stareButton];
    _clickBtn = stareButton;
}

- (void)addSlideChnageValue {
    CGFloat width  = 280;
    CGFloat height = 40;
    CGFloat xPixel = (SCREEN_WIDTH - width) * 0.5;
    CGFloat yPixel = CGRectGetMaxY(_clickBtn.frame) + 20;

    UISlider *slider = [[UISlider alloc] initWithFrame:CGRectMake(xPixel, yPixel, width, height)];
    slider.minimumValue = MinNumber;
    slider.maximumValue = MaxNumber;
    slider.minimumTrackTintColor = [UIColor colorWithRed:0.000 green:1.000 blue:0.502 alpha:1.000];
    slider.maximumTrackTintColor = [UIColor colorWithWhite:0.800 alpha:1.000];

    /**
     * 注意:若沒有設定 thumb 圖片,這個屬性只會改變已滑過那段的線條顏色,不影響滑塊;
     * 若設定了 thumb 圖片又設這個屬性,圖片不會顯示,改由 tintColor 決定顏色(iOS 7)。
     */
    [slider setThumbImage:[UIImage imageNamed:@""] forState:UIControlStateNormal];
    slider.thumbTintColor = [UIColor cyanColor];
    [slider setValue:0.5 animated:YES];
    [slider addTarget:self action:@selector(slideTap:) forControlEvents:UIControlEventValueChanged];
    [self.view addSubview:slider];
    _slider = slider;
}

- (void)slideTap:(UISlider *)sender {
    NSLog(@"%.f", sender.value);
}

- (void)setupGradientView {
    self.gradientView = [[ZLGradientView alloc] initWithFrame:self.view.bounds];
    [self.view addSubview:self.gradientView];
}

- (void)setupCircleView {
    self.dashboardView = [[ZLDashboardView alloc] initWithFrame:
                          CGRectMake(40.f, 70.f, SCREEN_WIDTH - 80.f, SCREEN_WIDTH - 80.f)];
    self.dashboardView.bgImage = [UIImage imageNamed:@"backgroundImage"];
    [self.view addSubview:self.dashboardView];
}

- (void)onStareButtonClick:(UIButton *)sender {
    if (sender.selected) {
        // 重來一次:清掉舊的儀表盤再重建
        [self.gradientView removeFromSuperview];
        self.gradientView = nil;
        [self.dashboardView removeFromSuperview];
        self.dashboardView = nil;
        [self setupGradientView];
        [self setupCircleView];
        [self.view bringSubviewToFront:self.clickBtn];
        [self.view bringSubviewToFront:_slider];
    }
    sender.selected = YES;

    NSString *startNO = [NSString stringWithFormat:@"%d", MinNumber];
    NSString *toNO    = [NSString stringWithFormat:@"%.f", _slider.value];
    NSLog(@"endNO:%@", toNO);
    [self.dashboardView refreshJumpNOFromNO:startNO toNO:toNO];

    // 每跨一個百位就換一次背景色
    __block typeof(self) blockSelf = self;
    self.dashboardView.TimerBlock = ^(NSInteger index) {
        [blockSelf.gradientView setUpBackGroundColorWithColorArrayIndex:index];
    };
}

@end
幾個設計上的取捨
用兩個 NSTimer 分「快段」與「慢段」,比單一 timer 硬套 easing 更好控制:前 90% 的數值快速衝刺,剩下的一成慢慢收尾,尾段每跨一點還會再放慢一次,停下來的手感就自然多了。光點則完全交給 CAKeyframeAnimation 沿 CGPath 跑,不必手動算座標。
另外提醒兩點:NSTimer 會強引用 target,在正式專案裡建議改用 CADisplayLink 或加上 invalidate 的時機;把數字與提示語的對應表抽成資料驅動,之後要改文案就不必動邏輯。
以上就是這個儀表盤動畫的完整實作。