
iOS App 引導頁開發教程(含封裝與開源方案)
編輯:iOS 開發綜合
功能思路
方式一:判斷 App 是否首次啟動,若是則把 GuidePageViewController 設為視窗的根視圖控制器。該控制器包含三個子控制項:一個 UIScrollView、一個 UIPageControl、一個預設隱藏的 UIButton。UIScrollView 內放多個 UIImageView 作為分頁內容,滑到最後一頁時顯示按鈕,點擊「立即體驗」後把根視圖控制器換成 UITabBarController。
方式二:直接把根視圖控制器設為 UITabBarController,然後在第一個導航控制器的視圖上覆蓋一層引導頁視圖,點擊「立即體驗」時把該視圖隱藏即可。
基礎實作
@implementation AppDelegate

- (BOOL)application:(UIApplication *)application
didFinishLaunchingWithOptions:(NSDictionary *)launchOptions {
    // 首次啟動時進入引導頁(此處暫未判斷,可透過 NSUserDefaults 實作)
    self.window.rootViewController = [[GuidePageViewController alloc] init];
    return YES;
}

@end
引導頁視圖控制器:
#import "GuidePageViewController.h"
#import "ViewController.h"

#define kScreenWidth  ([UIScreen mainScreen].bounds.size.width)
#define kScreenHeight ([UIScreen mainScreen].bounds.size.height)
#define kGuidePageCount 4

@interface GuidePageViewController () <UIScrollViewDelegate>
@property (weak, nonatomic) UIPageControl *pageControl;
@property (weak, nonatomic) UIButton *startAppButton;
@end

@implementation GuidePageViewController

- (void)viewDidLoad {
    [super viewDidLoad];

    // UIScrollView 承載所有引導頁
    UIScrollView *guidePageScrollView = [[UIScrollView alloc] initWithFrame:CGRectMake(0, 0, kScreenWidth, kScreenHeight)];
    guidePageScrollView.contentSize = CGSizeMake(kScreenWidth * kGuidePageCount, 0);
    guidePageScrollView.showsHorizontalScrollIndicator = NO;
    guidePageScrollView.pagingEnabled = YES;
    guidePageScrollView.bounces = NO;
    guidePageScrollView.delegate = self;

    for (int i = 0; i < kGuidePageCount; i++) {
        UIImageView *guideImageView = [[UIImageView alloc] initWithFrame:CGRectMake(kScreenWidth * i, 0, kScreenWidth, kScreenHeight)];
        guideImageView.image = [UIImage imageNamed:[NSString stringWithFormat:@"guide-page-%d", i + 1]];
        [guidePageScrollView addSubview:guideImageView];
    }
    [self.view addSubview:guidePageScrollView];

    // 分頁指示器
    UIPageControl *pageControl = [[UIPageControl alloc] initWithFrame:CGRectMake((kScreenWidth - 100) / 2, kScreenHeight - 50, 100, 30)];
    pageControl.numberOfPages = kGuidePageCount;
    pageControl.currentPage = 0;
    pageControl.currentPageIndicatorTintColor = [UIColor greenColor];
    [self.view addSubview:pageControl];
    self.pageControl = pageControl;

    // 立即體驗按鈕,預設隱藏
    UIButton *startAppButton = [UIButton buttonWithType:UIButtonTypeCustom];
    startAppButton.frame = CGRectMake((kScreenWidth - 100) / 2, 550, 100, 40);
    [startAppButton setTitle:@"立即體驗" forState:UIControlStateNormal];
    startAppButton.backgroundColor = [UIColor grayColor];
    [startAppButton addTarget:self action:@selector(startAppAction) forControlEvents:UIControlEventTouchUpInside];
    startAppButton.hidden = YES;
    [self.view addSubview:startAppButton];
    _startAppButton = startAppButton;
}

- (void)scrollViewDidScroll:(UIScrollView *)scrollView {
    NSInteger currentPage = scrollView.contentOffset.x / kScreenWidth;
    self.pageControl.currentPage = currentPage;
    if (currentPage == (kGuidePageCount - 1)) {
        self.startAppButton.hidden = NO;
    }
}

- (void)startAppAction {
    // 根視圖控制器一般是 UITabBarController,此處從簡
    [UIApplication sharedApplication].keyWindow.rootViewController = [[ViewController alloc] init];
}

@end
上面這版有個明顯問題:圖片名稱與根視圖控制器都是寫死的,換到別的專案就得改代碼。要達到「一行都不用改就能複用」,應該把這兩項抽成初始化參數。
封裝版本
呼叫方式變成:
@implementation AppDelegate

- (BOOL)application:(UIApplication *)application
didFinishLaunchingWithOptions:(NSDictionary *)launchOptions {
    ViewController *viewController = [[ViewController alloc] init];
    self.window.rootViewController = [[GuidePageViewController alloc]
        initWithImages:@[@"guide-page-1", @"guide-page-2", @"guide-page-3", @"guide-page-4"]
      rootViewController:viewController];
    return YES;
}

@end
#import <UIKit/UIKit.h>

@interface GuidePageViewController : UIViewController
- (instancetype)initWithImages:(NSArray *)images rootViewController:(UIViewController *)rootViewController;
@end
在初始化方法中把圖片陣列與根視圖控制器保存下來,後續用 self.images.count 取得頁數、直接從陣列取圖:
#import "GuidePageViewController.h"
#import "ViewController.h"

#define kScreenWidth  ([UIScreen mainScreen].bounds.size.width)
#define kScreenHeight ([UIScreen mainScreen].bounds.size.height)

@interface GuidePageViewController () <UIScrollViewDelegate>
@property (weak, nonatomic) UIPageControl *pageControl;
@property (weak, nonatomic) UIButton *startAppButton;
@property (strong, nonatomic) NSArray *images;
@property (strong, nonatomic) UIViewController *rootViewController;
@end

@implementation GuidePageViewController

- (instancetype)initWithImages:(NSArray *)images rootViewController:(UIViewController *)rootViewController {
    if (self = [super init]) {
        _images = images;
        _rootViewController = rootViewController;
    }
    return self;
}

- (void)viewDidLoad {
    [super viewDidLoad];

    UIScrollView *guidePageScrollView = [[UIScrollView alloc] initWithFrame:CGRectMake(0, 0, kScreenWidth, kScreenHeight)];
    guidePageScrollView.contentSize = CGSizeMake(kScreenWidth * self.images.count, 0);
    guidePageScrollView.showsHorizontalScrollIndicator = NO;
    guidePageScrollView.pagingEnabled = YES;
    guidePageScrollView.bounces = NO;
    guidePageScrollView.delegate = self;

    for (int i = 0; i < self.images.count; i++) {
        UIImageView *guideImageView = [[UIImageView alloc] initWithFrame:CGRectMake(kScreenWidth * i, 0, kScreenWidth, kScreenHeight)];
        guideImageView.image = [UIImage imageNamed:self.images[i]];
        [guidePageScrollView addSubview:guideImageView];
    }
    [self.view addSubview:guidePageScrollView];

    UIPageControl *pageControl = [[UIPageControl alloc] initWithFrame:CGRectMake((kScreenWidth - 100) / 2, kScreenHeight - 50, 100, 30)];
    pageControl.numberOfPages = self.images.count;
    pageControl.currentPage = 0;
    pageControl.currentPageIndicatorTintColor = [UIColor greenColor];
    [self.view addSubview:pageControl];
    self.pageControl = pageControl;

    UIButton *startAppButton = [UIButton buttonWithType:UIButtonTypeCustom];
    startAppButton.frame = CGRectMake((kScreenWidth - 100) / 2, 550, 100, 40);
    [startAppButton setTitle:@"立即體驗" forState:UIControlStateNormal];
    startAppButton.backgroundColor = [UIColor grayColor];
    [startAppButton addTarget:self action:@selector(startAppAction) forControlEvents:UIControlEventTouchUpInside];
    startAppButton.hidden = YES;
    [self.view addSubview:startAppButton];
    _startAppButton = startAppButton;
}

- (void)scrollViewDidScroll:(UIScrollView *)scrollView {
    NSInteger currentPage = scrollView.contentOffset.x / kScreenWidth;
    self.pageControl.currentPage = currentPage;
    if (currentPage == (self.images.count - 1)) {
        self.startAppButton.hidden = NO;
    }
}

- (void)startAppAction {
    [UIApplication sharedApplication].keyWindow.rootViewController = self.rootViewController;
}

@end
終極方案:直接用開源庫
如果不想自己維護,GitHub 上的 EAIntroView 這類開源庫基本能滿足需求,流程只有三步:建立所有引導頁 EAIntroPage、建立引導頁視圖 EAIntroView 並設定代理、顯示引導頁視圖。
建立引導頁:
// basic:標題與描述
EAIntroPage *page1 = [EAIntroPage page];
page1.title = @"Hello world";
page1.desc = sampleDescription1;

// custom:自訂字型、位置與圖示
EAIntroPage *page2 = [EAIntroPage page];
page2.title = @"This is page 2";
page2.titleFont = [UIFont fontWithName:@"Georgia-BoldItalic" size:20];
page2.titlePositionY = 220;
page2.desc = sampleDescription2;
page2.descFont = [UIFont fontWithName:@"Georgia-Italic" size:18];
page2.descPositionY = 200;
page2.titleIconView = [[UIImageView alloc] initWithImage:[UIImage imageNamed:@"title2"]];
page2.titleIconPositionY = 100;

// 從 nib 載入自訂視圖
EAIntroPage *page3 = [EAIntroPage pageWithCustomViewFromNibNamed:@"IntroPage"];
page3.bgImage = [UIImage imageNamed:@"bg2"];
建立視圖並設定代理:
EAIntroView *intro = [[EAIntroView alloc] initWithFrame:self.view.bounds
                                               andPages:@[page1, page2, page3, page4]];
intro.delegate = self;
顯示:
[intro showInView:self.view animateDuration:0.0];
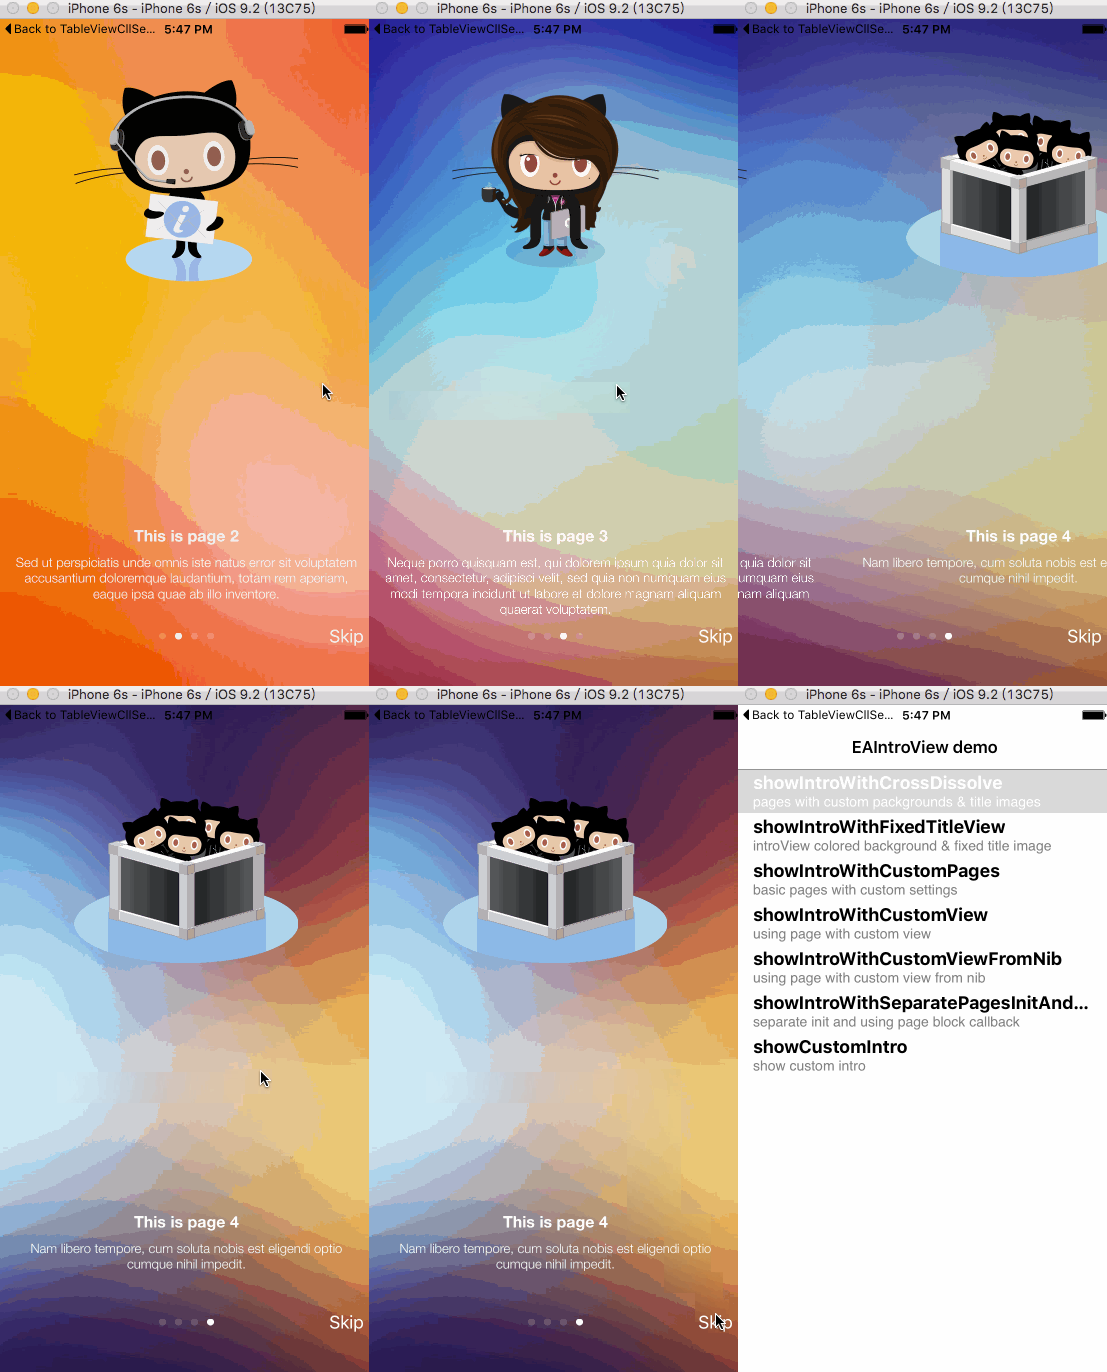
三種方式各有適用範圍:自己實作適合頁數固定、樣式簡單的情況;封裝版更易複用;而對互動效果、動畫細節有要求時,直接引入成熟開源庫會省下更多時間。
- 上一篇文章: 一步一步實現 iOS 主題皮膚切換
- 下一篇文章: 自定義日曆控制項的實作過程(UICollectionView 版)