
一步一步實現 iOS 主題皮膚切換
本文以實例方式分享 iOS 主題皮膚切換的完整實作,供需要這類功能的專案參考。
1. 功能說明
主題切換的核心是:依使用者選擇的主題,動態替換介面元素。通常需要變換的內容包括 navigationBar 背景圖、tabBar 背景圖、tabBar 各分頁的圖示與選中態圖示、navigationItem.title 的字型顏色,以及其他自訂控制項的外觀。
原始碼下載:https://xiazai.jb51.net/201609/yuanma/ThemeSkinSetup(jb51.net).rar
2. 目錄結構與效果預覽
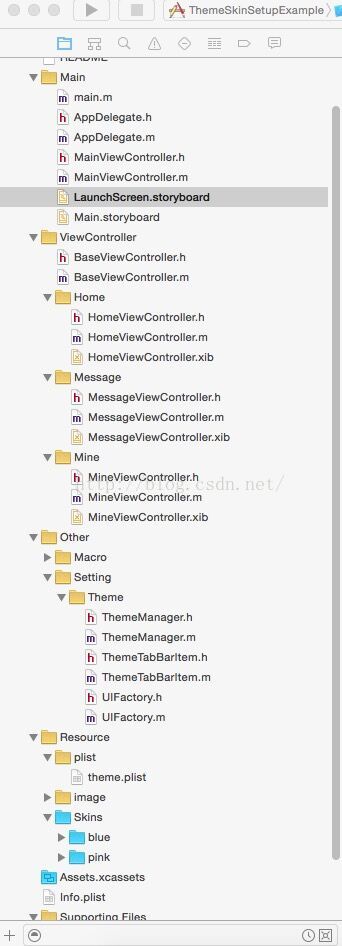
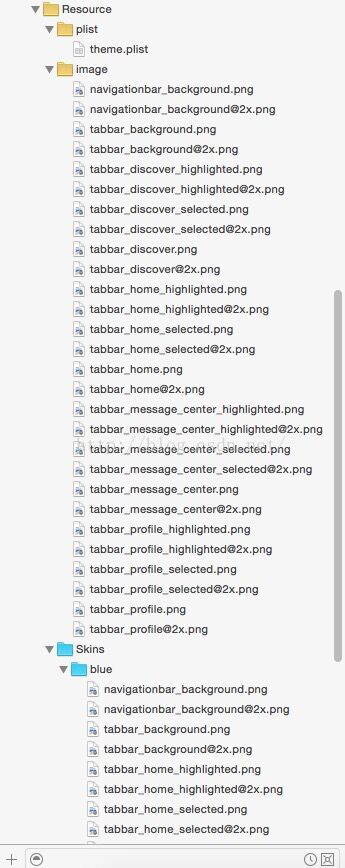

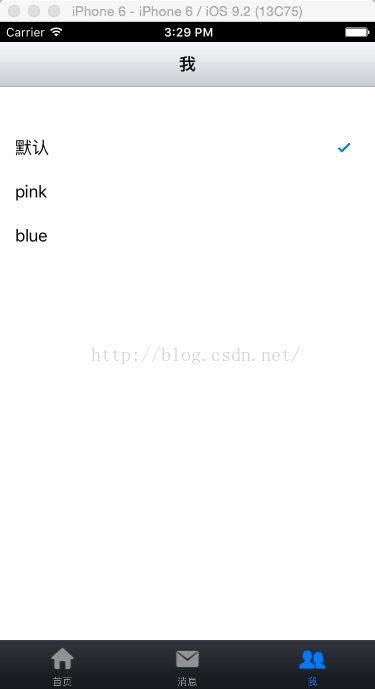
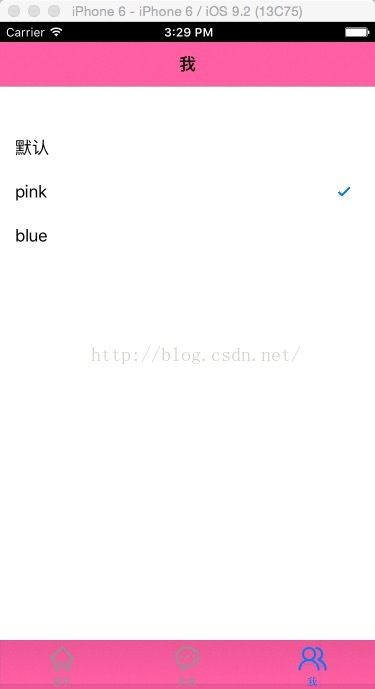
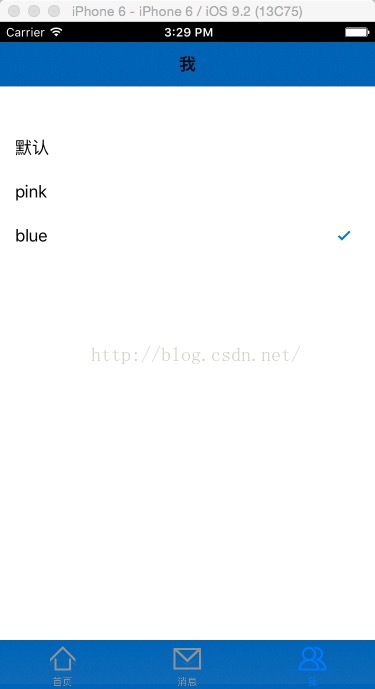
3. 實作步驟總覽
1. 把 image 資料夾與 Skins 拖進專案資源目錄
2. 建立 BaseViewController
3. 設定 theme.plist
4. 搭建專案基本框架,實作主題列表的 tableView
5. 建立主題管理器 ThemeManager
6. 自定義 ThemeTabBarItem 控制項
7. 建立 UI 工廠 UIFactory
8. 實作 tableView 的 didSelect 事件完成切換
9. 記錄使用者選擇,下次啟動時還原
步驟一:建立 BaseViewController
#import <UIKit/UIKit.h>

@interface BaseViewController : UIViewController
- (void)reloadThemeImage;
@end
#import "BaseViewController.h"
#import "ThemeManager.h"
#import "NotificationMacro.h"

@interface BaseViewController ()
@end

@implementation BaseViewController

- (id)init {
    if (self == [super init]) {
        [[NSNotificationCenter defaultCenter] addObserver:self
                                                selector:@selector(themeChangedNotfication:)
                                                    name:kThemeChangedNotification
                                                  object:nil];
    }
    [self reloadThemeImage];
    return self;
}

- (void)viewDidLoad {
    [super viewDidLoad];
    [self reloadThemeImage];
}

- (void)themeChangedNotfication:(NSNotification *)notification {
    [self reloadThemeImage];
}

// 主題變更後重新載入共用圖片資源
- (void)reloadThemeImage {
    ThemeManager *themeManager = [ThemeManager sharedThemeManager];

    UIImage *navigationBackgroundImage = [themeManager themeImageWithName:@"navigationbar_background.png"];
    [self.navigationController.navigationBar setBackgroundImage:navigationBackgroundImage
                                                 forBarMetrics:UIBarMetricsDefault];

    UIImage *tabBarBackgroundImage = [themeManager themeImageWithName:@"tabbar_background.png"];
    [self.tabBarController.tabBar setBackgroundImage:tabBarBackgroundImage];
}

@end
步驟二:實作 AppDelegate
#import "AppDelegate.h"
#import "MainViewController.h"
#import "ThemeManager.h"
#import "NotificationMacro.h"

@interface AppDelegate ()
@end

@implementation AppDelegate

- (BOOL)application:(UIApplication *)application
didFinishLaunchingWithOptions:(NSDictionary *)launchOptions {
    [self initUserDefaultConfig];
    MainViewController *rootViewController = [[MainViewController alloc] init];
    self.window.rootViewController = rootViewController;
    return YES;
}

// 啟動時還原上次選擇的主題
- (void)initUserDefaultConfig {
    NSString *themeName = [[NSUserDefaults standardUserDefaults] objectForKey:kThemeNameKey];
    ThemeManager *themeManager = [ThemeManager sharedThemeManager];
    themeManager.themeName = themeName;
}

@end
#import "MainViewController.h"
#import "HomeViewController.h"
#import "MessageViewController.h"
#import "MineViewController.h"
#import "UIFactory.h"

@interface MainViewController ()
@end

@implementation MainViewController

- (id)init {
    if (self = [super init]) {
        [self initTabBarUI];
    }
    return self;
}

- (void)initTabBarUI {
    // 主頁
    HomeViewController *homeViewController = [[HomeViewController alloc] init];
    UINavigationController *homeNavigationController =
        [[UINavigationController alloc] initWithRootViewController:homeViewController];
    UITabBarItem *homeTabBarItem = [UIFactory createTabBarItemWithTitle:@"主頁"
                                                              imageName:@"tabbar_home"
                                                         selectedImage:@"tabbar_home_selected"];
    homeNavigationController.tabBarItem = homeTabBarItem;

    // 訊息
    MessageViewController *messageViewController = [[MessageViewController alloc] init];
    UINavigationController *messageNavigationController =
        [[UINavigationController alloc] initWithRootViewController:messageViewController];
    UITabBarItem *messageTabBarItem = [UIFactory createTabBarItemWithTitle:@"消息"
                                                                 imageName:@"tabbar_message_center"
                                                            selectedImage:@"tabbar_message_center_selected"];
    messageNavigationController.tabBarItem = messageTabBarItem;

    // 我
    MineViewController *mineViewController = [[MineViewController alloc] init];
    UINavigationController *mineNavigationController =
        [[UINavigationController alloc] initWithRootViewController:mineViewController];
    UITabBarItem *mineTabBarItem = [UIFactory createTabBarItemWithTitle:@"我"
                                                              imageName:@"tabbar_profile"
                                                         selectedImage:@"tabbar_profile_selected"];
    mineNavigationController.tabBarItem = mineTabBarItem;

    self.viewControllers = @[homeNavigationController,
                             messageNavigationController,
                             mineNavigationController];
}

@end
步驟三:建立主題管理器 ThemeManager
這是整套方案的樞紐:它讀取 theme.plist 取得主題與目錄的對應關係,並依當前主題名稱拼出資源路徑。
#import <Foundation/Foundation.h>
#import <UIKit/UIKit.h>

@interface ThemeManager : NSObject

@property (nonatomic, copy) NSString *themeName;              // 主題名稱
@property (nonatomic, retain) NSDictionary *themePlistDict;   // 主題屬性列表

+ (ThemeManager *)sharedThemeManager;
- (UIImage *)themeImageWithName:(NSString *)imageName;

@end
#import "ThemeManager.h"
#import "NotificationMacro.h"

static ThemeManager *sharedThemeManager;

@implementation ThemeManager

- (id)init {
    if (self = [super init]) {
        NSString *themePath = [[NSBundle mainBundle] pathForResource:@"theme" ofType:@"plist"];
        self.themePlistDict = [NSDictionary dictionaryWithContentsOfFile:themePath];
        self.themeName = nil;
    }
    return self;
}

+ (ThemeManager *)sharedThemeManager {
    @synchronized(self) {
        if (nil == sharedThemeManager) {
            sharedThemeManager = [[ThemeManager alloc] init];
        }
    }
    return sharedThemeManager;
}

// 覆寫 themeName 的 setter
- (void)setThemeName:(NSString *)themeName {
    _themeName = themeName;
}

- (UIImage *)themeImageWithName:(NSString *)imageName {
    if (imageName == nil) { return nil; }
    NSString *themePath = [self themePath];
    NSString *themeImagePath = [themePath stringByAppendingPathComponent:imageName];
    return [UIImage imageWithContentsOfFile:themeImagePath];
}

// 回傳當前主題的資源路徑
- (NSString *)themePath {
    NSString *resourcePath = [[NSBundle mainBundle] resourcePath];
    if (self.themeName == nil || [self.themeName isEqualToString:@""]) {
        return resourcePath;
    }
    NSString *themeSubPath = [self.themePlistDict objectForKey:self.themeName];   // Skins/blue
    return [resourcePath stringByAppendingPathComponent:themeSubPath];
}

@end
步驟四:自定義主題按鈕 ThemeTabBarItem
#import <UIKit/UIKit.h>

@interface ThemeTabBarItem : UITabBarItem
@property (nonatomic, copy) NSString *imageName;
@property (nonatomic, copy) NSString *selectedImageName;
- (id)initWithTitle:(NSString *)title
          imageName:(NSString *)imageName
      selectedImage:(NSString *)selectedImageName;
@end
#import "ThemeTabBarItem.h"
#import "ThemeManager.h"
#import "NotificationMacro.h"

@implementation ThemeTabBarItem

// 初始化時註冊觀察者
- (id)init {
    if (self = [super init]) {
        [[NSNotificationCenter defaultCenter] addObserver:self
                                                selector:@selector(themeChangedNotification:)
                                                    name:kThemeChangedNotification
                                                  object:nil];
    }
    return self;
}

- (id)initWithTitle:(NSString *)title
          imageName:(NSString *)imageName
      selectedImage:(NSString *)selectedImageName {
    if (self = [self init]) {
        self.title = title;
        // 賦值時會觸發 setter,進而呼叫 reloadThemeImage
        self.imageName = imageName;
        self.selectedImageName = selectedImageName;
    }
    return self;
}

#pragma mark - 覆寫 Setter
- (void)setImageName:(NSString *)imageName {
    if (_imageName != imageName) {
        _imageName = imageName;
    }
    [self reloadThemeImage];
}

- (void)setSelectedImageName:(NSString *)selectedImageName {
    if (_selectedImageName != selectedImageName) {
        _selectedImageName = selectedImageName;
    }
    [self reloadThemeImage];
}

// 主題改變後重新載入圖片
- (void)themeChangedNotification:(NSNotification *)notification {
    [self reloadThemeImage];
}

- (void)reloadThemeImage {
    ThemeManager *themeManager = [ThemeManager sharedThemeManager];
    if (self.imageName != nil) {
        [self setImage:[themeManager themeImageWithName:self.imageName]];
    }
    if (self.selectedImageName != nil) {
        [self setSelectedImage:[themeManager themeImageWithName:self.selectedImageName]];
    }
}

- (void)dealloc {
    [[NSNotificationCenter defaultCenter] removeObserver:self];
}

@end
步驟五:建立 UI 工廠
#import <Foundation/Foundation.h>
#import <UIKit/UIKit.h>

@interface UIFactory : NSObject
+ (UITabBarItem *)createTabBarItemWithTitle:(NSString *)title
                                   imageName:(NSString *)imageName
                               selectedImage:(NSString *)selectedImageName;
@end
#import "UIFactory.h"
#import "ThemeTabBarItem.h"

@implementation UIFactory

+ (UITabBarItem *)createTabBarItemWithTitle:(NSString *)title
                                   imageName:(NSString *)imageName
                               selectedImage:(NSString *)selectedImageName {
    return [[ThemeTabBarItem alloc] initWithTitle:title
                                        imageName:imageName
                                    selectedImage:selectedImageName];
}

@end
步驟六:實作主題列表的選擇事件
#import "BaseViewController.h"

@interface MineViewController : BaseViewController <UITableViewDelegate, UITableViewDataSource>
@property (weak, nonatomic) IBOutlet UITableView *tableView;
@property (nonatomic, retain) NSMutableArray *themeDataSource;
@end
#import "MineViewController.h"
#import "ThemeManager.h"
#import "NotificationMacro.h"

@interface MineViewController ()
@end

@implementation MineViewController

- (void)viewDidLoad {
    [super viewDidLoad];
    self.title = @"我";
    ThemeManager *themeManager = [ThemeManager sharedThemeManager];
    _themeDataSource = [NSMutableArray arrayWithArray:themeManager.themePlistDict.allKeys];
}

#pragma mark - UITableViewDataSource
- (NSInteger)tableView:(UITableView *)tableView numberOfRowsInSection:(NSInteger)section {
    return self.themeDataSource.count;
}

- (UITableViewCell *)tableView:(UITableView *)tableView cellForRowAtIndexPath:(NSIndexPath *)indexPath {
    static NSString *Identifier = @"Cell";
    UITableViewCell *cell = [tableView dequeueReusableCellWithIdentifier:Identifier];
    if (cell == nil) {
        cell = [[UITableViewCell alloc] initWithStyle:UITableViewCellStyleDefault
                                     reuseIdentifier:Identifier];
    }
    NSString *text = self.themeDataSource[indexPath.row];
    cell.textLabel.text = text;

    ThemeManager *themeManager = [ThemeManager sharedThemeManager];
    NSString *currentTheme = themeManager.themeName;
    if (currentTheme == nil) { currentTheme = @"默認"; }
    cell.accessoryType = [currentTheme isEqualToString:text]
        ? UITableViewCellAccessoryCheckmark : UITableViewCellAccessoryNone;
    return cell;
}

#pragma mark - UITableViewDelegate
- (void)tableView:(UITableView *)tableView didSelectRowAtIndexPath:(NSIndexPath *)indexPath {
    ThemeManager *themeManager = [ThemeManager sharedThemeManager];
    NSString *themeName = self.themeDataSource[indexPath.row];
    if ([themeName isEqualToString:@"默認"]) {
        themeName = nil;
    }

    // 更新當前主題
    themeManager.themeName = themeName;
    // 發送通知,讓各控制項重新載入資源
    [[NSNotificationCenter defaultCenter] postNotificationName:kThemeChangedNotification object:nil];

    // 持久化,下次啟動可還原
    NSUserDefaults *userDefaults = [NSUserDefaults standardUserDefaults];
    [userDefaults setObject:themeName forKey:kThemeNameKey];
    [userDefaults synchronize];

    // 更新列表勾選狀態
    [self.tableView reloadData];
}

@end
整套設計的關鍵在於「通知 + 統一入口」:主題管理器負責解析路徑,凡是想響應主題變化的控制項只要訂閱 kThemeChangedNotification 並重新載入自己的圖片即可,彼此之間完全不需要相互引用。再加上 NSUserDefaults 做持久化,切換體驗就能無縫延續到下一次啟動。
- 上一篇文章: iOS 圖片模糊效果的三種實作方式
- 下一篇文章: iOS App 引導頁開發教程(含封裝與開源方案)