
AFNetworking 走 HTTPS 單向與雙向驗證的完整實作
自蘋果宣布 2017 年 1 月 1 日起強制使用 HTTPS 後,這個話題突然變熱。並不是說 HTTPS 此前不存在,而是這項政策讓不少開發者措手不及。我在 2015 年做過 HTTPS 介面,深知坑有多深:一方面自己對原理不熟悉,另一方面網上資料稀少,還有大量真偽不明的博客互相轉載,當時幾乎找不到能直接用的程式碼。
因此一直想來補這個坑。以下把整理好的做法記錄下來,希望對正在翻資料的人有幫助。
一、AFNetworking 2.x 的做法
網路上相關文章不少,方向大致正確但不完整,且內容幾乎雷同。這裡重新整理一次:
1)匯入 client.p12 憑證
2)在 plist 中做如下設定

3)修改 AFNetworking 中的一個類
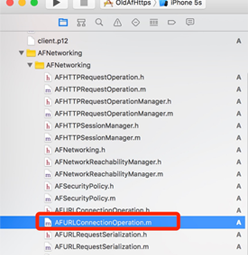
在該檔中新增一個方法,用於從 p12 資料中取出 SecIdentity:
- (OSStatus)extractIdentity:(CFDataRef)inP12Data toIdentity:(SecIdentityRef*)identity {
    OSStatus securityError = errSecSuccess;
    CFStringRef password = CFSTR("證書密碼");
    const void *keys[] = { kSecImportExportPassphrase };
    const void *values[] = { password };
    CFDictionaryRef options = CFDictionaryCreate(NULL, keys, values, 1, NULL, NULL);
    CFArrayRef items = CFArrayCreate(NULL, 0, 0, NULL);
    securityError = SecPKCS12Import(inP12Data, options, &items);
    if (securityError == 0) {
        CFDictionaryRef ident = CFArrayGetValueAtIndex(items, 0);
        const void *tempIdentity = NULL;
        tempIdentity = CFDictionaryGetValue(ident, kSecImportItemIdentity);
        *identity = (SecIdentityRef)tempIdentity;
    }
    if (options) {
        CFRelease(options);
    }
    return securityError;
}
接著覆寫 NSURLConnectionDelegate 中的同名方法:
- (void)connection:(NSURLConnection *)connection willSendRequestForAuthenticationChallenge:(NSURLAuthenticationChallenge *)challenge {
    NSString *thePath = [[NSBundle mainBundle] pathForResource:@"client" ofType:@"p12"];
    //倒入證書
    NSLog(@"thePath===========%@", thePath);
    NSData *PKCS12Data = [[NSData alloc] initWithContentsOfFile:thePath];
    CFDataRef inPKCS12Data = (__bridge CFDataRef)PKCS12Data;
    SecIdentityRef identity = NULL;
    // extract the identity from the certificate
    [self extractIdentity:inPKCS12Data toIdentity:&identity];
    SecCertificateRef certificate = NULL;
    SecIdentityCopyCertificate(identity, &certificate);
    const void *certs[] = {certificate};
    NSURLCredential *credential = [NSURLCredential credentialWithIdentity:identity certificates:nil persistence:NSURLCredentialPersistencePermanent];
    [challenge.sender useCredential:credential forAuthenticationChallenge:challenge];
}
4)發起請求
NSString *url = @"xxxxxxxxxx";
// 1.獲得請求管理者
AFHTTPRequestOperationManager *mgr = [AFHTTPRequestOperationManager manager];
// 2.設置https請求
AFSecurityPolicy *securityPolicy = [AFSecurityPolicy policyWithPinningMode:AFSSLPinningModeCertificate];
securityPolicy.allowInvalidCertificates = YES;
mgr.securityPolicy = securityPolicy;
// 3.發送POST請求
[mgr POST:url parameters:nil success:^(AFHTTPRequestOperation * _Nonnull operation, id _Nonnull responseObject) {
    NSLog(@"responseObject: %@", responseObject);
} failure:^(AFHTTPRequestOperation * _Nonnull operation, NSError * _Nonnull error) {
    NSLog(@"Error: %@", error);
}];
到這裡,2.x 的雙向驗證就完成了。但有兩個明顯問題:一是必須改動 AFNetworking 的原始碼,二是 pod update 之後改動會被整個覆蓋掉。
另外值得注意:這套寫法實際上只用了 client.p12,並未使用 server.cer。推測是因為客戶端選擇信任任何憑證,結果退化成單向驗證了。
二、AFNetworking 3.x 的做法
1)匯入 client.p12 與 server.cer
2)plist 設定同前
3)不必改動庫內程式碼,但要覆寫驗證回呼
NSString *url = @"https://test.niuniuhaoguanjia.com/3.0.0/?service=City.GetCityList";
NSString *certFilePath = [[NSBundle mainBundle] pathForResource:@"server" ofType:@"cer"];
NSData *certData = [NSData dataWithContentsOfFile:certFilePath];
NSSet *certSet = [NSSet setWithObject:certData];
AFSecurityPolicy *policy = [AFSecurityPolicy policyWithPinningMode:AFSSLPinningModeCertificate withPinnedCertificates:certSet];
policy.allowInvalidCertificates = YES;
policy.validatesDomainName = NO;

_manager = [AFHTTPSessionManager manager];
_manager.securityPolicy = policy;
_manager.requestSerializer = [AFHTTPRequestSerializer serializer];
_manager.responseSerializer = [AFHTTPResponseSerializer serializer];
_manager.responseSerializer.acceptableContentTypes = [NSSet setWithObjects:@"application/json", @"text/json", @"text/javascript", @"text/plain", nil];
//關閉緩存避免干擾測試
_manager.requestSerializer.cachePolicy = NSURLRequestReloadIgnoringLocalCacheData;

[_manager setSessionDidBecomeInvalidBlock:^(NSURLSession * _Nonnull session, NSError * _Nonnull error) {
    NSLog(@"setSessionDidBecomeInvalidBlock");
}];

//客戶端請求驗證 重寫 setSessionDidReceiveAuthenticationChallengeBlock 方法
__weak typeof(self)weakSelf = self;
[_manager setSessionDidReceiveAuthenticationChallengeBlock:^NSURLSessionAuthChallengeDisposition (NSURLSession *session, NSURLAuthenticationChallenge *challenge, NSURLCredential *__autoreleasing *_credential) {
    NSURLSessionAuthChallengeDisposition disposition = NSURLSessionAuthChallengePerformDefaultHandling;
    __autoreleasing NSURLCredential *credential = nil;

    if ([challenge.protectionSpace.authenticationMethod isEqualToString:NSURLAuthenticationMethodServerTrust]) {
        if ([weakSelf.manager.securityPolicy evaluateServerTrust:challenge.protectionSpace.serverTrust forDomain:challenge.protectionSpace.host]) {
            credential = [NSURLCredential credentialForTrust:challenge.protectionSpace.serverTrust];
            if (credential) {
                disposition = NSURLSessionAuthChallengeUseCredential;
            } else {
                disposition = NSURLSessionAuthChallengePerformDefaultHandling;
            }
        } else {
            disposition = NSURLSessionAuthChallengeCancelAuthenticationChallenge;
        }
    } else {
        // client authentication
        SecIdentityRef identity = NULL;
        SecTrustRef trust = NULL;
        NSString *p12 = [[NSBundle mainBundle] pathForResource:@"client" ofType:@"p12"];
        NSFileManager *fileManager = [NSFileManager defaultManager];
        if (![fileManager fileExistsAtPath:p12]) {
            NSLog(@"client.p12:not exist");
        } else {
            NSData *PKCS12Data = [NSData dataWithContentsOfFile:p12];
            if ([[weakSelf class] extractIdentity:&identity andTrust:&trust fromPKCS12Data:PKCS12Data]) {
                SecCertificateRef certificate = NULL;
                SecIdentityCopyCertificate(identity, &certificate);
                const void *certs[] = {certificate};
                CFArrayRef certArray = CFArrayCreate(kCFAllocatorDefault, certs, 1, NULL);
                credential = [NSURLCredential credentialWithIdentity:identity certificates:(__bridge NSArray*)certArray persistence:NSURLCredentialPersistencePermanent];
                disposition = NSURLSessionAuthChallengeUseCredential;
            }
        }
    }
    *_credential = credential;
    return disposition;
}];
4)發起請求(與上段程式碼放在一起)
[_manager GET:url parameters:nil progress:^(NSProgress * _Nonnull downloadProgress) {
} success:^(NSURLSessionDataTask * _Nonnull task, id _Nullable responseObject) {
    NSDictionary *dic = [NSJSONSerialization JSONObjectWithData:responseObject options:NSJSONReadingMutableContainers error:nil];
    NSLog(@"JSON: %@", dic);
} failure:^(NSURLSessionDataTask * _Nullable task, NSError * _Nonnull error) {
    NSLog(@"Error: %@", error);
    NSData *data = [error.userInfo objectForKey:@"com.alamofire.serialization.response.error.data"];
    NSString *str = [[NSString alloc] initWithData:data encoding:NSUTF8StringEncoding];
    NSLog(@"%@", str);
}];
另外需要一個取出 identity 與 trust 的工具方法:
+ (BOOL)extractIdentity:(SecIdentityRef*)outIdentity andTrust:(SecTrustRef *)outTrust fromPKCS12Data:(NSData *)inPKCS12Data {
    OSStatus securityError = errSecSuccess;
    //client certificate password
    NSDictionary *optionsDictionary = [NSDictionary dictionaryWithObject:@"證書密碼" forKey:(__bridge id)kSecImportExportPassphrase];
    CFArrayRef items = CFArrayCreate(NULL, 0, 0, NULL);
    securityError = SecPKCS12Import((__bridge CFDataRef)inPKCS12Data, (__bridge CFDictionaryRef)optionsDictionary, &items);
    if (securityError == 0) {
        CFDictionaryRef myIdentityAndTrust = CFArrayGetValueAtIndex(items, 0);
        const void *tempIdentity = NULL;
        tempIdentity = CFDictionaryGetValue(myIdentityAndTrust, kSecImportItemIdentity);
        *outIdentity = (SecIdentityRef)tempIdentity;
        const void *tempTrust = NULL;
        tempTrust = CFDictionaryGetValue(myIdentityAndTrust, kSecImportItemTrust);
        *outTrust = (SecTrustRef)tempTrust;
    } else {
        NSLog(@"Failed with error code %d", (int)securityError);
        return NO;
    }
    return YES;
}
想把它封裝成通用元件時,最常遇到的障礙是 block 內使用 self 造成的循環引用與釋放時機問題。此處刻意用 weakSelf 取值,並把 certificate 相關的 CF 物件交由 credential 持有,避免提前釋放。封裝後若出現請求失敗,優先檢查這兩點。
三、單向驗證
網路上不少文章把單向驗證當成雙向來寫,多半是沒有理解兩者的差異:單向驗證只需要 server.cer 做憑證固定(SSL Pinning),客戶端不必出示任何憑證;雙向驗證則要求伺服器也驗證客戶端身份,因此必須提供 client.p12。
//AF加上這句和下面的方法
_manager.securityPolicy = [self customSecurityPolicy];

/**** SSL Pinning ****/
- (AFSecurityPolicy*)customSecurityPolicy {
    NSString *cerPath = [[NSBundle mainBundle] pathForResource:@"server" ofType:@"cer"];
    NSData *certData = [NSData dataWithContentsOfFile:cerPath];
    AFSecurityPolicy *securityPolicy = [AFSecurityPolicy policyWithPinningMode:AFSSLPinningModeCertificate];
    [securityPolicy setAllowInvalidCertificates:YES];
    NSSet *set = [NSSet setWithObjects:certData, nil];
    [securityPolicy setPinnedCertificates:@[certData]];
    /**** SSL Pinning ****/
    return securityPolicy;
}
實務上還有一點要留意:allowInvalidCertificates = YES 與 validatesDomainName = NO 是為了讓自簽憑證在開發階段能跑通,但上線前應改回 NO,否則 SSL Pinning 形同虛設,中間人攻擊仍可進行。另外伺服器憑證更新時,App 內固定的憑證必須同步更換,建議提前把新憑證加入 pinned 集合做灰度,避免憑證到期造成全量請求失敗。
四、Demo
基於憑證安全考量,Demo 中的憑證已移除,請自行放入測試憑證。文末另附 2.x 與 3.x 兩個版本的範例專案。
- 上一篇文章: 從零實作自訂 UITableViewCell(含 Xib)
- 下一篇文章: 讓 UITableViewCell 分割線真正通到底