
自訂按鈕讓圖片與文字位置随心而變的兩種做法
有人可能會想:按鈕誰不會自訂?確實,UIButton 是專案裡最常見的元件之一。但正因為常見,值得比較一下不同寫法的簡潔程度。本文提出兩種做法,你可以拿來和自己平常的方式對照,看哪種更省事。
順帶一提,別因為知識看起來簡單就跳過——「越是簡單的東西,往往藏著大智慧」,積累都是一點一滴來的。
系統預設的按鈕是「圖片在左、文字在右」的左右結構,無法滿足所有設計稿。含圖文兩種元素的按鈕,實務上共有四種排列:
- 圖片在上,文字在下
- 圖片在左,文字在右
- 圖片在下,文字在上
- 圖片在右,文字在左
常見思路是透過 UIEdgeInsetsMake 調整 imageEdgeInsets 與 titleEdgeInsets;另一條路是繼承 UIButton 並覆寫 layoutSubviews,直接安排內部子控制項的位置。兩者都可行,下面分別示範。
方法一:用分類(Category)實作
#import <UIKit/UIKit.h>

// 定義一個枚舉(包含了四種類型的button)
typedef NS_ENUM(NSUInteger, MKButtonEdgeInsetsStyle) {
    MKButtonEdgeInsetsStyleTop,  // image在上,label在下
    MKButtonEdgeInsetsStyleLeft, // image在左,label在右
    MKButtonEdgeInsetsStyleBottom, // image在下,label在上
    MKButtonEdgeInsetsStyleRight  // image在右,label在左
};

@interface UIButton (ImageTitleSpacing)

/**
 * 設置button的titleLabel和imageView的布局樣式,及間距
 */
- (void)layoutButtonWithEdgeInsetsStyle:(MKButtonEdgeInsetsStyle)style imageTitleSpace:(CGFloat)space;

@end
#import "UIButton+ImageTitleSpacing.h"

@implementation UIButton (ImageTitleSpacing)

- (void)layoutButtonWithEdgeInsetsStyle:(MKButtonEdgeInsetsStyle)style imageTitleSpace:(CGFloat)space {
    /**
     * 知識點:titleEdgeInsets是title相對於其上下左右的inset,跟tableView的contentInset類似。
     * 如果只有title,那它上下左右都是相對於button的,image也是一樣;
     * 如果同時有image和label,那這時候image的上左下是相對於button,右邊是相對於label的;
     * title的上右下是相對於button,左邊是相對於image的。
     */
    // 1. 得到imageView和titleLabel的寬、高
    CGFloat imageWith = self.imageView.frame.size.width;
    CGFloat imageHeight = self.imageView.frame.size.height;
    CGFloat labelWidth = 0.0;
    CGFloat labelHeight = 0.0;
    if ([UIDevice currentDevice].systemVersion.floatValue >= 8.0) {
        // 由於iOS8中titleLabel的size為0,用下面的這種設置
        labelWidth = self.titleLabel.intrinsicContentSize.width;
        labelHeight = self.titleLabel.intrinsicContentSize.height;
    } else {
        labelWidth = self.titleLabel.frame.size.width;
        labelHeight = self.titleLabel.frame.size.height;
    }

    // 2. 聲明全局的imageEdgeInsets和labelEdgeInsets
    UIEdgeInsets imageEdgeInsets = UIEdgeInsetsZero;
    UIEdgeInsets labelEdgeInsets = UIEdgeInsetsZero;

    // 3. 根據style和space得到imageEdgeInsets和labelEdgeInsets的值
    switch (style) {
        case MKButtonEdgeInsetsStyleTop: {
            imageEdgeInsets = UIEdgeInsetsMake(-labelHeight-space/2.0, 0, 0, -labelWidth);
            labelEdgeInsets = UIEdgeInsetsMake(0, -imageWith, -imageHeight-space/2.0, 0);
        }
            break;
        case MKButtonEdgeInsetsStyleLeft: {
            imageEdgeInsets = UIEdgeInsetsMake(0, -space/2.0, 0, space/2.0);
            labelEdgeInsets = UIEdgeInsetsMake(0, space/2.0, 0, -space/2.0);
        }
            break;
        case MKButtonEdgeInsetsStyleBottom: {
            imageEdgeInsets = UIEdgeInsetsMake(0, 0, -labelHeight-space/2.0, -labelWidth);
            labelEdgeInsets = UIEdgeInsetsMake(-imageHeight-space/2.0, -imageWith, 0, 0);
        }
            break;
        case MKButtonEdgeInsetsStyleRight: {
            imageEdgeInsets = UIEdgeInsetsMake(0, labelWidth+space/2.0, 0, -labelWidth-space/2.0);
            labelEdgeInsets = UIEdgeInsetsMake(0, -imageWith-space/2.0, 0, imageWith+space/2.0);
        }
            break;
        default:
            break;
    }

    // 4. 賦值
    self.titleEdgeInsets = labelEdgeInsets;
    self.imageEdgeInsets = imageEdgeInsets;
}

@end
使用方式很輕巧:
// 導入頭文件
#import "UIButton+ImageTitleSpacing.h"

// 設置完按鈕的圖片、標題和frame後,只需要加上如下代碼:
[button layoutButtonWithEdgeInsetsStyle:這裡填樣式 imageTitleSpace:這裡填寫圖片和文字的間距];
注意 iOS 8 之後 titleLabel 的 frame 在 layout 前是 0,所以要用 intrinsicContentSize 取值——這是這段程式碼裡最關鍵的相容處理。
方法二:用繼承覆寫 layoutSubviews
#import "TSSquareButton.h"

@implementation TSSquareButton

- (instancetype)initWithFrame:(CGRect)frame {
    if (self = [super initWithFrame:frame]) {
        // 設置圖片的其他屬性
        self.titleLabel.textAlignment = NSTextAlignmentCenter;
        self.titleLabel.font = [UIFont systemFontOfSize:12.0];
        [self setBackgroundColor:[UIColor whiteColor]];
        [self setTitleColor:[UIColor blackColor] forState:UIControlStateNormal];
    }
    return self;
}

// 重寫layoutSubviews方法,手動設置按鈕子控件的位置
- (void)layoutSubviews {
    [super layoutSubviews];
    self.imageView.TS_width = self.TS_width * 0.4;
    self.imageView.TS_height = self.imageView.TS_width;
    self.imageView.TS_y = self.TS_height * 0.25;
    self.imageView.TS_centerX = self.TS_width * 0.5;
    self.titleLabel.TS_width = self.TS_width;
    self.titleLabel.TS_y = self.imageView.TS_buttom;
    self.titleLabel.TS_height = 25;
    self.titleLabel.TS_x = 0;
}

@end
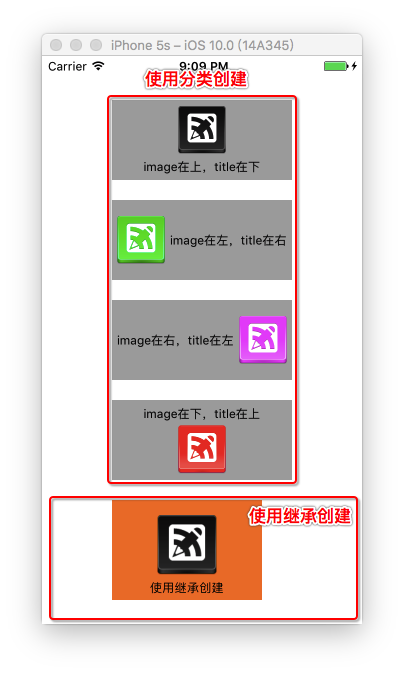
兩種方式的取捨
分類方式:使用極為方便,一行程式碼搞定,不必自己推算 UIEdgeInsets 的數值,適合純程式碼建立的按鈕。缺點是 Xib/Storyboard 建立的按鈕用不了——因為 Outlet 連線後的時機與 layout 週期對不上,此方法需要在 frame 確定後手動呼叫。
繼承方式:純程式碼與 Xib 都支援,因為 layoutSubviews 一定會被呼叫。缺點是較為僵化:它適用於「同一類」按鈕。若一個畫面上有幾種不同排列的按鈕,就得建立多個 UIButton 子類,各自在 layoutSubviews 裡寫不同的位置關係,類別數量會迅速膨脹。
實務上常見的折衷是:把繼承類做成可配置的——開一個 style 屬性,在 layoutSubviews 中依 style 分支處理。這樣只有一個子類,同時保有 Xib 相容性。當然,做法遠不止這兩種,若你有更好的方案也歡迎交流。
- 上一篇文章: 自訂 UITableViewCell 按鈕點擊的三種處理方式
- 下一篇文章: 用 inputView 機制讓 Picker 自底部彈出