
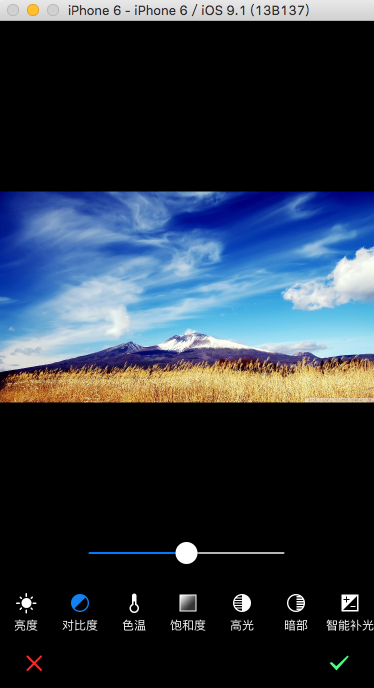
美圖秀秀美化圖片之【增強】模塊界面與功能設計
本文從【增強】模塊入手介紹一下界面設計和功能實現。所有功能都已實現,部分功能有待改善,我會在以後時間中步步改善。目前效果也很棒。有興趣的可以在文章最後提供的下載鏈接中下載並運行。模擬器最好使用iphone6模擬器【增強】功能包含如下功能
1.亮度
2.對比度
3.色溫
4.飽和度
5.高光
6.暗部
7.智能補光
涉及開發技巧
效果bar的實現
UISlider的使用
GPUImage的使用
一、自定義bar
點擊一個效果按鈕時,該按鈕變為高亮狀態,而前面的按鈕自動恢復到正常狀態
代碼實現


#import <UIKit/UIKit.h>


@class FWEffectBar, FWEffectBarItem;

@protocol FWEffectBarDelegate <NSObject>
- (void)effectBar:(FWEffectBar *)bar didSelectItemAtIndex:(NSInteger)index;

@end

@interface FWEffectBar : UIScrollView

@property (nonatomic, assign) id<FWEffectBarDelegate> delegate;
@property (nonatomic, copy) NSArray *items;
@property (nonatomic, weak) FWEffectBarItem *selectedItem;
@property UIEdgeInsets contentEdgeInsets;

/**
 * Sets the height of tab bar.
 */
- (void)setHeight:(CGFloat)height;

/**
 * Returns the minimum height of tab bar's items.
 */
- (CGFloat)minimumContentHeight;

@end
FWEffectBar.h
//
//  FWEffectBar.m
//  FWMeituApp
//
//  Created by ForrestWoo on 15-9-23.
//  Copyright (c) 2015年 ForrestWoo co,.ltd. All rights reserved.
//

#import 'FWEffectBar.h'
#import 'FWEffectBarItem.h'

@interface FWEffectBar ()

@property (nonatomic) CGFloat itemWidth;

@end

@implementation FWEffectBar

- (id)initWithFrame:(CGRect)frame {
    self = [super initWithFrame:frame];
    if (self) {
    }
    return self;
}

- (id)initWithCoder:(NSCoder *)aDecoder {
    self = [super initWithCoder:aDecoder];
    if (self) {
    }
    return self;
}

- (id)init {
    return [self initWithFrame:CGRectZero];
}

- (void)layoutSubviews {
    CGSize frameSize = self.frame.size;
    CGFloat minimumContentHeight = [self minimumContentHeight];

    [self setItemWidth:roundf((frameSize.width - [self contentEdgeInsets].left -
                               [self contentEdgeInsets].right) / [[self items] count])];

    NSInteger index = 0;

    // Layout items

    for (FWEffectBarItem *item in [self items]) {
        CGFloat itemHeight = [item itemHeight];

        if (!itemHeight) {
            itemHeight = frameSize.height;
        }

        [item setFrame:CGRectMake(self.contentEdgeInsets.left + (index * self.itemWidth),
                                  roundf(frameSize.height - itemHeight) - self.contentEdgeInsets.top,
                                  self.itemWidth, itemHeight - self.contentEdgeInsets.bottom)];
        [item setNeedsDisplay];

        index++;
    }
}

#pragma mark - Configuration

- (void)setItemWidth:(CGFloat)itemWidth {
    if (itemWidth > 0) {
        _itemWidth = itemWidth;
    }
}

- (void)setItems:(NSArray *)items {
    for (FWEffectBarItem *item in _items) {
        [item removeFromSuperview];
    }

    _items = [items copy];
    for (FWEffectBarItem *item in _items) {
        [item addTarget:self action:@selector(tabBarItemWasSelected:) forControlEvents:UIControlEventTouchDown];
        [self addSubview:item];
    }
}

- (void)setHeight:(CGFloat)height {
    [self setFrame:CGRectMake(CGRectGetMinX(self.frame), CGRectGetMinY(self.frame),
                              CGRectGetWidth(self.frame), height)];
}

- (CGFloat)minimumContentHeight {
    CGFloat minimumTabBarContentHeight = CGRectGetHeight([self frame]);

    for (FWEffectBarItem *item in [self items]) {
        CGFloat itemHeight = [item itemHeight];
        if (itemHeight && (itemHeight < minimumTabBarContentHeight)) {
            minimumTabBarContentHeight = itemHeight;
        }
    }

    return minimumTabBarContentHeight;
}

#pragma mark - Item selection

- (void)tabBarItemWasSelected:(id)sender {
    [self setSelectedItem:sender];

    if ([[self delegate] respondsToSelector:@selector(effectBar:didSelectItemAtIndex:)]) {
        NSInteger index = [self.items indexOfObject:self.selectedItem];
        [[self delegate] effectBar:self didSelectItemAtIndex:index];
    }
}

- (void)setSelectedItem:(FWEffectBarItem *)selectedItem {
    if (selectedItem == _selectedItem) {
        return;
    }
    [_selectedItem setSelected:NO];

    _selectedItem = selectedItem;
    [_selectedItem setSelected:YES];
}

@end
FWEffectBar.m
我定義了一個FWEffectBarDelegate的協議,當點擊bar中按鈕時,將觸發- (void)effectBar:(FWEffectBar *)bar didSelectItemAtIndex:(NSInteger)index,我們可以在FWEffectBar的代理中實現當我們點擊按鈕時要做的事情。
items屬性是該bar所包含的所有子項(FWEffectBarItem)。
FWEffectBarItem是包含在bar中的按鈕,圖像文字豎著排列,當點擊它時將呈現高亮狀態。
//
//  FWEffectBarItem.h
//  FWMeituApp
//
//  Created by ForrestWoo on 15-9-23.
//  Copyright (c) 2015年 ForrestWoo co,.ltd. All rights reserved.
//

#import <UIKit/UIKit.h>

@interface FWEffectBarItem : UIControl

/**
 * itemHeight is an optional property. When set it is used instead of tabBar's height.
 */
@property CGFloat itemHeight;

#pragma mark - Title configuration

/**
 * The title displayed by the tab bar item.
 */
@property (nonatomic, copy) NSString *title;

/**
 * The offset for the rectangle around the tab bar item's title.
 */
@property (nonatomic) UIOffset titlePositionAdjustment;

/**
 * For title's text attributes see
 * https://developer.apple.com/library/ios/documentation/uikit/reference/NSString_UIKit_Additions/Reference/Reference.html
 */

/**
 * The title attributes dictionary used for tab bar item's unselected state.
 */
@property (copy) NSDictionary *unselectedTitleAttributes;

/**
 * The title attributes dictionary used for tab bar item's selected state.
 */
@property (copy) NSDictionary *selectedTitleAttributes;

#pragma mark - Image configuration

/**
 * The offset for the rectangle around the tab bar item's image.
 */
@property (nonatomic) UIOffset imagePositionAdjustment;

/**
 * The image used for tab bar item's selected state.
 */
- (UIImage *)finishedSelectedImage;

/**
 * The image used for tab bar item's unselected state.
 */
- (UIImage *)finishedUnselectedImage;

/**
 * Sets the tab bar item's selected and unselected images.
 */
- (void)setFinishedSelectedImage:(UIImage *)selectedImage withFinishedUnselectedImage:(UIImage *)unselectedImage;

#pragma mark - Background configuration

/**
 * The background image used for tab bar item's selected state.
 */
- (UIImage *)backgroundSelectedImage;

/**
 * The background image used for tab bar item's unselected state.
 */
- (UIImage *)backgroundUnselectedImage;

/**
 * Sets the tab bar item's selected and unselected background images.
 */
- (void)setBackgroundSelectedImage:(UIImage *)selectedImage withUnselectedImage:(UIImage *)unselectedImage;

@end
FWEffectBarItem.h
//
//  FWEffectBarItem.m
//  FWMeituApp
//
//  Created by ForrestWoo on 15-9-23.
//  Copyright (c) 2015年 ForrestWoo co,.ltd. All rights reserved.
//

#import 'FWEffectBarItem.h'

@interface FWEffectBarItem ()
{
    NSString *_title;
    UIOffset _imagePositionAdjustment;
    NSDictionary *_unselectedTitleAttributes;
    NSDictionary *_selectedTitleAttributes;
}

@property UIImage *unselectedBackgroundImage;
@property UIImage *selectedBackgroundImage;
@property UIImage *unselectedImage;
@property UIImage *selectedImage;

@end

@implementation FWEffectBarItem

- (id)initWithFrame:(CGRect)frame
{
    if (self = [super initWithFrame:frame]) {
        [self commonInitialization];
    }
    return self;
}

- (id)initWithCoder:(NSCoder *)aDecoder
{
    if (self = [super initWithCoder:aDecoder]) {
        [self commonInitialization];
    }
    return self;
}

- (id)init
{
    return [self initWithFrame:CGRectZero];
}

- (void)commonInitialization {
    // Setup defaults

    [self setBackgroundColor:[UIColor clearColor]];

    _title = @'';
    _titlePositionAdjustment = UIOffsetZero;

    if (NSFoundationVersionNumber > NSFoundationVersionNumber_iOS_6_1) {
        _unselectedTitleAttributes = @{
                                       NSFontAttributeName: [UIFont systemFontOfSize:12],
                                       NSForegroundColorAttributeName: [UIColor whiteColor],
                                       };
    } else {
#if __IPHONE_OS_VERSION_MIN_REQUIRED < __IPHONE_7_0
        _unselectedTitleAttributes = @{
                                       UITextAttributeFont: [UIFont systemFontOfSize:12],
                                       UITextAttributeTextColor: [UIColor blackColor],
                                       };
#endif
    }

    _selectedTitleAttributes = [_unselectedTitleAttributes copy];
}

- (void)drawRect:(CGRect)rect
{
    CGSize frameSize = self.frame.size;
    CGSize imageSize = CGSizeZero;
    CGSize titleSize = CGSizeZero;
    NSDictionary *titleAttributes = nil;
    UIImage *backgroundImage = nil;
    UIImage *image = nil;
    CGFloat imageStartingY = 0.0f;

    if ([self isSelected]) {
        image = [self selectedImage];
        backgroundImage = [self selectedBackgroundImage];
        titleAttributes = [self selectedTitleAttributes];

        if (!titleAttributes) {
            titleAttributes = [self unselectedTitleAttributes];
        }
    } else {
        image = [self unselectedImage];
        backgroundImage = [self unselectedBackgroundImage];
        titleAttributes = [self unselectedTitleAttributes];
    }

    imageSize = [image size];

    CGContextRef context = UIGraphicsGetCurrentContext();
    CGContextSaveGState(context);
    [backgroundImage drawInRect:self.bounds];

    // Draw image and title

    if (![_title length]) {
        [image drawInRect:CGRectMake(roundf(frameSize.width / 2 - imageSize.width / 2) +
                                     _imagePositionAdjustment.horizontal,
                                     roundf(frameSize.height / 2 - imageSize.height / 2) +
                                     _imagePositionAdjustment.vertical,
                                     imageSize.width, imageSize.height)];
    } else {

        if (NSFoundationVersionNumber > NSFoundationVersionNumber_iOS_6_1) {
            CGSize ts = CGSizeMake(frameSize.width, 20);
            titleSize = [_title boundingRectWithSize:ts
                                             options:NSStringDrawingUsesLineFragmentOrigin
                                          attributes:titleAttributes
                                             context:nil].size;

            imageStartingY = roundf((frameSize.height - imageSize.height - titleSize.height) / 2);
            CGRect frame = CGRectMake(roundf(frameSize.width / 2 - imageSize.width / 2) +
                                      _imagePositionAdjustment.horizontal,
                                      imageStartingY + _imagePositionAdjustment.vertical,
                                      imageSize.width, imageSize.height);
            [image drawInRect:frame];
//            NSLog(@'image frame:%@,%f,%f', NSStringFromCGRect(CGRectMake(roundf(frameSize.width / 2 - imageSize.width / 2) +
//                                                                         _imagePositionAdjustment.horizontal,
//                                                                         imageStartingY + _imagePositionAdjustment.vertical,
//                                                                         imageSize.width, imageSize.height)),imageStartingY,_imagePositionAdjustment.vertical);
            CGContextSetFillColorWithColor(context, [titleAttributes[NSForegroundColorAttributeName] CGColor]);

            CGRect frame1 = CGRectMake(roundf(frameSize.width / 2 - titleSize.width / 2) +
                                       _titlePositionAdjustment.horizontal,
                                       imageStartingY + imageSize.height + _titlePositionAdjustment.vertical,
                                       titleSize.width, titleSize.height);
//            NSLog(@'text frame:%@', NSStringFromCGRect(frame1));
//            NSLog(@'self frame:%@', NSStringFromCGRect(rect));
            [_title drawInRect:frame1
                withAttributes:titleAttributes];
        } else {
#if __IPHONE_OS_VERSION_MIN_REQUIRED < __IPHONE_7_0
            titleSize = [_title sizeWithFont:titleAttributes[UITextAttributeFont]
                           constrainedToSize:CGSizeMake(frameSize.width, 20)];
            UIOffset titleShadowOffset = [titleAttributes[UITextAttributeTextShadowOffset] UIOffsetValue];
            imageStartingY = roundf((frameSize.height - imageSize.height - titleSize.height) / 2);

            [image drawInRect:CGRectMake(roundf(frameSize.width / 2 - imageSize.width / 2) +
                                         _imagePositionAdjustment.horizontal,
                                         imageStartingY + _imagePositionAdjustment.vertical,
                                         imageSize.width, imageSize.height)];

            CGContextSetFillColorWithColor(context, [titleAttributes[UITextAttributeTextColor] CGColor]);

            UIColor *shadowColor = titleAttributes[UITextAttributeTextShadowColor];

            if (shadowColor) {
                CGContextSetShadowWithColor(context, CGSizeMake(titleShadowOffset.horizontal, titleShadowOffset.vertical),
                                            1.0, [shadowColor CGColor]);
            }

            [_title drawInRect:CGRectMake(roundf(frameSize.width / 2 - titleSize.width / 2) +
                                          _titlePositionAdjustment.horizontal,
                                          imageStartingY + imageSize.height + _titlePositionAdjustment.vertical,
                                          titleSize.width, titleSize.height)
                      withFont:titleAttributes[UITextAttributeFont]
                 lineBreakMode:NSLineBreakByTruncatingTail];
#endif
        }
    }

    CGContextRestoreGState(context);
}

- (UIImage *)finishedSelectedImage
{
  return [self selectedImage];
}

- (UIImage *)finishedUnselectedImage
{
    return [self unselectedImage];
}

- (void)setFinishedSelectedImage:(UIImage *)selectedImage withFinishedUnselectedImage:(UIImage *)unselectedImage
{
    if (selectedImage && (selectedImage != [self selectedImage])) {
        [self setSelectedImage:selectedImage];
    }

    if (unselectedImage && (unselectedImage != [self unselectedImage])) {
        [self setUnselectedImage:unselectedImage];
    }
}


- (UIImage *)backgroundSelectedImage {
    return [self selectedBackgroundImage];
}

- (UIImage *)backgroundUnselectedImage {
    return [self unselectedBackgroundImage];
}

- (void)setBackgroundSelectedImage:(UIImage *)selectedImage withUnselectedImage:(UIImage *)unselectedImage {
    if (selectedImage && (selectedImage != [self selectedBackgroundImage])) {
        [self setSelectedBackgroundImage:selectedImage];
    }

    if (unselectedImage && (unselectedImage != [self unselectedBackgroundImage])) {
        [self setUnselectedBackgroundImage:unselectedImage];
    }
}

@end
FWEffectBarItem.m
- (void)setFinishedSelectedImage:(UIImage *)selectedImage withFinishedUnselectedImage:(UIImage *)unselectedImage方法用來設置FWEffectBarItem的被選中和未選中時的圖片
title屬性用來設置FWEffectBarItem的文字。
二、UISlider的使用
UIView *subview = [[UIView alloc] initWithFrame:CGRectMake(0, HEIGHT - 115 - 40, WIDTH, 40)];
    subview.backgroundColor = [UIColor colorWithRed:0 green:0 blue:0 alpha:0.5];
    [self.view addSubview:subview];

    self.slider = [[FWSlider alloc] initWithFrame:CGRectZero];

    self.slider.minimumValue = -100;
    self.slider.maximumValue = 100;
    self.slider.value = 0;
    self.slider.frame = CGRectMake(WIDTH / 2 - 100, 10, 200, 20);
    [self.slider addTarget:self action:@selector(updateValue:) forControlEvents:UIControlEventTouchUpInside];
    [self.slider addTarget:self action:@selector(updateTipView:) forControlEvents:UIControlEventValueChanged];
    [self.slider setThumbImage:[UIImage imageNamed:@'icon_slider_thumb'] forState:UIControlStateNormal];

    [subview addSubview:self.slider];
setThumbImage用來設置滑塊,該slider沒有完全實現,當我們滑動的時候,沒有顯示當前值,有待改善
四、FWBeautyProcessType枚舉的定義
typedef NS_ENUM(NSInteger, FWBeautyProcessType)
{
    //智能優化
    FWBeautyProcessTypeAutoBeauty,
    //編輯
    FWBeautyProcessTypeEdit,
    //增強
    FWBeautyProcessTypeColorList,
    //特效
    FWBeautyProcessTypeFilter,
    //邊框
    FWBeautyProcessTypeBolder,
    //魔幻筆
    FWBeautyProcessTypeMagicPen,
    //馬賽克
    FWBeautyProcessTypeMosaic,
    //文字
    FWBeautyProcessTypeText,
    //背景虛化
    FWBeautyProcessTypeBlur
};
該枚舉定義了【美化圖片】下的所有功能模塊,用於識別到底是哪種模塊,不同模塊相應的界面是不同的,請看下面代碼
- (void)setupImageView
{
    if (self.type == FWBeautyProcessTypeAutoBeauty || self.type == FWBeautyProcessTypeColorList || self.type == FWBeautyProcessTypeEdit)
    {
        //105 = 設備高 - 關閉按鈕高度 - 3段間距:30 - bar高度:55 - 的結果
        self.imageView.frame = CGRectMake(0, 0, WIDTH, HEIGHT - 115);
    }
    self.imageView.contentMode = UIViewContentModeScaleAspectFit;

    [self.view addSubview:self.imageView];
}

//配置單選項卡
- (void)setupBar
{
    self.styleBar = [[FWEffectBar alloc] init];
    NSDictionary *autoDict = nil;

    if (self.type == FWBeautyProcessTypeAutoBeauty || self.type == FWBeautyProcessTypeColorList)
    {
        self.styleBar.frame = CGRectMake(0,HEIGHT - 105, WIDTH, 55);

        if (self.type == FWBeautyProcessTypeAutoBeauty )
            autoDict = [[FWCommonTools getPlistDictionaryForButton] objectForKey:@'AutoBeauty'];
        else
            autoDict = [[FWCommonTools getPlistDictionaryForButton] objectForKey:@'ColorValue'];

    }
    else if (self.type == FWBeautyProcessTypeEdit)
    {
        self.styleBar.frame = CGRectMake(100, HEIGHT - 55, 160, 55);

        autoDict = [[FWCommonTools getPlistDictionaryForButton] objectForKey:@'Edit'];

    }

    NSArray *normalImageArr = [autoDict objectForKey:@'normalImages'];
    NSArray *hightlightedImageArr = [autoDict objectForKey:@'HighlightedImages'];
    NSArray *textArr = [autoDict objectForKey:@'Texts'];

    NSMutableArray *arr = [[NSMutableArray alloc] initWithCapacity:0];
    for (int i = 0; i < [textArr count]; i++)
    {
        FWEffectBarItem *item = [[FWEffectBarItem alloc] initWithFrame:CGRectZero];
        [item setFinishedSelectedImage:[UIImage imageNamed:[hightlightedImageArr objectAtIndex:i]] withFinishedUnselectedImage:[UIImage imageNamed:[normalImageArr objectAtIndex:i]] ];
        item.title = [textArr objectAtIndex:i];
        [arr addObject:item];
    }

    self.styleBar.items = arr;

    self.styleBar.delegate = self;
    [self.styleBar setSelectedItem:[self.styleBar.items objectAtIndex:0]];
    [self.view addSubview:self.styleBar];
    [self effectBar:self.styleBar didSelectItemAtIndex:0];
}

- (void)setupSliderForColorList
{
    UIView *subview = [[UIView alloc] initWithFrame:CGRectMake(0, HEIGHT - 115 - 40, WIDTH, 40)];
    subview.backgroundColor = [UIColor colorWithRed:0 green:0 blue:0 alpha:0.5];
    [self.view addSubview:subview];

    self.slider = [[FWSlider alloc] initWithFrame:CGRectZero];
    self.slider.minimumValue = -100;
    self.slider.maximumValue = 100;
    self.slider.value = 0;
    self.slider.frame = CGRectMake(WIDTH / 2 - 100, 10, 200, 20);
    [self.slider addTarget:self action:@selector(updateValue:) forControlEvents:UIControlEventTouchUpInside];
    [self.slider addTarget:self action:@selector(updateTipView:) forControlEvents:UIControlEventValueChanged];
    [self.slider setThumbImage:[UIImage imageNamed:@'icon_slider_thumb'] forState:UIControlStateNormal];

    [subview addSubview:self.slider];
    self.slider.tipView.currentValueLabel.text = [NSString stringWithFormat:@'%f',self.slider.value];

}
不同頁面的方法
- (void)displayAutoBeautyPage
{
    [self setupImageView];
    [self setupBar];
}

- (void)displayColorListPage
{
    [self setupImageView];
    [self setupBar];
    [self setupSliderForColorList];
}

- (void)displayEditPage
{
    [self setupImageView];
    [self setupBar];
    [self setupButtons];
}
 if ([text isEqualToString:@'智能優化'])
    {
        FWFunctionViewController *vc = [[FWFunctionViewController alloc] initWithImage:self.image type:FWBeautyProcessTypeAutoBeauty];
        [self presentViewController:vc animated:YES completion:^{
        }];
        [vc displayAutoBeautyPage];
    }
    else if ([text isEqualToString:@'增強'])
    {
        FWFunctionViewController *vc = [[FWFunctionViewController alloc] initWithImage:self.image type:FWBeautyProcessTypeColorList];
        [self presentViewController:vc animated:YES completion:^{
        }];
        [vc displayColorListPage];
    }
    else if ([text isEqualToString:@'編輯']) {
        FWFunctionViewController *vc = [[FWFunctionViewController alloc] initWithImage:self.image type:FWBeautyProcessTypeEdit];
        [self presentViewController:vc animated:YES completion:^{
        }];
        [vc displayEditPage];

        //                CGRect frame1 = CGRectMake(87.5, 550, 200, 20);
        //                [vc setupSliderWithFrame:frame1];
    }e
五、功能實現
1.亮度的實現
+ (UIImage *)changeValueForBrightnessFilter:(float)value image:(UIImage *)image;
{
    GPUImageBrightnessFilter *filter = [[GPUImageBrightnessFilter alloc] init];
    filter.brightness = value;
    [filter forceProcessingAtSize:image.size];
    GPUImagePicture *pic = [[GPUImagePicture alloc] initWithImage:image];
    [pic addTarget:filter];

    [pic processImage];
    [filter useNextFrameForImageCapture];
    return [filter imageFromCurrentFramebuffer];
}
該功能使用了GPUImage庫中的GPUImageBrightnessFilter濾鏡,具體介紹請參考GPUImage簡單濾鏡使用(一)
2.對比度的實現
GPUImageContrastFilter *filter = [[GPUImageContrastFilter alloc] init];
    filter.contrast = value;
    [filter forceProcessingAtSize:image.size];
    GPUImagePicture *pic = [[GPUImagePicture alloc] initWithImage:image];
    [pic addTarget:filter];

    [pic processImage];
    [filter useNextFrameForImageCapture];
    return [filter imageFromCurrentFramebuffer];
該功能使用了GPUImage庫中的GPUImageContrastFilter濾鏡,具體介紹請參考GPUImage簡單濾鏡使用(二)
3.色溫的實現
+ (UIImage *)changeValueForWhiteBalanceFilter:(float)value image:(UIImage *)image
{
    GPUImageWhiteBalanceFilter *filter = [[GPUImageWhiteBalanceFilter alloc] init];
    filter.temperature = value;
    filter.tint = 0.0;
    [filter forceProcessingAtSize:image.size];
    GPUImagePicture *pic = [[GPUImagePicture alloc] initWithImage:image];
    [pic addTarget:filter];

    [pic processImage];
    [filter useNextFrameForImageCapture];
    return [filter imageFromCurrentFramebuffer];
}
該功能使用了GPUImage庫中的GPUImageWhiteBalanceFilter濾鏡。
4.飽和度的實現
+ (UIImage *)changeValueForSaturationFilter:(float)value image:(UIImage *)image;
{
    GPUImageSaturationFilter *filter = [[GPUImageSaturationFilter alloc] init];
    filter.saturation = value;
    [filter forceProcessingAtSize:image.size];
    GPUImagePicture *pic = [[GPUImagePicture alloc] initWithImage:image];
    [pic addTarget:filter];

    [pic processImage];
    [filter useNextFrameForImageCapture];
    return [filter imageFromCurrentFramebuffer];
}
該功能使用了GPUImage庫中的GPUImageSaturationFilter濾鏡。
5.高光和暗部的實現
+ (UIImage *)changeValueForHightlightFilter:(float)value image:(UIImage *)image;
{
    GPUImageHighlightShadowFilter *filter = [[GPUImageHighlightShadowFilter alloc] init];
    filter.highlights = value;
    filter.shadows = 0.0;
    [filter forceProcessingAtSize:image.size];
    GPUImagePicture *pic = [[GPUImagePicture alloc] initWithImage:image];
    [pic addTarget:filter];
    [pic processImage];
    [filter useNextFrameForImageCapture];
    return [filter imageFromCurrentFramebuffer];
}
+ (UIImage *)changeValueForLowlightFilter:(float)value image:(UIImage *)image
{
    GPUImageHighlightShadowFilter *filter = [[GPUImageHighlightShadowFilter alloc] init];
    filter.highlights = 1.0;
    filter.shadows = value;
    [filter forceProcessingAtSize:image.size];
    GPUImagePicture *pic = [[GPUImagePicture alloc] initWithImage:image];
    [pic addTarget:filter];
    [pic processImage];
    [filter useNextFrameForImageCapture];
    return [filter imageFromCurrentFramebuffer];
}
該功能使用了GPUImage庫中的GPUImageHighlightShadowFilter濾鏡。
6.智能補光的實現
+ (UIImage *)changeValueForExposureFilter:(float)value image:(UIImage *)image
{
    GPUImageExposureFilter *filter = [[GPUImageExposureFilter alloc] init];
    filter.exposure = value;
    [filter forceProcessingAtSize:image.size];
    GPUImagePicture *pic = [[GPUImagePicture alloc] initWithImage:image];
    [pic addTarget:filter];

    [pic processImage];
    [filter useNextFrameForImageCapture];
    return [filter imageFromCurrentFramebuffer];
}
該功能使用了GPUImage庫中的GPUImageExposureFilter濾鏡。
我將會在以後的時間裡添加幾篇介紹GPUImage庫中的剩余濾鏡,慢慢來學習opengl es.加油,我的寶貝~上下眼皮開始打架了,睡覺喽!咦,最後附幾張效果圖吧


原圖 亮度較暗 對比度較高


色溫較冷 飽和度較高 高光

智能補光
- 美圖秀秀美化圖片之編輯 模塊界面設計
- Decosama攝影圖片最新評測:iPhone犀利美圖軟件
- iPhone制圖利器美圖秀秀最新版評測:一款神奇的軟件
- iPhone美圖軟件對比橫評:用戶體驗與功能如何取捨
- iPhone哪個GIF動畫制作軟件好:美圖GIF對比玩圖
- 美圖GIF iPhone版新增泰坦尼克場景
- 美圖貼貼iphone版 女生專屬賣萌神器登App Store
- 邂逅美圖秀秀iPhone新版拍照功能 春攝無邊
- iPhone裡的月光寶盒 美圖GIF帶你體驗時光倒轉
- 騰訊微博如何發美圖私語
- 美圖GIF最新iPhone版(制作真人GIF圖片)
- 升級IOS9系統美圖秀秀變英文了怎麼辦?升級IOS9系統美圖秀秀變英文的解決方法
- 美圖秀秀美化圖片之邊框 界面設計重大更新
- 源碼推薦(7.14):生成漂浮氣泡的按鈕,精致唯美圖表
- 源碼推薦(9.02):生成漂浮氣泡的按鈕,精致唯美圖表
