
IOS多線程完成多圖片下載(一)
編輯:IOS開發綜合
在沒有步入注釋之前先給年夜家展現下後果圖,假如年夜家認為很滿足請持續往下浏覽全文。

年夜家可以看到這個界面很簡略,其實就是UITableView的結構,然則難點是在於若何從網高低載這些圖片,下載以後應若何停止存儲!
我們一步一步停止解析,先從單線程(主線程)停止多圖片下載我們結構上的文字及圖片的地址從plist文件中停止讀取

依據構造,我們自界說一個數據模子文件
DDZApp.h
#import <Foundation/Foundation.h>
@interface DDZApp : NSObject
//圖標
@property (nonatomic,strong) NSString *icon;
//名字
@property (nonatomic,strong) NSString *name;
//下載量
@property (nonatomic,strong) NSString *download;
+ (instancetype)appWithDict:(NSDictionary *)dict;
@end
DDZApp.m
#import "DDZApp.h"
@implementation DDZApp
+ (instancetype)appWithDict:(NSDictionary *)dict {
DDZApp *app = [[self alloc] init];
[app setValuesForKeysWithDictionary:dict];
return app;
}
@end
以下的都是視圖掌握器中的代碼
ViewController.m
1.
@interface ViewController ()
//一切數據
@property (nonatomic,strong)NSArray *apps;
//內存緩存圖片
@property (nonatomic,strong)NSMutableDictionary *imgCache;
@end
第一個屬性用於存儲讀取plist文件中的內容,設置為屬性保留起來,便可以不消反復讀取
第二個屬性用於保留從網高低載上去的圖片,也是為了不消反復讀取
2.
@implementation ViewController
//讀取數據
- (NSArray *)apps {
if (!_apps) {
//從plist文件中讀取數據
NSArray *dictArray = [NSArray arrayWithContentsOfFile:[[NSBundle mainBundle] pathForResource:@"apps.plist" ofType:nil]];
NSMutableArray *appArray = [NSMutableArray array];
for (NSDictionary *dict in dictArray) {
[appArray addObject:[DDZApp appWithDict:dict]];
}
_apps = appArray;
}
return _apps;
}
//緩存圖片
- (NSMutableDictionary *)imgCache {
if (!_imgCache) {
//初始化
_imgCache = [NSMutableDictionary dictionary];
}
return _imgCache;
}
這兩個辦法都是為了初始化適才的兩個屬性
3.
#pragma mark - 數據源辦法
- (NSInteger)tableView:(UITableView *)tableView numberOfRowsInSection:(NSInteger)section {
return self.apps.count;
}
- (UITableViewCell *)tableView:(UITableView *)tableView cellForRowAtIndexPath:(NSIndexPath *)indexPath {
static NSString *ID = @"app";
UITableViewCell *cell = [tableView dequeueReusableCellWithIdentifier:ID];
DDZApp *app = self.apps[indexPath.row];
cell.textLabel.text = app.name;
cell.detailTextLabel.text = app.download;
//先從內存中掏出圖片
UIImage *image = self.imgCache[app.icon];
if (image) {
cell.imageView.image = image;
}else {
//內存中沒有圖片
//將圖片文件數據寫入到沙盒中
NSString *cachesPath = [NSSearchPathForDirectoriesInDomains(NSCachesDirectory, NSUserDomainMask, YES) firstObject];
//取得文件名
NSString *filename = [app.icon lastPathComponent];
//盤算出文件的全途徑
NSString *file = [cachesPath stringByAppendingPathComponent:filename];
//加載沙盒的文件數據
NSData *data = [NSData dataWithContentsOfFile:file];
//斷定沙盒中能否有圖片
if (data) {
//直接加載沙盒中圖片
cell.imageView.image = [UIImage imageWithData:data];
//存到字典(內存)中
self.imgCache[app.icon] = cell.imageView.image;
}else {
//下載圖片
data = [NSData dataWithContentsOfURL:[NSURL URLWithString:app.icon]];
cell.imageView.image = [UIImage imageWithData:data];
//存到內存中
self.imgCache[app.icon] = cell.imageView.image;
//將圖片數據寫入到沙盒中
[data writeToFile:file atomically:YES];
}
}
return cell;
}
這兩個辦法是UITableView必需要完成的辦法
第一個是前往數據量,沒甚麼好說的
第二個是綁定命據
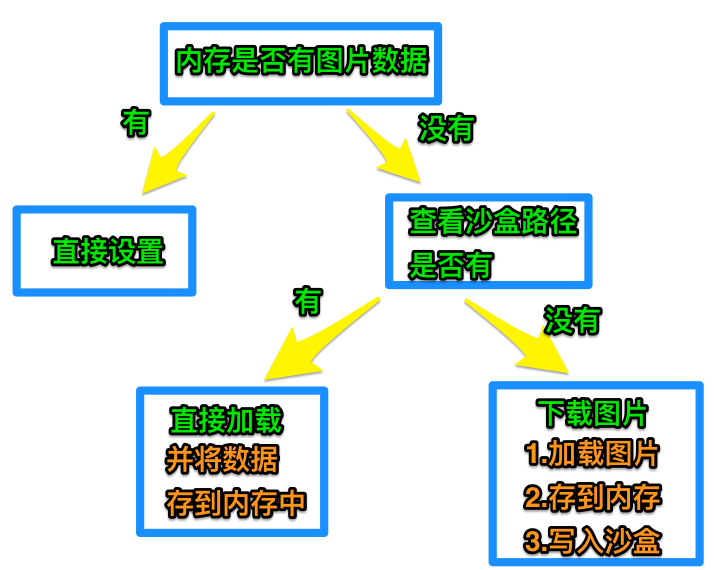
詳細的流程看下圖
以上內容針對IOS多線程完成多圖片下載(一)的相干引見,願望對年夜家有所贊助,下篇文章持續給年夜家引見IOS多線程完成多圖片下載(二),感興致的同伙請連續存眷。
【IOS多線程完成多圖片下載(一)】的相關資料介紹到這裡,希望對您有所幫助! 提示:不會對讀者因本文所帶來的任何損失負責。如果您支持就請把本站添加至收藏夾哦!


相關文章
+