iOS 完成跑馬燈效果的辦法示例
在網頁開發當中跑馬燈是常用到的,用來顯示告訴等,在游戲開發當中也如此。
首先來看看效果圖:
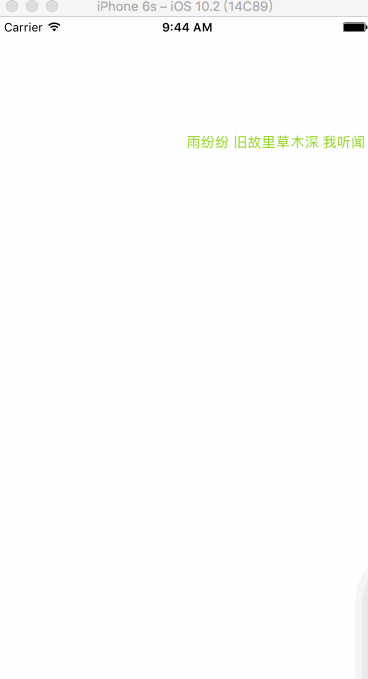
接上去就復雜看看這效果是怎樣完成的。
完成辦法
1、首先我們從這個圖片外面能聯想到假如完成這個效果必定需求運用到動畫,或許還有有用scrollView的思緒,這裡我是用的動畫的方式完成的。
2、.h文件
自定義一個承繼UIView的LGJAutoRunLabel類,在.h文件中:
@class LGJAutoRunLabel;

typedef NS_ENUM(NSInteger, RunDirectionType) {
 LeftType = 0,
 RightType = 1,
};

@protocol LGJAutoRunLabelDelegate <NSObject>

@optional
- (void)operateLabel: (LGJAutoRunLabel *)autoLabel animationDidStopFinished: (BOOL)finished;

@end

@interface LGJAutoRunLabel : UIView

@property (nonatomic, weak) id <LGJAutoRunLabelDelegate> delegate;
@property (nonatomic, assign) CGFloat speed;
@property (nonatomic, assign) RunDirectionType directionType;

- (void)addContentView: (UIView *)view;
- (void)startAnimation;
- (void)stopAnimation;
定義一個NS_ENUM用來判別自動滾動的方向,辨別是左和右,聲明一個可選類型的協議,用來在controller中調用並對autoLabel停止操作。聲明對外的屬性和辦法。這裡了如指掌,次要的完成思緒都集中在.m文件中。
3、.m文件
聲明“公有”變量和屬性:
@interface LGJAutoRunLabel()<CAAnimationDelegate>
{
 CGFloat _width;
 CGFloat _height;
 CGFloat _animationViewWidth;
 CGFloat _animationViewHeight;
 BOOL _stoped;
 UIView *_contentView;//滾動內容視圖
}
@property (nonatomic, strong) UIView *animationView;//放置滾動內容視圖
@end
初始化辦法:
- (instancetype)initWithFrame:(CGRect)frame {

 if (self == [super initWithFrame:frame]) {
 _width = frame.size.width;
 _height = frame.size.height;

 self.speed = 1.0f;
 self.directionType = LeftType;
 self.layer.masksToBounds = YES;
 self.animationView = [[UIView alloc] initWithFrame:CGRectMake(_width, 0, _width, _height)];
 [self addSubview:self.animationView];
 }
 return self;
}
將滾動內容視圖contentView添加到動畫視圖animationView上:
- (void)addContentView:(UIView *)view {

 [_contentView removeFromSuperview];
 view.frame = view.bounds;
 _contentView = view;
 self.animationView.frame = view.bounds;
 [self.animationView addSubview:_contentView];

 _animationViewWidth = self.animationView.frame.size.width;
 _animationViewHeight = self.animationView.frame.size.height;
}
讓animationView上的contentView自動滾動起來的次要辦法在這兒,重點來了,就是這個- (void)startAnimation辦法,看一下這個辦法外面是怎樣樣完成的:
- (void)startAnimation {
 [self.animationView.layer removeAnimationForKey:@"animationViewPosition"];
 _stoped = NO;

 CGPoint pointRightCenter = CGPointMake(_width + _animationViewWidth / 2.f, _animationViewHeight / 2.f);
 CGPoint pointLeftCenter = CGPointMake(-_animationViewWidth / 2, _animationViewHeight / 2.f);
 CGPoint fromPoint = self.directionType == LeftType ? pointRightCenter : pointLeftCenter;
 CGPoint toPoint  = self.directionType == LeftType ? pointLeftCenter : pointRightCenter;

 self.animationView.center = fromPoint;
 UIBezierPath *movePath = [UIBezierPath bezierPath];
 [movePath moveToPoint:fromPoint];
 [movePath addL.netoPoint:toPoint];

 CAKeyframeAnimation *moveAnimation = [CAKeyframeAnimation animationWithKeyPath:@"position"];
 moveAnimation.path   = movePath.CGPath;
 moveAnimation.removedOnCompletion = YES;
 moveAnimation.duration  = _animationViewWidth / 30.f * (1 / self.speed);
 moveAnimation.delegate  = self;
 [self.animationView.layer addAnimation:moveAnimation forKey:@"animationViewPosition"];
}
↘️首先先把animationView.layer上的動畫移除掉,接上去就是要找到animationView\contentView的pointCenter這裡把這個中點當做是animationView或許是contentView都行,由於這兩個視圖的frame是相等的,這步找左右中點的意義在於,完全顯示出文字內容,由於能夠會遇到那種比方文字太長了,view長度不夠,不能完全顯示出來文字的全部內容, 這裡我們找到中點,也就相當於確定了內容視圖要滑動的范圍了,接上去依據起始方向的枚舉值設置fromPoint和toPoint這裡我們默許是從右向左滾動的。這裡我們做動畫設置,用到了貝塞爾曲線,我們設置UIBezierPath的起始地位就是fromPoint也就是屏幕右方(我們看不見)self.animationView.center。終止地位是屏幕左方toPoint此時animationView滾動的起始地位的首和終止地位的尾的間隔正好是屏幕的寬度。這裡我們運用CAKeyframeAnimation關鍵幀動畫,moveAnimation.path = movePath.CGPath; ,moveAnimation.removedOnCompletion = YES;動畫完成後就將動畫移除,不保存最終的形態。 [self.animationView.layer addAnimation:moveAnimation forKey:@"animationViewPosition"];將動畫添加到animationView.layer上。
(這段是對下面代碼的解釋)
-------------------聯系線-------------------
接上去的這個就是代理辦法的完成了,當動畫完成懊悔調用LGJAutoRunLabelDelegate我們自定義的delegate辦法。
- (void)stopAnimation {
 _stoped = YES;
 [self.animationView.layer removeAnimationForKey:@"animationViewPosition"];
}

- (void)animationDidStop:(CAAnimation *)anim finished:(BOOL)flag {
 if (self.delegate && [self.delegate respondsToSelector:@selector(operateLabel:animationDidStopFinished:)]) {
 [self.delegate operateLabel:self animationDidStopFinished:flag];
 }
 if (flag && !_stoped) {
 [self startAnimation];
 }
}
4、在controller中運用辦法
次要的辦法就是聲明LGJAutoRunLabel實例,將代理設為本身,聲明directionType默許為Left,在runLabel上創立label也就是我們看到的文字。其他辦法了如指掌了。
//MARK:- CreateAutoRunLabel
- (void)createAutoRunLabel {
 LGJAutoRunLabel *runLabel = [[LGJAutoRunLabel alloc] initWithFrame:CGRectMake(0, 100, kWidth, 50)];
 runLabel.delegate = self;
 runLabel.directionType = LeftType;
 [self.view addSubview:runLabel];
 [runLabel addContentView:[self createLabelWithText:@"繁華聲 遁入空門 折煞了夢偏冷 輾轉終身 情債又幾 如你默許 生死枯等 枯等一圈 又一圈的 浮圖塔 斷了幾層 斷了誰的痛直奔 一盞殘燈 傾塌的山門 容我再等 歷史轉身 等酒香醇 等你彈 一曲古筝" textColor:[selfrandomColor] labelFont:[UIFont systemFontOfSize:14]]];
 [runLabel startAnimation];
}

- (UILabel *)createLabelWithText: (NSString *)text textColor:(UIColor *)textColor labelFont:(UIFont *)font {
 NSString *string = [NSString stringWithFormat:@"%@", text];
 CGFloat width = [UILabel getWidthByTitle:string font:font];
 UILabel *label = [[UILabel alloc] initWithFrame:CGRectMake(0, 0, width, 50)];
 label.font = font;
 label.text = string;
 label.textColor = textColor;
 return label;
}

- (UIColor *)randomColor {
 return [UIColor colorWithRed:[self randomValue] green:[self randomValue] blue:[self randomValue] alpha:1];
}

- (CGFloat)randomValue {
 return arc4random()%255 / 255.0f;
}
總結
這個例子挺小的,次要思緒就是應用動畫將其變活,能夠不太好了解的中央就是在動畫挪動的path這個途徑的間隔上,我們想這個途徑的時分一定要這樣想,我讓動畫從最初我看不見的中央呈現,然後最後到我看不見的中央消逝,這個兩頭的間隔之差就是屏幕的寬度了,而這個屏幕的寬度正好我們可以用contentView.frame來表示。
以上就是這篇文章的全部內容了,希望本文的內容對大家的學習或許任務能帶來一定的協助,假如有疑問大家可以留言交流。
【iOS 完成跑馬燈效果的辦法示例】的相關資料介紹到這裡,希望對您有所幫助! 提示:不會對讀者因本文所帶來的任何損失負責。如果您支持就請把本站添加至收藏夾哦!