
iOS 自動旋轉實戰:三種自適應方案與 iOS 6 之後的 API 變化
很多 App 會依裝置方向自動調整畫面。這個功能是否啟用取決於開發者的實作,而實作難度其實不高。本文從基礎尺寸概念談起,整理三種常見做法,並說明 iOS 6 帶來的 API 變動。
先搞清楚尺寸
以 iPhone 4 / 4S 為例:直立時視圖高 480px、寬 320px(含狀態列則高 460px);橫放時高 320px、寬 480px(含狀態列高 300px)。
這組數字是後續所有手動定位計算的基礎。特別注意狀態列會吃掉 20px,這也是為什麼程式碼中常看到 460 與 300 這兩個不太整齊的數字。
三種實作方向
1. 讓所有物件自動調整
2. 手動調整物件的位置與大小
3. 為不同方向分別製作視圖版本
無論採用哪一種,都需要覆寫 UIViewController 的相關方法。
旋轉的溝通機制與 iOS 6 的斷點
在舊版 iOS 中,當裝置方向改變時,系統會呼叫 shouldAutorotateToInterfaceOrientation: 詢問 App 是否支援該方向,回傳 YES 即支援。預設實作只支援單一方向,等同關閉了自動旋轉。
筆者的學習環境是 Mac 10.8 + Xcode 4.5、iOS 6.0。在 iOS 6 中,shouldAutorotateToInterfaceOrientation: 已被廢棄,改由兩個新方法接手:
// 是否允許自動旋轉
-(BOOL)shouldAutorotate
{
    return NO;   // 只支援 portrait,禁止旋轉
}

// 支援哪些方向
-(NSUInteger)supportedInterfaceOrientations
{
    return UIInterfaceOrientationMaskLandscape;
    // 可選:UIInterfaceOrientationMaskLandscape
    //      UIInterfaceOrientationMaskAll
    //      UIInterfaceOrientationMaskAllButUpsideDown
}
在 Target 的 General 分頁中也可以直接勾選要支援的方向,預設四個方向都開啟。但要注意一個細節:圖形介面的勾選無法排除 upside down,若需要排除,仍得靠 supportedInterfaceOrientations 回傳 UIInterfaceOrientationMaskAllButUpsideDown。
為了相容舊版系統,實務上建議把舊方法一起保留:
-(BOOL)shouldAutorotateToInterfaceOrientation:(UIInterfaceOrientation)toInterfaceOrientation
{
    return YES;
}
三個 mask 的意義整理如下:
· UIInterfaceOrientationMaskLandscape:僅左右橫屏
· UIInterfaceOrientationMaskAll:四個方向都支援
· UIInterfaceOrientationMaskAllButUpsideDown:支援除倒置以外的所有方向
方案一:用屬性自動調整
這個方式完全不用寫程式碼,只在介面建置器中設定即可。
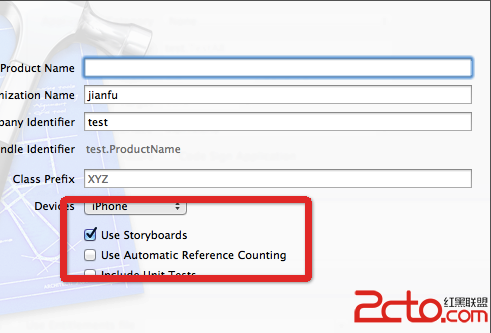
在 Xcode 4.5 中,專案預設啟用 Storyboards 與 ARC。若你不想用這兩者,必須在建立專案時取消勾選。
要調整控件在不同方向下的行為,先選取控件,然後定位到 Size Inspector。
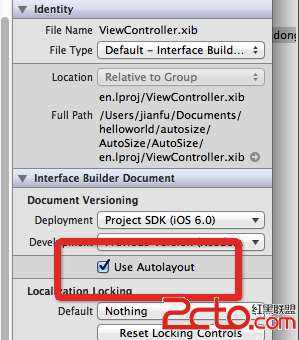
Xcode 4.5 預設開啟 Auto Layout,此時 Size Inspector 中看不到 AutoSizing 區塊。要找回它,到 File Inspector 取消勾選 Use Autolayout。
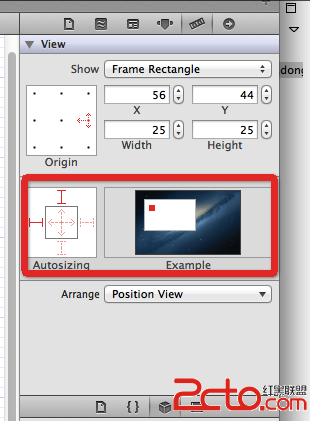
取消之後,Size Inspector 會出現 AutoSizing 的圖形化設定。左側的外框 I 形線條代表距離父視圖邊緣的間距:實線表示固定,虛線表示可變。內側的箭頭代表物件本身的尺寸:實線表示可縮放,虛線表示固定不變。右側預覽則顯示套用後的效果(以橫放呈現)。
這套機制的直覺理解是:固定邊距的物件會維持與邊緣的距離,可變邊距的物件則會隨容器伸縮;允許縮放時,物件會自動改變大小來填滿空間。
方案一的限制:它能處理「等比縮放」與「保持邊距」這類規則性排版,但遇到需要依方向重新編排的版面就無力了——比如直立時是上下堆疊、橫向時要改成左右並列,自動調整做不到。這種情況就得動用方案二。
方案二:用程式碼手動調整
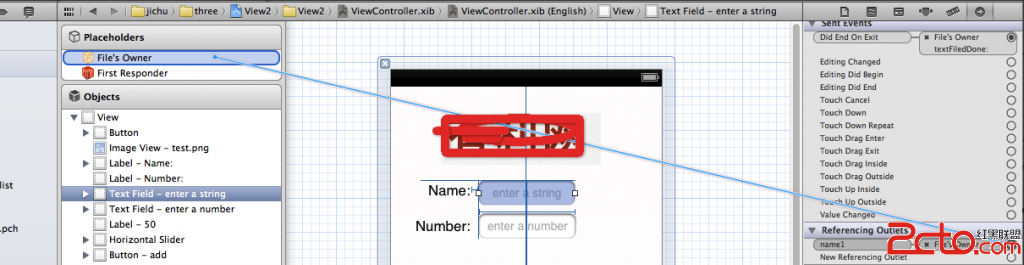
「手動」指的是透過程式碼控制物件的位置、大小與其他屬性。前提是在 xib 中先把控件連線到程式的變數。
連線方式很直接,在 Interface Builder 中拖曳即可。
iOS 在旋轉時會觸發對應的系統方法。舊版可用 willAnimateSecondHalfOfRotationToInterfaceOrientation: 或 willAnimateFirstHalfOfRotation...,但在 iOS 6 中這兩個方法也被廢棄了,改以 willAnimateRotationToInterfaceOrientation:duration: 取代,功能上足以涵蓋原本兩個方法。
實際使用範例:
-(IBAction)buttonPressed:(id)sender {
    if (sender == view1Button1 || sender == view2Button1) {
        view1Button2.hidden = YES;
        view2Button2.hidden = YES;
    } else {
        view1Button1.hidden = YES;
        view2Button1.hidden = YES;
    }
}

-(void)willAnimateRotationToInterfaceOrientation:(UIInterfaceOrientation)toInterfaceOrientation
                                        duration:(NSTimeInterval)duration {
    if (toInterfaceOrientation == UIInterfaceOrientationPortrait) {
        self.view = view1;
        self.view.transform = CGAffineTransformIdentity;
        self.view.transform = CGAffineTransformMakeRotation(degreeToRadian(0));
        self.view.bounds = CGRectMake(0.0, 0.0, 300.0, 460.0);
    }
    else if (toInterfaceOrientation == UIInterfaceOrientationLandscapeLeft) {
        self.view = view2;
        self.view.transform = CGAffineTransformIdentity;
        self.view.transform = CGAffineTransformMakeRotation(degreeToRadian(-90));
        self.view.bounds = CGRectMake(0.0, 0.0, 480.0, 300.0);
    }
    else if (toInterfaceOrientation == UIInterfaceOrientationPortraitUpsideDown) {
        self.view = view1;
        self.view.transform = CGAffineTransformIdentity;
        self.view.transform = CGAffineTransformMakeRotation(degreeToRadian(180));
        self.view.bounds = CGRectMake(0.0, 0.0, 300.0, 460.0);
    }
    else {
        self.view = view2;
        self.view.transform = CGAffineTransformIdentity;
        self.view.transform = CGAffineTransformMakeRotation(degreeToRadian(90));
        self.view.bounds = CGRectMake(0.0, 0.0, 480.0, 300.0);
    }
}

-(BOOL)shouldAutorotate {
    return YES;
}

-(NSUInteger)supportedInterfaceOrientations {
    return UIInterfaceOrientationMaskAll;
}
這裡有兩個實作細節值得注意。第一,每次設定 transform 前先指派 CGAffineTransformIdentity,這是因為 transform 會累加——若不重置,從 Portrait 轉 LandscapeLeft 再轉 Portrait,旋轉量會疊加出錯。第二,這裡替換了整個 self.view(在 view1 與 view2 之間切換),屬於方案二與方案三的混合用法。
另外,degreeToRadian() 是自行定義的輔助函式,因為 CGAffineTransformMakeRotation 接受的是弧度而非角度。
方案三:為不同方向製作獨立界面
有些時候前兩種方法都不是最佳解,此時可以為不同方向分別開發一套視圖。
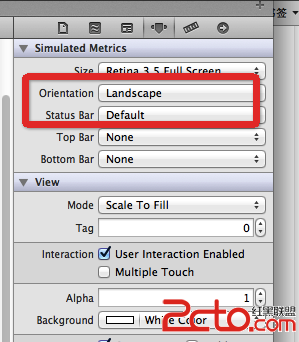
實作時會遇到一個問題:需要建立多個 view,其中橫向用的那個寬度應為 480、高度 300,但在 Interface Builder 中直接改 view 的尺寸改不動。解法是先將該 view 的方向屬性設為橫向,再配合狀態列的設定,就能得到正確的尺寸。
該選哪一種?
方案一成本最低,適合版面規則、只是需要等比縮放的情況。方案二最靈活,能處理依方向重新編排的複雜版面,代價是要維護座標計算。方案三適合直立與橫向資訊架構差異極大的 App(例如直立時是列表、橫向時變成左右分割的-detail 樣式),因為此時共用同一套 view 反而會讓程式碼塞滿 if-else。
最後提醒:本文的程式碼以 iOS 6 的 API 為基準,其中 shouldAutorotateToInterfaceOrientation:、willAnimateFirstHalfOfRotation... 等均已在新版 iOS 中移除。若你在維護新專案,請直接使用 shouldAutorotate 與 supportedInterfaceOrientations,並注意 iOS 16 之後 shouldAutorotate 的行為也有調整,需要搭配 windowScene.requestGeometryUpdate 使用。