
iOS 開發:三級控制器的搭建與自定義標籤欄
編輯:iOS 開發綜合
三級控制器指的是 UITabBarController → UINavigationController → UIViewController 這樣的嵌套結構:標籤欄負責一級切換,每個標籤下各自掛一個導航控制器負責二級推疊,導航棧內再放具體業務頁面作為第三級。這幾乎是國內 App 的標準骨架。
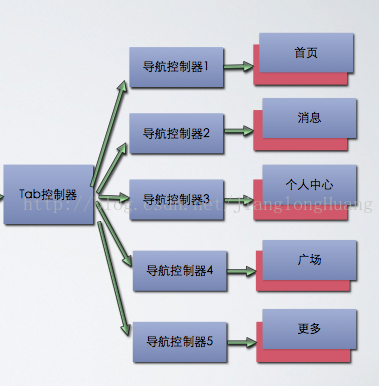
步驟一:建立三級結構
#import "MainTabbarController.h"

#import "ProfileViewController.h"
#import "GroupViewController.h"
#import "SearchViewController.h"
#import "CommentViewController.h"
#import "MessageViewController.h"

@implementation UITabBarController

- (void)viewDidLoad {
    [super viewDidLoad];

    // 建立三級控制器
    [self _creatView];

    // 自定義標籤欄
    [self _newInitTabbar];
}

#pragma mark - 建立三級控制器

- (void)_creatView {

    // 1. 建立各業務視圖控制器並放進數組
    ProfileViewController *profileCtrl = [[[ProfileViewController alloc] init] autorelease];
    GroupViewController   *groupCtrl   = [[[GroupViewController   alloc] init] autorelease];
    SearchViewController  *searchCtrl  = [[[SearchViewController  alloc] init] autorelease];
    CommentViewController *commentCtrl = [[[CommentViewController alloc] init] autorelease];
    MessageViewController *messageCtrl = [[[MessageViewController alloc] init] autorelease];

    NSArray *viewCtrls = @[profileCtrl, groupCtrl, searchCtrl, commentCtrl, messageCtrl];

    // 2. 每個視圖控制器各包一層導航控制器
    NSMutableArray *navCtrls = [[NSMutableArray alloc] init];
    for (int i = 0; i < 5; i++) {
        UIViewController *viewCtrl = viewCtrls[i];

        UINavigationController *navCtrl =
            [[UINavigationController alloc] initWithRootViewController:viewCtrl];
        [navCtrl.navigationBar setBackgroundImage:[UIImage imageNamed:@"navbar_bg_normal"]
                                      forBarMetrics:UIBarMetricsDefault];
        [navCtrls addObject:navCtrl];
    }

    // 3. 把導航控制器交給標籤控制器管理
    self.viewControllers = navCtrls;
}
步驟二:自定義標籤欄
- (void)_newInitTabbar {

    // (1) 移除系統標籤欄上的默認按鈕
    NSArray *views = [self.tabBar subviews];
    for (UIView *view in views) {
        [view removeFromSuperview];
    }

    // (2) 設置背景圖
    self.tabBar.backgroundImage = [UIImage imageNamed:@"navbg"];

    // (3) 建立自定義按鈕
    CGFloat width = [UIScreen mainScreen].bounds.size.width;
    CGFloat w = width / 5;   // 每個按鈕的寬度

    for (int i = 0; i < 5; i++) {
        UIButton *button = [UIButton buttonWithType:UIButtonTypeCustom];
        NSString *imageName = [NSString stringWithFormat:@"%d", i + 1];
        [button setImage:[UIImage imageNamed:imageName] forState:UIControlStateNormal];

        button.frame = CGRectMake((w - 42) / 2 + w * i, 2, 42, 45);
        button.tag   = i;   // 別忘了記下標,點擊時要用

        [button addTarget:self
                   action:@selector(buttonAction:)
         forControlEvents:UIControlEventTouchUpInside];
        [self.tabBar addSubview:button];
    }

    // (4) 建立選中狀態的指示圖
    _selectedImg = [[UIImageView alloc] initWithImage:[UIImage imageNamed:@"選中"]];
    _selectedImg.frame = CGRectMake((w - 53) / 2.0, 2, 53, 45);
    [self.tabBar addSubview:_selectedImg];
}

#pragma mark - 點擊切換

- (void)buttonAction:(UIButton *)button {

    // 切換對應的視圖控制器
    self.selectedIndex = button.tag;

    // 讓指示圖滑到按鈕位置
    [UIView beginAnimations:nil context:nil];
    [UIView setAnimationDuration:0.2];
    _selectedImg.center = button.center;
    [UIView commitAnimations];
}
實務提醒
上面示範的是「移除系統按鈕、完全自繪」的路子,視覺自由度最高,但有幾個地方值得改進:
- button.tag 別漏設。 原示例未指定 tag,
selectedIndex會永遠是 0,這是很容易忽略的 bug。 - 動畫 API 過時。
beginAnimations/commitAnimations這組寫法建議改為[UIView animateWithDuration:animations:],更簡潔也更安全。 - 移除子視圖有風險。
[self.tabBar subviews]取得的是私有視圖層級,直接全數移除在不同 iOS 版本上行為不一致。更穩妥的做法是用UITabBarItem替換自訂視圖,或乾脆自寫一個 tabBar 容器,不走系統 tabBar。 - ARC 環境。 示例中的
autorelease是 MRC 寫法,ARC 下直接拿掉即可。