
讓 UITableViewCell 依內容自適應高度:圖片加文字雙欄排版
編輯:iOS 開發綜合
固定行高的 tableView.rowHeight = 100 只會套用一次全域設定,一遇到「圖片長寬不一、文字長短不定」的版面就完全派不上用場。真正靈活的做法,是把行高決定權交給 delegate,讓每一列自己算出需要多高。
資料準備
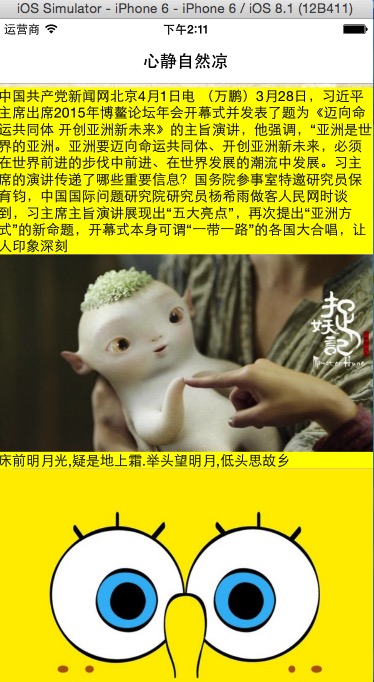
示範資料由三部分組成:一張配圖、一段文字,兩者交疊堆疊成一列。
#import "MainViewController.h"
#import "Cell.h"

@interface MainViewController () <UITableViewDataSource, UITableViewDelegate>
@property (nonatomic, retain) NSArray *picArr;
@property (nonatomic, retain) NSMutableArray *ziArr;
@end

@implementation MainViewController

- (instancetype)initWithNibName:(NSString *)nibNameOrNil bundle:(NSBundle *)nibBundleOrNil {
    self = [super initWithNibName:nibNameOrNil bundle:nibBundleOrNil];
    if (self) {
        [self create];
    }
    return self;
}

- (void)create {
    self.picArr = @[@"1.jpg", @"2.jpg", @"3.jpg"];
    self.ziArr = [NSMutableArray arrayWithObjects:
        @"第一段刻意寫得比較長,用來觀察文字換行後的高度變化……",
        @"床前明月光,疑是地上霜。舉頭望明月,低頭思故鄉。",
        @"勇士在一度落後 17 分的情況下客場逆轉快船,庫里全場 27 分。",
        nil];
}

- (void)viewDidLoad {
    [super viewDidLoad];
    self.navigationController.navigationBar.translucent = NO;
    self.view.backgroundColor = [UIColor greenColor];
    self.navigationItem.title = @"心靜自然涼";

    UITableView *tableView = [[UITableView alloc]
        initWithFrame:CGRectMake(0, 0,
                                 self.view.frame.size.width,
                                 self.view.frame.size.height - 64)
                style:UITableViewStylePlain];
    tableView.backgroundColor = [UIColor yellowColor];
    [self.view addSubview:tableView];
    [tableView release];

    tableView.delegate = self;
    tableView.dataSource = self;
    // 注意:這裡刻意不設定 rowHeight,改由 delegate 決定
}

- (NSInteger)tableView:(UITableView *)tableView numberOfRowsInSection:(NSInteger)section {
    return self.ziArr.count;
}

- (UITableViewCell *)tableView:(UITableView *)tableView
         cellForRowAtIndexPath:(NSIndexPath *)indexPath {
    static NSString *reuse = @"reuse";
    Cell *cell = [tableView dequeueReusableCellWithIdentifier:reuse];
    if (!cell) {
        cell = [[Cell alloc] initWithStyle:UITableViewCellStyleSubtitle
                          reuseIdentifier:reuse];
    }
    cell.cellImageView.image = [UIImage imageNamed:self.picArr[indexPath.row]];
    cell.newLabel.text = self.ziArr[indexPath.row];
    return cell;
}
核心:動態計算行高
行高必須由兩段內容相加:圖片縮放後的高度,加上文字排版後的高度。
#pragma mark 依內容決定每一列的高度
- (CGFloat)tableView:(UITableView *)tableView
    heightForRowAtIndexPath:(NSIndexPath *)indexPath {

    // 1. 圖片高度:等比縮放到 cell 寬度
    UIImage *image = [UIImage imageNamed:self.picArr[indexPath.row]];
    CGSize picSize = image.size;
    CGFloat rowHeight = picSize.height * self.view.frame.size.width / picSize.width;

    // 2. 文字高度:用 boundingRect 量出實際排版尺寸
    NSDictionary *fontDic = @{
        NSFontAttributeName: [UIFont systemFontOfSize:14]
    };
    CGRect rect = [self.ziArr[indexPath.row]
        boundingRectWithSize:CGSizeMake(375, 0)   // 高度給 0,寬度限制為 375
                  options:NSStringDrawingUsesLineFragmentOrigin
               attributes:fontDic
                  context:nil];

    return rowHeight + rect.size.height;
}

@end
這裡有個關鍵細節:boundingRectWithSize: 的第二個參數要寫成 (375, 0),意思是「寬度受限、高度不限」,系統才會回傳文字換行後真正需要的高度。若把高度也固定住,量出來的值就會失真。
客製化 Cell
cell 本身負責把子視圖擺到正確位置,這件事要寫在 layoutSubviews 裡——因為它是最後執行的,此時 image 與 text 都已經完成賦值。
// Cell.h
#import <UIKit/UIKit.h>

@interface Cell : UITableViewCell
@property (nonatomic, retain) UIImageView *cellImageView;
@property (nonatomic, retain) UILabel *newLabel;
@end
// Cell.m
#import "Cell.h"

@implementation Cell

- (instancetype)initWithStyle:(UITableViewCellStyle)style
              reuseIdentifier:(NSString *)reuseIdentifier {
    self = [super initWithStyle:style reuseIdentifier:reuseIdentifier];
    if (self) {
        [self createView];
    }
    return self;
}

- (void)createView {
    self.cellImageView = [[UIImageView alloc] init];
    self.cellImageView.backgroundColor = [UIColor yellowColor];
    [self.contentView addSubview:self.cellImageView];
    [_cellImageView release];

    self.newLabel = [[UILabel alloc] init];
    self.newLabel.backgroundColor = [UIColor yellowColor];
    self.newLabel.font = [UIFont systemFontOfSize:14];  // 預設是 17
    self.newLabel.numberOfLines = 0;                    // 0 代表不限行數
    [self.contentView addSubview:self.newLabel];
    [_newLabel release];
}

- (void)layoutSubviews {
    [super layoutSubviews];

    // 圖片:寬度鋪滿,高度等比縮放
    CGSize picSize = self.cellImageView.image.size;
    CGFloat height = picSize.height * self.contentView.frame.size.width / picSize.width;
    self.cellImageView.frame = CGRectMake(0, 0,
                                          self.contentView.frame.size.width,
                                          height);

    // 文字:緊接在圖片下方
    NSDictionary *fontDic = @{ NSFontAttributeName: [UIFont systemFontOfSize:14] };
    CGRect rect = [self.newLabel.text
        boundingRectWithSize:CGSizeMake(375, 0)
                    options:NSStringDrawingUsesLineFragmentOrigin
                 attributes:fontDic
                    context:nil];
    self.newLabel.frame = CGRectMake(0, height,
                                     self.contentView.frame.size.width,
                                     rect.size.height);
}

- (void)dealloc {
    [_cellImageView release];
    [_newLabel release];
    [super dealloc];
}

@end
兩個容易踩到的坑
- 高度計算重複:
heightForRowAtIndexPath:會被頻繁呼叫,若每次都重新解讀圖片檔案會很燙手,實務上應把量測結果快取起來。 - 寬度寫死:範例把可量測寬度固定為 375,換到不同尺寸的手機上就必須改;正式專案應改用
tableView.bounds.size.width之類的動態值。
- 上一篇文章: UITableView 的編輯模式:刪除、置頂與拖曳排序完整實作
- 下一篇文章: iOS 截屏功能實作:把當前畫面存進相簿