
UITableView 的編輯模式:刪除、置頂與拖曳排序完整實作
編輯:iOS 開發綜合
清單類 App 幾乎都離不開「編輯」這件事:滑出刪除鈕、自訂刪除文字、加入置頂動作、長按拖曳換順序。UITableView 把這些都包成了標準 delegate 方法,只要把幾個關鍵環節接起來就能用。
先準備資料與表格
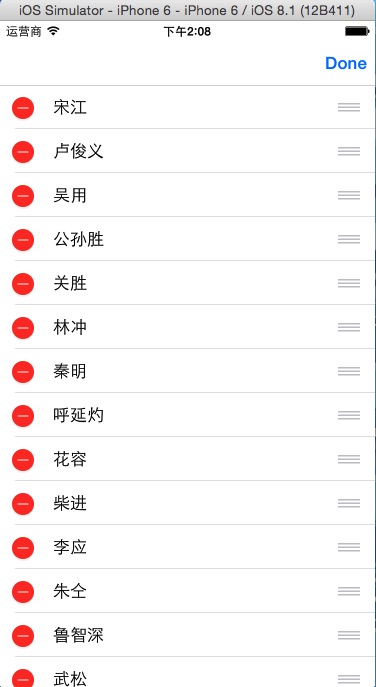
這裡用《水滸傳》好漢名單當示範資料,並把系統的編輯按鈕掛到導覽列右側。
#import "MainViewController.h"

@interface MainViewController () <UITableViewDataSource, UITableViewDelegate>
@property (nonatomic, retain) NSMutableArray *arr;
@property (nonatomic, retain) UITableView *tableView;
@end

@implementation MainViewController

- (void)dealloc {
    [_arr release];
    [_tableView release];
    [super dealloc];
}

- (instancetype)initWithNibName:(NSString *)nibNameOrNil bundle:(NSBundle *)nibBundleOrNil {
    self = [super initWithNibName:nibNameOrNil bundle:nibBundleOrNil];
    if (self) {
        self.arr = [NSMutableArray arrayWithObjects:@"宋江", @"盧俊義", @"吳用", @"公孫勝",
                    @"關勝", @"林沖", @"秦明", @"呼延灼", @"花榮", @"柴進",
                    @"李應", @"朱仝", @"魯智深", @"武松", nil];
    }
    return self;
}

- (void)viewDidLoad {
    [super viewDidLoad];
    self.navigationController.navigationBar.translucent = NO;

    self.tableView = [[UITableView alloc]
        initWithFrame:CGRectMake(0, 0,
                                 self.view.frame.size.width,
                                 self.view.frame.size.height - 64)
                style:UITableViewStylePlain];
    [self.view addSubview:self.tableView];
    [self.tableView release];

    self.tableView.delegate = self;
    self.tableView.dataSource = self;

    // 直接沿用系統提供的編輯按鈕
    self.navigationItem.rightBarButtonItem = self.editButtonItem;

    // 若不想透過按鈕,也可以直接進入編輯模式:
    // [self.tableView setEditing:YES animated:YES];
}
讓編輯按鈕真的能切換狀態
系統的 editButtonItem 點下去時,其實是呼叫目前的視圖控制器的 setEditing:animated:。所以只要重寫它,把狀態轉發給 tableView 就好:
#pragma mark 重寫系統編輯按鈕的觸發行為
- (void)setEditing:(BOOL)editing animated:(BOOL)animated {
    [super setEditing:editing animated:animated];
    [self.tableView setEditing:editing animated:YES];
}
控制哪些列可以編輯
canEditRowAtIndexPath: 回傳 YES 才會出現刪除(或插入)控制項。註解裡示範了「奇數列可編輯、偶數列不可」的做法,實務上常用來保護不該被刪除的項目。
- (BOOL)tableView:(UITableView *)tableView canEditRowAtIndexPath:(NSIndexPath *)indexPath {
    return YES;
    // 只開放奇數列:
    // return indexPath.row % 2 == 1;
}

// 指定編輯樣式為刪除
- (UITableViewCellEditingStyle)tableView:(UITableView *)tableView
           editingStyleForRowAtIndexPath:(NSIndexPath *)indexPath {
    return UITableViewCellEditingStyleDelete;
}
真正執行刪除
這裡有個一定要記住的順序:先改資料來源,再呼叫表格的刪除方法。順序顛倒會讓 dataSource 與畫面不同步而直接崩潰。
- (void)tableView:(UITableView *)tableView
    commitEditingStyle:(UITableViewCellEditingStyle)editingStyle
     forRowAtIndexPath:(NSIndexPath *)indexPath {
    if (editingStyle == UITableViewCellEditingStyleDelete) {
        [self.arr removeObjectAtIndex:indexPath.row];
        // 與其 reloadData,不如用動畫刪除,視覺上更流暢
        [self.tableView deleteRowsAtIndexPaths:@[indexPath]
                             withRowAnimation:UITableViewRowAnimationLeft];
    }
}

// 自訂刪除確認按鈕的文字
- (NSString *)tableView:(UITableView *)tableView
    titleForDeleteConfirmationButtonForRowAtIndexPath:(NSIndexPath *)indexPath {
    return @"來點我啊";
}
iOS 8 起:一次滑出多個動作
從 iOS 8 開始可以用 editActionsForRowAtIndexPath: 一次提供多個滑行動作,例如「刪除」加上「置頂」。每個動作的實際行為都寫在 block 裡。
- (NSArray *)tableView:(UITableView *)tableView
    editActionsForRowAtIndexPath:(NSIndexPath *)indexPath {

    UITableViewRowAction *deleteAction =
        [UITableViewRowAction rowActionWithStyle:UITableViewRowActionStyleDefault
                                           title:@"刪除"
                                         handler:^(UITableViewRowAction *action,
                                                   NSIndexPath *indexPath) {
            NSLog(@"觸發了刪除");
        }];
    deleteAction.backgroundColor = [UIColor cyanColor];

    UITableViewRowAction *topAction =
        [UITableViewRowAction rowActionWithStyle:UITableViewRowActionStyleDefault
                                           title:@"置頂"
                                         handler:^(UITableViewRowAction *action,
                                                   NSIndexPath *indexPath) {
            NSString *temp = self.arr[indexPath.row];
            [self.arr removeObjectAtIndex:indexPath.row];
            [self.arr insertObject:temp atIndex:0];
            [self.tableView reloadData];
        }];
    topAction.backgroundColor = [UIColor redColor];

    return @[deleteAction, topAction];
}
拖曳排序
拖曳一樣是「先搬資料、再讓畫面跟上」。取出來源物件時要注意記憶體管理(MRC 下需 retain/release,ARC 下直接省略即可)。
- (void)tableView:(UITableView *)tableView
    moveRowAtIndexPath:(NSIndexPath *)sourceIndexPath
           toIndexPath:(NSIndexPath *)destinationIndexPath {
    NSString *str = self.arr[sourceIndexPath.row];
    [self.arr removeObjectAtIndex:sourceIndexPath.row];
    [self.arr insertObject:str atIndex:destinationIndexPath.row];
}
最後補上資料與 cell
- (NSInteger)tableView:(UITableView *)tableView numberOfRowsInSection:(NSInteger)section {
    return self.arr.count;
}

- (UITableViewCell *)tableView:(UITableView *)tableView
         cellForRowAtIndexPath:(NSIndexPath *)indexPath {
    static NSString *reuse = @"reuse";
    UITableViewCell *cell = [tableView dequeueReusableCellWithIdentifier:reuse];
    if (!cell) {
        cell = [[UITableViewCell alloc] initWithStyle:UITableViewCellStyleValue1
                                    reuseIdentifier:reuse];
    }
    cell.textLabel.text = self.arr[indexPath.row];
    return cell;
}

@end
重點回顧
- 編輯狀態靠重寫
setEditing:animated:轉發給 tableView。 - 刪除與排序都遵守「先改資料、後動畫」的鐵律。
- iOS 8 之後的多動作菜單用
UITableViewRowAction陣列回傳。