
Quartz 2D 完整指南:繪圖路徑、上下文堆疊、矩陣變換與 Bitmap
一、Quartz 2D 是什麼
Quartz 2D 是蘋果的二維繪圖引擎,同時支援 iOS 與 macOS,API 屬於 Core Graphics 框架,以純 C 語言提供。iOS 系統中絕大多數控制元件的外觀,背後都是 Quartz 2D 畫出來的。因此它最重要的用途就是自訂 view、打造系統沒有的 UI 元件。
核心概念:圖形上下文
圖形上下文(CGContextRef)承擔三件事:保存繪圖參數、記錄繪圖路徑、決定最終輸出到哪裡(螢幕、PDF、bitmap)。可以把它想成一張畫布——所有的畫筆設定與圖形都依附在它上面。
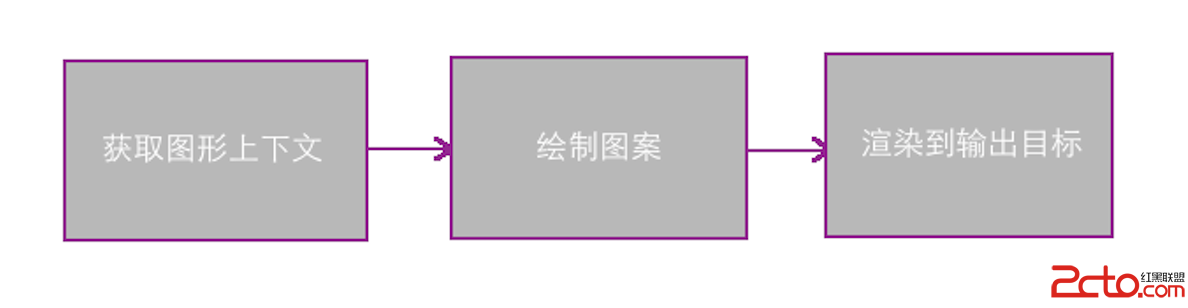
自訂 view 的三步驟
- 取得與當前 view 相關聯的圖形上下文。
- 在上下文上繪製圖形內容。
- 渲染,讓內容顯示到 view 的 layer 上。
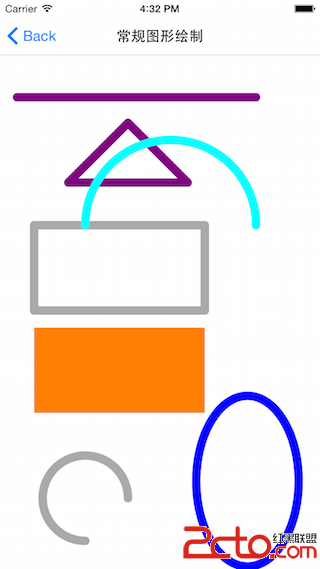
二、基本繪圖
// 取得目前 view 的上下文
CGContextRef ctx = UIGraphicsGetCurrentContext();

/** 直線 **/
CGContextMoveToPoint(ctx, 20, 50);
CGContextAddLineToPoint(ctx, 300, 50);
CGContextSetStrokeColorWithColor(ctx, [UIColor purpleColor].CGColor);
CGContextSetLineWidth(ctx, 10);
CGContextSetLineCap(ctx, kCGLineCapRound);   // 端點圓角
CGContextStrokePath(ctx);                    // 渲染

/** 三角形 **/
CGContextMoveToPoint(ctx, 150, 80);
CGContextAddLineToPoint(ctx, 220, 150);
CGContextAddLineToPoint(ctx, 80, 150);
CGContextClosePath(ctx);                     // 自動閉合首尾
CGContextSetLineJoin(ctx, kCGLineJoinRound); // 轉角圓角
CGContextStrokePath(ctx);

/** 空心矩形 **/
CGContextAddRect(ctx, CGRectMake(40, 200, 200, 100));
[[UIColor lightGrayColor] setStroke];
CGContextSetLineWidth(ctx, 10);
CGContextStrokePath(ctx);

/** 實心矩形 **/
CGContextAddRect(ctx, CGRectMake(40, 320, 200, 100));
[[UIColor orangeColor] setFill];
CGContextFillPath(ctx);

/** 圓弧(含整圓) **/
// 參數:上下文、圓心 x、圓心 y、半徑、起始弧度、結束弧度、順時針(1)/逆時針(0)
CGContextAddArc(ctx, 100, 520, 50, 0, M_PI_2, 1);
CGContextStrokePath(ctx);

/** 橢圓 **/
CGContextAddEllipseInRect(ctx, CGRectMake(230, 400, 120, 200));
CGContextSetStrokeColorWithColor(ctx, [UIColor blueColor].CGColor);
CGContextStrokePath(ctx);
座標系差異:Quartz 2D 的原點在左下、y 軸向上;UIKit 的原點在左上、y 軸向下。若不翻轉座標系,畫出來的圖會與預期呈上下鏡像關係。實務上有兩種解法:在 drawRect: 開頭自己做 CGContextTranslateCTM 加 CGContextScaleCTM(ctx, 1, -1) 翻轉,或乾脆把 y 座標也想成從底部起算。
三、上下文堆疊與狀態保存
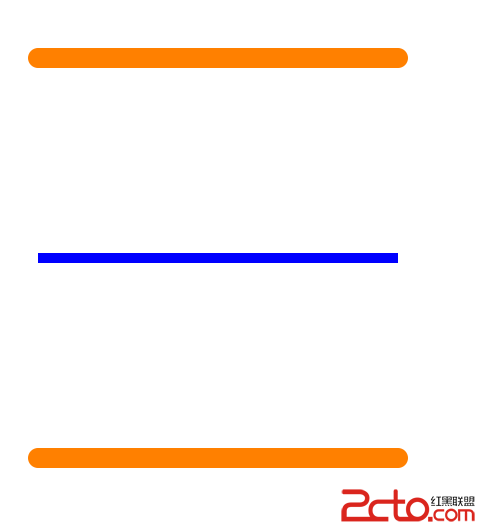
繪圖參數一旦設定就會持續保留在上下文上,直到被重新設定為止。這解釋了為什麼畫完紅線後接著畫的第二條線也是紅色。
若有多條線需要不同參數,有兩種做法:每次重設參數,或用 CGContextSaveGState 把當前狀態壓入堆疊,畫完後用 CGContextRestoreGState 從堆頂取回。注意規則是「存幾次就能取幾次,且每次只能取堆頂」。
// 第一條線:橙色、粗 10、圓角
CGContextMoveToPoint(ctx, 20, 300);
CGContextAddLineToPoint(ctx, 200, 300);
CGContextSetLineWidth(ctx, 10);
CGContextSetLineCap(ctx, kCGLineCapRound);
CGContextSetStrokeColorWithColor(ctx, [UIColor orangeColor].CGColor);
CGContextStrokePath(ctx);

// 第二條線:先存狀態
CGContextSaveGState(ctx);
CGContextMoveToPoint(ctx, 20, 400);
CGContextAddLineToPoint(ctx, 200, 400);
CGContextSetLineWidth(ctx, 5);
CGContextSetLineCap(ctx, kCGLineCapButt);
CGContextSetStrokeColorWithColor(ctx, [UIColor blueColor].CGColor);
CGContextStrokePath(ctx);

// 第三條線:取回狀態,恢復成第一條線的樣式
CGContextRestoreGState(ctx);
CGContextMoveToPoint(ctx, 20, 500);
CGContextAddLineToPoint(ctx, 200, 500);
CGContextStrokePath(ctx);
四、矩陣變換
旋轉、縮放、平移皆以視圖左上角為原點,且必須在繪圖之前設定,畫完再改是無效的。
CGContextRef ctx = UIGraphicsGetCurrentContext();

CGContextRotateCTM(ctx, M_PI_4);        // 旋轉 45 度
CGContextScaleCTM(ctx, 0.5, 0.5);       // 縮放
CGContextTranslateCTM(ctx, 100, 100);   // 平移

CGContextAddRect(ctx, CGRectMake(100, 100, 100, 100));
CGContextStrokePath(ctx);
五、剪切操作
剪切的作用是「只保留指定區域內的內容」,原則同樣是先設定剪切範圍,再繪圖。
CGContextRef ctx = UIGraphicsGetCurrentContext();

// 剪切為自訂路徑(例:三角形)
CGContextAddEllipseInRect(ctx, CGRectMake(100, 100, 50, 50));
CGContextClip(ctx);

// 或直接剪切為矩形
CGContextClipToRect(ctx, CGRectMake(80, 100, 100, 100));

UIImage *image = [UIImage imageNamed:@"google"];
[image drawAtPoint:CGPointMake(80, 100)];   // 只有剪切區內會顯示
六、繪圖路徑
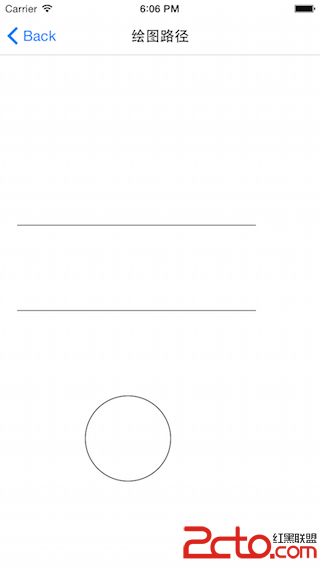
前面每畫一個圖形,系統其實都默默建立了一條路徑。你也可以手動建立多條路徑,全部加入上下文後一次性渲染,這在繪製複合圖形時能減少渲染次數。
CGContextRef ctx = UIGraphicsGetCurrentContext();

CGMutablePathRef path = CGPathCreateMutable();
CGPathMoveToPoint(path, NULL, 20, 300);
CGPathAddLineToPoint(path, NULL, 300, 300);
CGContextAddPath(ctx, path);

CGMutablePathRef path2 = CGPathCreateMutable();
CGPathAddEllipseInRect(path2, NULL, CGRectMake(100, 400, 100, 100));
CGContextAddPath(ctx, path2);

CGContextStrokePath(ctx);      // 一次渲染全部

CGPathRelease(path);           // Create 建立的必須釋放
CGPathRelease(path2);
七、Bitmap 上下文與截屏
Quartz 2D 提供數種類型的上下文:Bitmap、PDF、Window、Layer、Printer。最常用的是 Bitmap,也就是產生一張 UIImage。
// 方式一:簡單,但清晰度較差
UIGraphicsBeginImageContext(size);

// 方式二:推薦。參數依序為尺寸、是否不透明、縮放比例(0 為依螢幕)
UIGraphicsBeginImageContextWithOptions(size, NO, 0);
流程是:建立上下文 → 繪圖 → 取出圖片 → 關閉上下文 → 釋放需釋放的變數。
- (void)actionShot:(UIButton *)sender {
    self.buttonShot.hidden = YES;

    UIGraphicsBeginImageContextWithOptions(
        CGSizeMake(self.view.frame.size.width, self.view.frame.size.height), NO, 0);

    AppDelegate *delegate = (AppDelegate *)[UIApplication sharedApplication].delegate;
    [delegate.window.layer renderInContext:UIGraphicsGetCurrentContext()];

    UIImage *screenImage = UIGraphicsGetImageFromCurrentImageContext();
    UIGraphicsEndImageContext();
    self.buttonShot.hidden = NO;

    // 裁切指定區域(倍率應改為讀取螢幕 scale)
    CGImageRef full = screenImage.CGImage;
    CGRect rect = CGRectMake(0, 0, screenImage.size.width * 3, screenImage.size.height * 3);
    CGImageRef cropped = CGImageCreateWithImageInRect(full, rect);
    UIImage *finalImage = [UIImage imageWithCGImage:cropped];

    UIImageWriteToSavedPhotosAlbum(finalImage, self,
        @selector(image:didFinishSavingWithError:contextInfo:), nil);

    NSString *dir = NSSearchPathForDirectoriesInDomains(
                        NSDocumentDirectory, NSUserDomainMask, YES).firstObject;
    NSDateFormatter *fmt = [[NSDateFormatter alloc] init];
    fmt.dateFormat = @"yyyy-MM-dd HHmmss";
    NSString *path = [dir stringByAppendingPathComponent:
        [NSString stringWithFormat:@"ScreenShot_%@.png", [fmt stringFromDate:[NSDate date]]]];
    [UIImagePNGRepresentation(finalImage) writeToFile:path atomically:YES];

    CGImageRelease(cropped);
}
八、記憶體管理規則
- 凡是函式名稱含 create 或 copy 所產生的物件,使用完畢必須自行釋放,否則記憶體洩漏。
- 不含 create / copy 的則不需釋放,例如
UIGraphicsGetCurrentContext()取得的上下文由系統管理。 - 若對物件執行了 retain,不再使用時需 release。以 CGColorSpace 為例,可用
CGColorSpaceRetain/CGColorSpaceRelease,也可使用 Core Foundation 的CFRetain/CFRelease,但不可傳入 NULL。