
iOS UIAlertView 使用指南:基本提示、多按鈕與三種輸入框樣式
編輯:iOS 開發綜合
UIAlertView 就是我們熟悉的對話框,用來顯示訊息或請使用者確認某個動作。本文從最簡單的單按鈕提示開始,逐步介紹多按鈕回饋與三種文字輸入樣式。
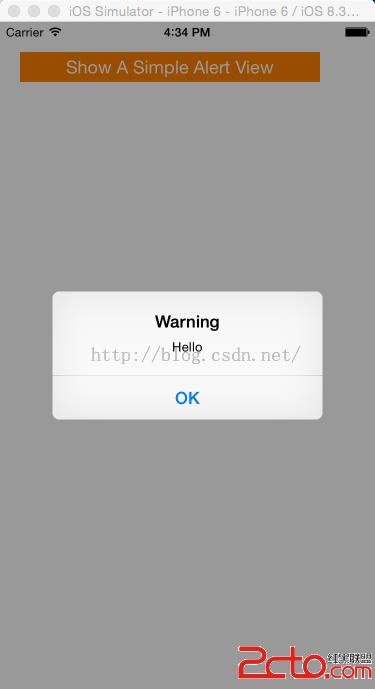
一、最簡單的提示框
建立一個專案,在 view 上放一顆按鈕,點擊後跳出提示。
#import "ViewController.h"

@implementation ViewController

- (void)viewDidLoad {
    [super viewDidLoad];
    self.view.backgroundColor = [UIColor whiteColor];

    UIButton *button = [[UIButton alloc] initWithFrame:CGRectMake(20, 30, 300, 30)];
    [button setTitleColor:[UIColor whiteColor] forState:UIControlStateNormal];
    [button setTitleColor:[UIColor grayColor] forState:UIControlStateHighlighted];
    [button setBackgroundColor:[UIColor orangeColor]];
    [button setTitle:@"Show A Simple Alert View" forState:UIControlStateNormal];
    [button addTarget:self action:@selector(showAlert)
     forControlEvents:UIControlEventTouchUpInside];
    [self.view addSubview:button];
}

- (void)showAlert {
    UIAlertView *alert = [[UIAlertView alloc] initWithTitle:@"Warning"
                                                   message:@"Hello"
                                                  delegate:self
                                         cancelButtonTitle:@"OK"
                                         otherButtonTitles:nil];
    [alert show];
}
@end
二、多按鈕並取得點擊結果
若要為每顆按鈕綁定不同行為,需讓 view controller 採用 UIAlertViewDelegate 協議,並實作 alertView:clickedButtonAtIndex:。我在畫面上方放一個 label,用來顯示被點擊的按鈕標題與索引。
// ViewController.h
#import <UIKit/UIKit.h>

@interface ViewController : UIViewController <UIAlertViewDelegate> {
    UILabel *label_;
}
@end
在 viewDidLoad 中補上 label 與第二顆按鈕:
label_ = [[UILabel alloc] initWithFrame:CGRectMake(0, 30,
                                     self.view.bounds.size.width, 60)];
label_.backgroundColor  = [UIColor blackColor];
label_.textAlignment    = NSTextAlignmentCenter;
label_.textColor        = [UIColor whiteColor];
[self.view addSubview:label_];

UIButton *buttonMore = [[UIButton alloc] initWithFrame:CGRectMake(20, 140, 300, 30)];
[buttonMore setTitleColor:[UIColor whiteColor] forState:UIControlStateNormal];
[buttonMore setTitleColor:[UIColor grayColor] forState:UIControlStateHighlighted];
[buttonMore setBackgroundColor:[UIColor brownColor]];
[buttonMore setTitle:@"Show More Buttons Alert View" forState:UIControlStateNormal];
[buttonMore addTarget:self action:@selector(showAlertWithMoreButtons)
     forControlEvents:UIControlEventTouchUpInside];
[self.view addSubview:buttonMore];
實作回呼方法:
- (void)alertView:(UIAlertView *)alertView
clickedButtonAtIndex:(NSInteger)buttonIndex {
    label_.text = [NSString stringWithFormat:@"%@ %ld",
                   [alertView buttonTitleAtIndex:buttonIndex],
                   (long)buttonIndex];
}
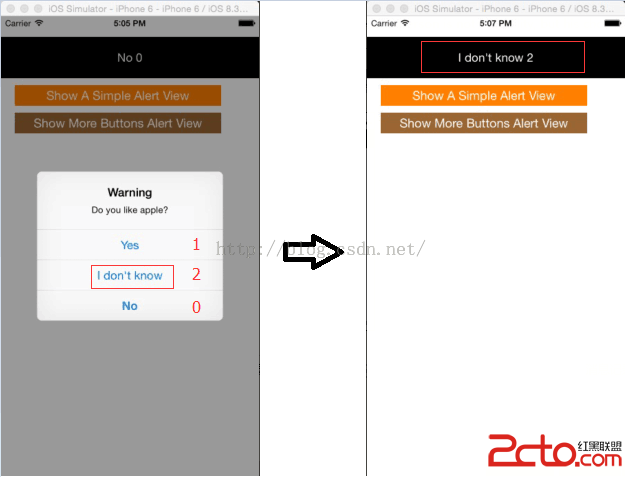
關鍵細節:取消按鈕的索引固定為 0,其餘按鈕依 otherButtonTitles 的宣告順序遞增。
三、三種輸入框樣式
普通文字輸入
- (void)showAlertTextInput {
    UIAlertView *alert = [[UIAlertView alloc] initWithTitle:@"Warning"
                                                   message:@"Do you like apple?"
                                                  delegate:self
                                         cancelButtonTitle:@"Cancel"
                                         otherButtonTitles:@"OK", nil];
    [alert setAlertViewStyle:UIAlertViewStylePlainTextInput];
    [alert show];
}
使用者輸入的內容透過 [alertView textFieldAtIndex:0].text 取得:
- (void)alertView:(UIAlertView *)alertView
clickedButtonAtIndex:(NSInteger)buttonIndex {
    label_.text = [NSString stringWithFormat:@"%@ %ld  TextFiled 0: %@",
                   [alertView buttonTitleAtIndex:buttonIndex],
                   (long)buttonIndex,
                   [alertView textFieldAtIndex:0].text];
}
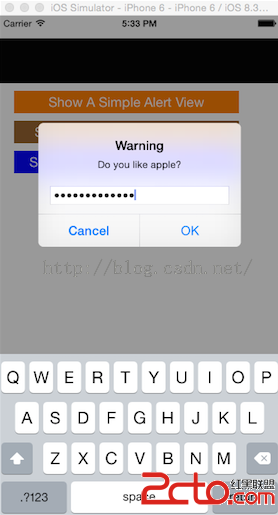
安全文字輸入(密碼樣式)
[alertView setAlertViewStyle:UIAlertViewStyleSecureTextInput];
帳號密碼雙欄輸入
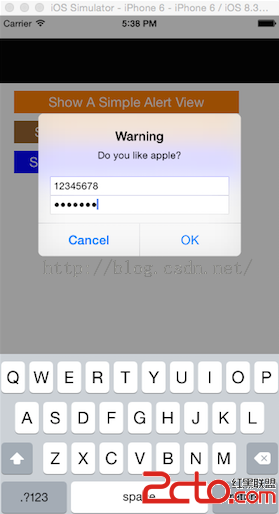
[alertView setAlertViewStyle:UIAlertViewStyleLoginAndPasswordInput];
此樣式會產生兩個輸入框,帳號在 index 0、密碼在 index 1,分別用 textFieldAtIndex:0 與 textFieldAtIndex:1 取值。
四、該改用 UIAlertController 了
UIAlertView 自 iOS 8 起已被標記為deprecated,Apple 建議改用 UIAlertController。新 API 的優勢明顯:
- 不再需要 delegate,每個
UIAlertAction各自帶一個 block,回呼邏輯寫在同一處,可讀性大幅提升。 - 同時處理 alert 與 action sheet 兩種樣式,介面統一。
- 文字輸入改為
addTextFieldWithConfigurationHandler:,可自訂 placeholder 與 keyboardType。
等價寫法如下:
UIAlertController *ac =
    [UIAlertController alertControllerWithTitle:@"Warning"
                                        message:@"Do you like apple?"
                                 preferredStyle:UIAlertControllerStyleAlert];

[ac addTextFieldWithConfigurationHandler:^(UITextField *tf) {
    tf.placeholder = @"請輸入";
}];

[ac addAction:[UIAlertAction actionWithTitle:@"Cancel"
                                       style:UIAlertActionStyleCancel
                                     handler:nil]];

[ac addAction:[UIAlertAction actionWithTitle:@"OK"
                                       style:UIAlertActionStyleDefault
                                     handler:^(UIAlertAction *action) {
    NSString *text = ac.textFields.firstObject.text;
    NSLog(@"輸入內容:%@", text);
}]];

[self presentViewController:ac animated:YES completion:nil];
若你正在維護舊專案,本文的 UIAlertView 寫法仍然有效;但新專案請直接採用 UIAlertController。
- 上一篇文章: Quartz 2D 完整指南:繪圖路徑、上下文堆疊、矩陣變換與 Bitmap
- 下一篇文章: FMDB 實戰:批次查詢與交易式批次更新