
UITabBarController 實戰:多頁籤架構、外觀客製與 UIMenuController
編輯:iOS 開發綜合
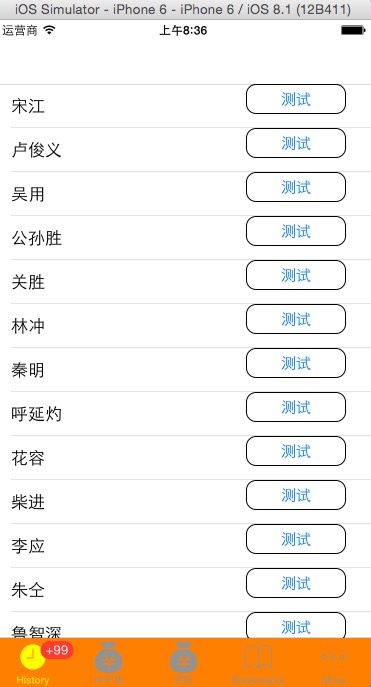
UITabBarController 是底部標籤頁架構的核心。本文示範如何組出六個分頁、每頁各自套一層 UINavigationController,並進一步客製 tabBar 外觀與實作長按快捷選單。
AppDelegate 中組裝分頁
#import "AppDelegate.h"
#import "FirstViewController.h"
#import "SecondViewController.h"
#import "ThirdViewController.h"
#import "FourViewController.h"
#import "FiveViewController.h"
#import "SixViewController.h"

@interface AppDelegate () <UITabBarControllerDelegate>
@end

@implementation AppDelegate

- (void)dealloc {
    [_window release];
    [super dealloc];
}

- (BOOL)application:(UIApplication *)application
didFinishLaunchingWithOptions:(NSDictionary *)launchOptions {

    self.window = [[UIWindow alloc] initWithFrame:[[UIScreen mainScreen] bounds]];
    self.window.backgroundColor = [UIColor whiteColor];
    [self.window makeKeyAndVisible];
    [_window release];

    // 每一頁都包一層導航控制器
    FirstViewController *firstVC = [[FirstViewController alloc] init];
    UINavigationController *firstNAVC =
        [[UINavigationController alloc] initWithRootViewController:firstVC];
    firstVC.tabBarItem = [[UITabBarItem alloc]
        initWithTabBarSystemItem:UITabBarSystemItemHistory tag:1000];
    firstVC.tabBarItem.badgeValue = @"99+";

    SecondViewController *secondVC = [[SecondViewController alloc] init];
    UINavigationController *secondNAVC =
        [[UINavigationController alloc] initWithRootViewController:secondVC];
    secondVC.tabBarItem = [[UITabBarItem alloc]
        initWithTitle:@"保護費"
                image:[UIImage imageNamed:@"iconfont-jiaofei.png"]
        selectedImage:[UIImage imageNamed:@"iconfont-chongzhi.png"]];

    ThirdViewController *thirdVC = [[ThirdViewController alloc] init];
    UINavigationController *thirdNAVC =
        [[UINavigationController alloc] initWithRootViewController:thirdVC];
    thirdVC.tabBarItem = [[UITabBarItem alloc]
        initWithTitle:@"進賬" image:[UIImage imageNamed:@"iconfont-jiaofei.png"] tag:1000];

    FourViewController *fourVC = [[FourViewController alloc] init];
    UINavigationController *fourNAVC =
        [[UINavigationController alloc] initWithRootViewController:fourVC];
    fourVC.tabBarItem = [[UITabBarItem alloc]
        initWithTabBarSystemItem:UITabBarSystemItemBookmarks tag:1000];

    FiveViewController *fiveVC = [[FiveViewController alloc] init];
    UINavigationController *fiveNAVC =
        [[UINavigationController alloc] initWithRootViewController:fiveVC];
    fiveVC.tabBarItem = [[UITabBarItem alloc]
        initWithTabBarSystemItem:UITabBarSystemItemDownloads tag:1000];

    SixViewController *sixVC = [[SixViewController alloc] init];
    UINavigationController *sixNAVC =
        [[UINavigationController alloc] initWithRootViewController:sixVC];
    sixVC.tabBarItem = [[UITabBarItem alloc]
        initWithTabBarSystemItem:UITabBarSystemItemSearch tag:1000];

    // 用陣列管理所有分頁
    UITabBarController *tabVC = [[UITabBarController alloc] init];
    tabVC.viewControllers = @[firstNAVC, secondNAVC, thirdNAVC,
                              fourNAVC, fiveNAVC, sixNAVC];

    tabVC.tabBar.translucent  = NO;
    tabVC.tabBar.barTintColor = [UIColor orangeColor];
    tabVC.tabBar.tintColor    = [UIColor yellowColor];
    tabVC.delegate = self;
    // tabVC.selectedIndex = 1;   // 指定預設頁

    self.window.rootViewController = tabVC;
    return YES;
}

// 切換分頁時清掉該頁的 badge
- (void)tabBarController:(UITabBarController *)tabBarController
       didSelectViewController:(UIViewController *)viewController {
    viewController.tabBarItem.badgeValue = nil;
}
@end
幾個關鍵點:tabBarItem 的 selectedImage 決定選取態的圖示,未指定時系統會以 alpha 值自動上色;badgeValue 則是紅點數字,設為 nil 即可清除。
分頁內的表格與長按選單
@interface FirstViewController () <UITableViewDataSource, UITableViewDelegate>
@property (nonatomic, retain) NSMutableArray *arr;
@property (nonatomic, retain) UITableView *tableView;
@end

@implementation FirstViewController

- (instancetype)initWithNibName:(NSString *)nibNameOrNil bundle:(NSBundle *)nibBundleOrNil {
    self = [super initWithNibName:nibNameOrNil bundle:nibBundleOrNil];
    if (self) {
        self.arr = [NSMutableArray arrayWithObjects:@"宋江", @"盧俊義", @"吳用", @"公孫勝",
                    @"關勝", @"林沖", @"秦明", @"呼延灼", @"花容", @"柴進",
                    @"李應", @"朱仝", @"魯智深", @"武松", nil];
    }
    return self;
}

- (void)viewDidLoad {
    [super viewDidLoad];
    self.view.backgroundColor = [UIColor yellowColor];
    self.navigationController.navigationBar.translucent = NO;

    self.tableView = [[UITableView alloc]
        initWithFrame:CGRectMake(0, 0, self.view.frame.size.width,
                                 self.view.frame.size.height - 64 - 49)
                style:UITableViewStylePlain];
    self.tableView.delegate   = self;
    self.tableView.dataSource = self;
    [self.view addSubview:self.tableView];
    [self.tableView release];
}

- (UITableViewCell *)tableView:(UITableView *)tableView
         cellForRowAtIndexPath:(NSIndexPath *)indexPath {
    static NSString *reuse = @"reuse";
    UITableViewCell *cell = [tableView dequeueReusableCellWithIdentifier:reuse];
    if (!cell) {
        cell = [[[UITableViewCell alloc] initWithStyle:UITableViewCellStyleValue1
                                      reuseIdentifier:reuse] autorelease];

        // 長按手勢
        UILongPressGestureRecognizer *longPress =
            [[UILongPressGestureRecognizer alloc] initWithTarget:self action:@selector(click:)];
        [cell addGestureRecognizer:longPress];
        [longPress release];

        // 自訂按鈕
        UIButton *button = [UIButton buttonWithType:UIButtonTypeSystem];
        button.frame = CGRectMake(250, 0, 100, 30);
        [button setTitle:@"測試" forState:UIControlStateNormal];
        button.layer.borderWidth  = 1;
        button.layer.cornerRadius = 10;
        [cell addSubview:button];
    }
    cell.textLabel.text = self.arr[indexPath.row];
    return cell;
}

- (void)click:(UILongPressGestureRecognizer *)longPress {
    UITableViewCell *cell = (UITableViewCell *)longPress.view;

    UIMenuController *menu = [UIMenuController sharedMenuController];
    [menu setTargetRect:cell.frame inView:cell.superview];

    UIMenuItem *flag = [[UIMenuItem alloc] initWithTitle:@"測試" action:@selector(flag)];
    [menu setMenuItems:@[flag]];
    [menu setMenuVisible:YES animated:YES];
}

// 沒有回傳 YES,快捷選單不會顯示
- (BOOL)canBecomeFirstResponder {
    return YES;
}

- (void)flag {
    NSLog(@"觸發自訂選單項");
}
@end
兩個容易忽略的細節
第一,UIMenuController 的選單項方法必須存在。無論是系統內建的 delete、copy、select,還是自訂的 flag,若對應的 method 未實作,該項目不會出現在選單上。
第二,canBecomeFirstResponder 必須回傳 YES。UIMenuController 只會顯示在「第一回應者」上,少了這一步,長按後什麼都不會發生。