
iOS UI 實作:以代理模式打造可增刪改的電話簿
編輯:iOS 開發綜合
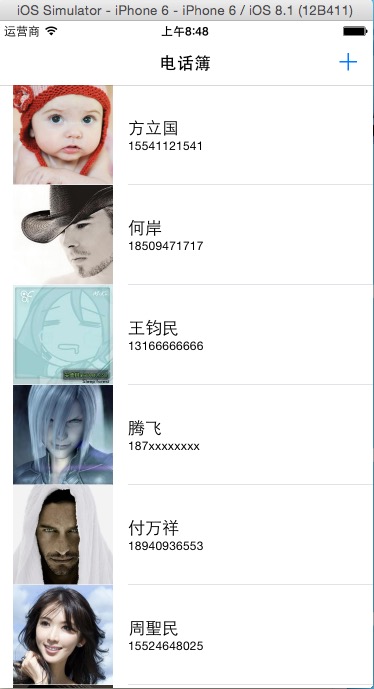
這個練習是一個三頁結構的通訊錄:列表頁展示聯絡人、詳情頁可編輯與刪除、新增頁可建立新聯絡人。三個頁面之間透過 delegate 回傳資料,是理解「代理設計模式」很合適的題材。


一、協定宣告:先講清楚誰要回傳什麼
#import <UIKit/UIKit.h>

// 協定一:詳情頁編輯完成後回傳新的資料
@protocol SecondViewController <NSObject>
- (void)change:(NSMutableArray *)array index:(NSInteger)index;
@end

// 協定二:詳情頁請求刪除某一筆
@protocol deleteController <NSObject>
- (void)deletePersonAtIndex:(NSInteger)index;
@end

// 協定三:新增頁完成後回傳新聯絡人
@protocol addNewController <NSObject>
- (void)addPerson:(NSMutableArray *)arr;
@end
把協定集中在標頭檔中宣告,是為了讓三個頁面都看得到同一份「契約」。
二、列表頁
#import "MainViewController.h"
#import "SecondViewController.h"
#import "AddViewController.h"

@interface MainViewController () <UITableViewDataSource, UITableViewDelegate>
@property (nonatomic, retain) NSMutableArray *arr;       // 聯絡人資料
@property (nonatomic, retain) NSMutableArray *imageArr;  // 對應頭像
@end

@implementation MainViewController

- (void)dealloc {
    [_arr release];
    [_imageArr release];
    [super dealloc];
}

- (void)viewDidLoad {
    [super viewDidLoad];

    // 從 plist 讀取初始資料
    NSString *path = [[NSBundle mainBundle] pathForResource:@"StudentArr" ofType:@"plist"];
    self.arr = [[NSMutableArray alloc] initWithContentsOfFile:path];

    self.view.backgroundColor = [UIColor cyanColor];
    self.navigationController.navigationBar.translucent = NO;
    self.navigationItem.title = @"電話簿";

    // 建立 tableView
    UITableView *tableView = [[UITableView alloc]
        initWithFrame:CGRectMake(0, 0, self.view.frame.size.width, self.view.frame.size.height - 64)
                style:UITableViewStylePlain];
    tableView.backgroundColor = [UIColor cyanColor];
    [self.view addSubview:tableView];
    [tableView release];

    tableView.rowHeight = 100;
    tableView.delegate = self;
    tableView.dataSource = self;
    tableView.tag = 1000;      // 用 tag 取回 tableView,方便子頁面回傳後刷新

    // 預載頭像
    self.imageArr = [[NSMutableArray alloc] init];
    for (int i = 1; i <= 22; i++) {
        NSString *imageName = [NSString stringWithFormat:@"%d.jpg", i];
        [self.imageArr addObject:[UIImage imageNamed:imageName]];
    }

    // 右上角「+」進入新增頁
    self.navigationItem.rightBarButtonItem = [[UIBarButtonItem alloc]
        initWithBarButtonSystemItem:UIBarButtonSystemItemAdd
                             target:self action:@selector(addNew:)];
}

- (NSInteger)tableView:(UITableView *)tableView numberOfRowsInSection:(NSInteger)section {
    return self.arr.count;
}

- (UITableViewCell *)tableView:(UITableView *)tableView cellForRowAtIndexPath:(NSIndexPath *)indexPath {
    static NSString *reuse = @"reuse";
    UITableViewCell *cell = [tableView dequeueReusableCellWithIdentifier:reuse];
    if (!cell) {
        cell = [[[UITableViewCell alloc] initWithStyle:UITableViewCellStyleSubtitle
                                    reuseIdentifier:reuse] autorelease];
    }
    cell.textLabel.text = self.arr[indexPath.row][0];
    cell.detailTextLabel.text = self.arr[indexPath.row][3];
    cell.imageView.image = self.imageArr[indexPath.row];
    return cell;
}

// 進入詳情頁,並把自己設為它的代理
- (void)tableView:(UITableView *)tableView didSelectRowAtIndexPath:(NSIndexPath *)indexPath {
    SecondViewController *secVC = [[SecondViewController alloc] init];
    secVC.detailArr = self.arr[indexPath.row];
    secVC.image = self.imageArr[indexPath.row];
    secVC.index = indexPath.row;
    secVC.delegate = self;        // 編輯回呼
    secVC.delegate1 = self;       // 刪除回呼
    [self.navigationController pushViewController:secVC animated:YES];
    [secVC release];
}

// 實作協定:更新某一筆
- (void)change:(NSMutableArray *)array index:(NSInteger)index {
    [self.arr replaceObjectAtIndex:index withObject:array];
    [(UITableView *)[self.view viewWithTag:1000] reloadData];
}

// 實作協定:刪除某一筆(資料與頭像要同步移除)
- (void)deletePersonAtIndex:(NSInteger)index {
    [self.arr removeObjectAtIndex:index];
    [self.imageArr removeObjectAtIndex:index];
    [(UITableView *)[self.view viewWithTag:1000] reloadData];
}

- (void)addNew:(UIBarButtonItem *)bar {
    AddViewController *addVC = [[AddViewController alloc] init];
    addVC.delegate2 = self;
    [self.navigationController pushViewController:addVC animated:YES];
    [addVC release];
}

// 實作協定:新增一筆
- (void)addPerson:(NSMutableArray *)arr {
    [self.arr addObject:arr];
    [self.imageArr addObject:[UIImage imageNamed:@"default.jpg"]];
    [(UITableView *)[self.view viewWithTag:1000] reloadData];
}

@end
三、詳情頁:編輯與刪除
#import "SecondViewController.h"

#define HEIGHT self.view.frame.size.height

@interface SecondViewController () <UITextFieldDelegate>
@end

@implementation SecondViewController

- (void)viewDidLoad {
    [super viewDidLoad];
    self.view.backgroundColor = [UIColor cyanColor];

    // 大圖
    UIImageView *imageView = [[UIImageView alloc] initWithImage:self.image];
    imageView.frame = CGRectMake(0, 0, self.view.frame.size.width, 320);
    [self.view addSubview(imageView];
    [imageView release];

    // 四個欄位標籤
    NSArray *titles = @[@"姓名", @"性別", @"愛好", @"電話"];
    for (int i = 1; i < 5; i++) {
        UILabel *label = [[UILabel alloc] initWithFrame:CGRectMake(50, 330 + i * 50, 100, 40)];
        label.layer.borderWidth = 1;
        label.layer.cornerRadius = 5;
        label.tag = i;
        label.text = titles[i - 1];
        [self.view addSubview:label];
        [label release];
    }

    // 四個輸入框,帶入原資料
    for (int i = 1; i < 5; i++) {
        UITextField *textfield = [[UITextField alloc] initWithFrame:CGRectMake(180, 330 + i * 50, 150, 40)];
        textfield.layer.borderWidth = 1;
        textfield.layer.cornerRadius = 5;
        textfield.tag = 10 + i;
        textfield.delegate = self;
        textfield.text = self.detailArr[i - 1];
        [self.view addSubview:textfield];
        [textfield release];
    }

    // 保存按鈕
    UIButton *saveButton = [UIButton buttonWithType:UIButtonTypeSystem];
    saveButton.frame = CGRectMake(70, 340, 60, 30);
    saveButton.layer.borderWidth = 1;
    saveButton.layer.cornerRadius = 5;
    [saveButton setTitle:@"保存" forState:UIControlStateNormal];
    [saveButton addTarget:self action:@selector(click:) forControlEvents:UIControlEventTouchUpInside];
    [self.view addSubview:saveButton];

    // 刪除按鈕
    UIButton *deleteButton = [UIButton buttonWithType:UIButtonTypeSystem];
    deleteButton.frame = CGRectMake(200, 340, 60, 30);
    deleteButton.layer.borderWidth = 1;
    deleteButton.layer.cornerRadius = 5;
    [deleteButton setTitle:@"刪除" forState:UIControlStateNormal];
    [deleteButton addTarget:self action:@selector(deleteClick:)
   forControlEvents:UIControlEventTouchUpInside];
    [self.view addSubview:deleteButton];
}

// 開始編輯時,若輸入框偏下則把整個 view 上移,避免被鍵盤遮住
- (BOOL)textFieldShouldBeginEditing:(UITextField *)textField {
    if (textField.frame.origin.y > HEIGHT / 2) {
        CGFloat height = textField.frame.origin.y - HEIGHT / 2;
        self.view.center = CGPointMake(self.view.center.x, self.view.center.y - height);
    }
    return YES;
}

// 按鍵盤 Done 收 keyboard
- (BOOL)textFieldShouldReturn:(UITextField *)textField {
    [textField resignFirstResponder];
    return YES;
}

// 結束編輯後把 view 移回原位
- (BOOL)textFieldShouldEndEditing:(UITextField *)textField {
    if (textField.frame.origin.y > HEIGHT / 2) {
        CGFloat height = textField.frame.origin.y - HEIGHT / 2;
        self.view.center = CGPointMake(self.view.center.x, self.view.center.y + height);
    }
    return YES;
}

// 保存:回填資料 → 返回 → 通知代理
- (void)click:(UIButton *)button {
    for (int i = 0; i < 4; i++) {
        self.detailArr[i] = ((UITextField *)[self.view viewWithTag:11 + i]).text;
    }
    [self.navigationController popToRootViewControllerAnimated:YES];
    [self.delegate change:self.detailArr index:self.index];
}

- (void)deleteClick:(UIButton *)button {
    [self.navigationController popToRootViewControllerAnimated:YES];
    [self.delegate1 deletePersonAtIndex:self.index];
}

@end
四、新增頁
#import "AddViewController.h"

#define HEIGHT self.view.frame.size.height

@interface AddViewController () <UITextFieldDelegate>
@end

@implementation AddViewController

- (void)viewDidLoad {
    [super viewDidLoad];
    self.view.backgroundColor = [[UIColor alloc] initWithPatternImage:
                                    [UIImage imageNamed:@"bg.jpg"]];
    self.navigationItem.title = @"新建聯繫人";

    NSArray *titles = @[@"姓名", @"性別", @"愛好", @"電話"];
    for (int i = 1; i < 5; i++) {
        UILabel *label = [[UILabel alloc] initWithFrame:CGRectMake(50, 330 + i * 50, 100, 40)];
        label.layer.borderWidth = 1;
        label.layer.cornerRadius = 5;
        label.tag = i;
        label.text = titles[i - 1];
        [self.view addSubview:label];
        [label release];

        UITextField *textfield = [[UITextField alloc] initWithFrame:CGRectMake(180, 330 + i * 50, 150, 40)];
        textfield.layer.borderWidth = 1;
        textfield.layer.cornerRadius = 5;
        textfield.tag = 10 + i;
        textfield.delegate = self;
        [self.view addSubview:textfield];
        [textfield release];
    }

    UIButton *newButton = [UIButton buttonWithType:UIButtonTypeSystem];
    newButton.frame = CGRectMake(70, 340, 60, 30);
    newButton.layer.borderWidth = 1;
    newButton.layer.cornerRadius = 5;
    [newButton setTitle:@"新建" forState:UIControlStateNormal];
    [newButton addTarget:self action:@selector(click:) forControlEvents:UIControlEventTouchUpInside];
    [self.view addSubview:newButton];

    UIButton *returnButton = [UIButton buttonWithType:UIButtonTypeSystem];
    returnButton.frame = CGRectMake(230, 340, 60, 30);
    returnButton.layer.borderWidth = 1;
    returnButton.layer.cornerRadius = 5;
    [returnButton setTitle:@"返回" forState:UIControlStateNormal];
    [returnButton addTarget:self action:@selector(returnClick:)
   forControlEvents:UIControlEventTouchUpInside];
    [self.view addSubview:returnButton];
}

- (void)click:(UIButton *)button {
    NSMutableArray *newArr = [[NSMutableArray alloc] init];
    for (int i = 0; i < 4; i++) {
        newArr[i] = ((UITextField *)[self.view viewWithTag:11 + i]).text;
    }
    [self.navigationController popToRootViewControllerAnimated:YES];
    [self.delegate2 addPerson:newArr];
    [newArr release];
}

- (void)returnClick:(UIButton *)button {
    [self.navigationController popToRootViewControllerAnimated:YES];
}

// 鍵盤遮擋與回位的處理,與詳情頁相同
- (BOOL)textFieldShouldBeginEditing:(UITextField *)textField {
    if (textField.frame.origin.y > HEIGHT / 2) {
        CGFloat height = textField.frame.origin.y - HEIGHT / 2;
        self.view.center = CGPointMake(self.view.center.x, self.view.center.y - height);
    }
    return YES;
}

- (BOOL)textFieldShouldReturn:(UITextField *)textField {
    [textField resignFirstResponder];
    return YES;
}

- (BOOL)textFieldShouldEndEditing:(UITextField *)textField {
    if (textField.frame.origin.y > HEIGHT / 2) {
        CGFloat height = textField.frame.origin.y - HEIGHT / 2;
        self.view.center = CGPointMake(self.view.center.x, self.view.center.y + height);
    }
    return YES;
}

@end
五、這個範例真正想教會你的事
程式碼量看起來不小,但骨架其實只有一條:子頁面不直接改父頁面的資料,而是透過 delegate 把「發生了什麼」回報上去,由持有資料的那一方決定怎麼改。
- 為什麼不直接操作? 因為資料的唯一持有者是列表頁。若讓詳情頁自己去改陣列,資料來源就會散落在各處,狀態很快失控。
- 代理的標準四步: ① 在子頁面的標頭檔宣告協定;② 宣告 id<協定> 類型的 delegate 屬性;③ 子頁面在時機到時呼叫
[self.delegate 方法名:];④ 父頁面實作該方法並刷新介面。 - 刪除時記得同步多個資料來源。 範例中
arr與imageArr必須一起移除,否則索引會錯位,這是很典型的 bug 來源。 - 鍵盤遮擋的通用解法: 在 textFieldShouldBeginEditing 中判斷輸入框是否落在畫面下半部,若是就上移整個 view;結束編輯後再移回。
這個模式在 iOS 開發中幾乎無所不在——UITableView 的 delegate/dataSource、UIPickerView、各種自訂元件,背後都是同一套思路。把這個電話簿吃透,之後看系統 API 的 delegate 設計會順暢許多。
- 上一篇文章: iOS UI 實作:打造一個可翻頁瀏覽的相冊
- 下一篇文章: iOS 網路開發:把 JSON 資料解析成字典