
iOS UI 實作:打造一個可翻頁瀏覽的相冊
編輯:iOS 開發綜合
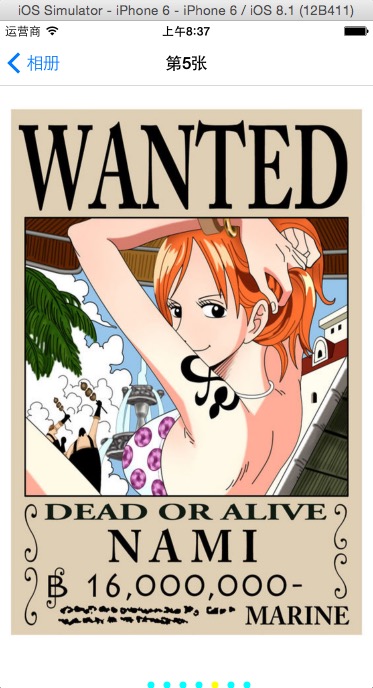
這個練習實作一個兩層結構的相冊:首頁用九宮格排列縮圖,點擊任一張後進入詳情頁,以橫向翻頁方式瀏覽全部照片,並搭配頁碼指示器同步顯示目前是第幾張。
一、首頁:九宮格縮圖
#import "MainViewController.h"
#import "SecondViewController.h"

@interface MainViewController ()
// 用陣列存放所有圖片物件
@property (nonatomic, retain) NSMutableArray *arr;
@end

@implementation MainViewController

- (void)dealloc {
    [_arr release];
    [super dealloc];
}

- (void)viewDidLoad {
    [super viewDidLoad];

    // 相冊首頁不需要半透明導覽列
    self.navigationController.navigationBar.translucent = NO;
    self.view.backgroundColor = [UIColor orangeColor];
    self.navigationItem.title = @"相冊";

    // 預先載入七張圖片
    self.arr = [[NSMutableArray alloc] init];
    for (int i = 1; i < 8; i++) {
        NSString *imageName = [NSString stringWithFormat:@"h%d.jpeg", i];
        UIImage *image = [UIImage imageNamed:imageName];
        [self.arr addObject:image];
    }

    // 以雙層迴圈排出 3x3 的九宮格,不足七個則不建立
    for (int i = 0; i < 3; i++) {
        for (int j = 0; j < 3; j++) {
            if (3 * i + j < 7) {
                UIButton *button = [UIButton buttonWithType:UIButtonTypeCustom];
                button.tag = 3 * i + j + 1;
                button.frame = CGRectMake(j * 120 + 20, i * 120 + 100, 100, 100);
                [self.view addSubview:button];
                button.layer.borderWidth = 1;

                // 把對應的圖片設到 button 上
                [button setImage:(UIImage *)self.arr[3 * i + j]
                        forState:UIControlStateNormal];
                [button addTarget:self action:@selector(click:)
                 forControlEvents:UIControlEventTouchUpInside];
            }
        }
    }
}

// 點擊縮圖 → 進入詳情頁,並把索引傳過去
- (void)click:(UIButton *)button {
    SecondViewController *secVC = [[SecondViewController alloc] init];
    secVC.number = button.tag - 1;
    [self.navigationController pushViewController:secVC animated:YES];
    [secVC release];
}

@end這裡有兩個小技巧值得記下:button.tag 承載了索引資訊,讓多個按鈕能共用同一個 action 方法;而 3 * i + j < 7 的判斷,讓九宮格在圖片數量不足時不會產生空白按鈕。
二、詳情頁的標頭檔
#import <UIKit/UIKit.h>

@interface SecondViewController : UIViewController

// 接收首頁傳來的索引
@property (nonatomic, assign) NSInteger number;

@end
三、詳情頁:橫向翻頁瀏覽
#import "SecondViewController.h"

#define WIDTH  self.view.frame.size.width
#define HEIGHT self.view.frame.size.height

@interface SecondViewController () <UIScrollViewDelegate>
@property (nonatomic, retain) UIScrollView *scrollView;
@end

@implementation SecondViewController

- (void)dealloc {
    [_scrollView release];
    [super dealloc];
}

- (void)viewDidLoad {
    [super viewDidLoad];

    // 建立滾動視圖
    self.scrollView = [[UIScrollView alloc] initWithFrame:self.view.frame];
    [self.view addSubview:self.scrollView];
    [_scrollView release];

    // 內容尺寸:總寬為七屏,高度減去底部頁碼指示器的空間
    self.scrollView.contentSize = CGSizeMake(7 * WIDTH, HEIGHT - 100);

    // 按頁滑動
    self.scrollView.pagingEnabled = YES;

    // 依序加入七個 imageView,各自佔滿一屏
    for (int i = 1; i < 8; i++) {
        NSString *imageName = [NSString stringWithFormat:@"h%d.jpeg", i];
        UIImageView *imageView = [[UIImageView alloc] initWithImage:[UIImage imageNamed:imageName]];
        imageView.frame = CGRectMake(i * WIDTH - WIDTH, 0, WIDTH, HEIGHT - 100);
        [self.scrollView addSubview:imageView];
        [imageView release];
    }

    // 關閉邊界回彈與滾動條
    self.scrollView.bounces = NO;
    self.scrollView.showsHorizontalScrollIndicator = NO;
    self.scrollView.showsVerticalScrollIndicator = NO;
    self.scrollView.delegate = self;

    // 頁碼指示器
    UIPageControl *page = [[UIPageControl alloc] initWithFrame:CGRectMake(100, 580, 200, 40)];
    page.backgroundColor = [UIColor whiteColor];
    [self.view addSubview:page];
    [page release];

    page.numberOfPages = 7;
    page.pageIndicatorTintColor = [UIColor cyanColor];
    page.currentPageIndicatorTintColor = [UIColor yellowColor];
    page.tag = 1000;

    // 依傳入的索引定位到對應頁面
    self.scrollView.contentOffset = CGPointMake(WIDTH * self.number, 0);
    NSString *str = [NSString stringWithFormat:@"第%ld張", self.number + 1];
    self.navigationItem.title = str;
}

// 滾動時同步更新頁碼與標題
- (void)scrollViewDidScroll:(UIScrollView *)scrollView {
    UIPageControl *page = (UIPageControl *)[self.view viewWithTag:1000];
    page.currentPage = self.scrollView.contentOffset.x / WIDTH;

    NSString *str = [NSString stringWithFormat:@"第%ld張", page.currentPage + 1];
    self.navigationItem.title = str;
}

@end
四、要點回顧
- contentSize 是滾動的前提:寬度設為「屏寬 × 張數」,ScrollView 才知道可滾動範圍。
- pagingEnabled = YES 讓滑動自動吸附到整屏,這正是翻頁觀感的來源。
- contentOffset 用於初始定位:從縮圖點進來時,直接跳到對應的那一張,而不是總從第一張開始。
- scrollViewDidScroll 是雙向同步的樞紐:把 offset 換算成頁碼,同時驅動 UIPageControl 與導覽列標題。
- 用 tag 定位元件:在只有一支 delegate 方法的情況下,靠 tag 找出頁碼控件是簡單有效的做法。
整個相冊沒有使用任何第三方庫,全靠 UIKit 原生控件組裝。理解了 ScrollView 的 contentSize / contentOffset / pagingEnabled 這三個核心概念,橫向輪播、引導頁、卡片切換等效果都能由此延伸。
- 上一篇文章: iOS 技術架構解析:四大分層與各框架職責
- 下一篇文章: iOS UI 實作:以代理模式打造可增刪改的電話簿