
iOS 列表控件實作:TableView 側滑刪除與拖曳排序
編輯:iOS 開發綜合
在慕課網跟著做了一遍 TableView 的練習之後,我頗有感慨:同樣的功能,在 Android 上用 ListView 實作側滑刪除與拖曳搬移 item,手續其實不算輕鬆;而在 iOS 這邊,只要重寫幾個 delegate 方法就搞定了。
專案:Todo
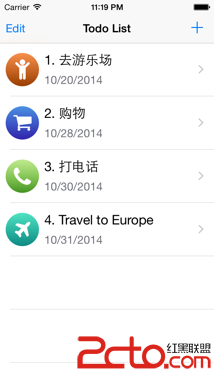
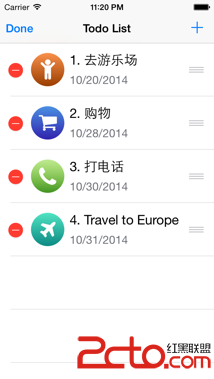
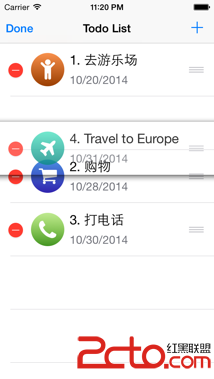
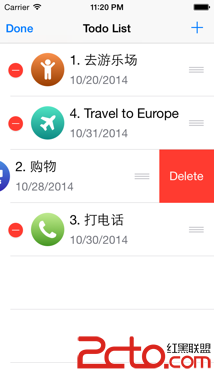
界面結構
用 navigation controller 提供導覽列,view controller 裡放一個 TableView 與自訂的 TableViewCell,資料來源是一個待辦事項模型陣列。
程式碼
import UIKit

var todos: [TodoModel] = []
var filtertodos: [TodoModel] = []

func dateFromString(dateStr: String) -> NSDate? {
    let dateFormatter = NSDateFormatter()
    dateFormatter.dateFormat = "yyyy-MM-dd"
    return dateFormatter.dateFromString(dateStr)
}

class ViewController: UIViewController, UITableViewDataSource, UITableViewDelegate, UISearchDisplayDelegate {

    @IBOutlet weak var tableView: UITableView!

    override func viewDidLoad() {
        super.viewDidLoad()

        todos = [
            TodoModel(id: 1, image: "child-selected", title: "1. 去遊樂場", date: dateFromString("2014-10-20")!),
            TodoModel(id: 2, image: "shopping-cart-selected", title: "2. 購物", date: dateFromString("2014-10-28")!),
            TodoModel(id: 3, image: "phone-selected", title: "3. 打電話", date: dateFromString("2014-10-30")!),
            TodoModel(id: 4, image: "travel-selected", title: "4. Travel to Europe", date: dateFromString("2014-10-31")!)
        ]

        navigationItem.leftBarButtonItem = editButtonItem()

        var contentOffset = tableView.contentOffset
        contentOffset.y += searchDisplayController!.searchBar.frame.size.height
        tableView.contentOffset = contentOffset
    }

    // 行數
    func tableView(tableView: UITableView, numberOfRowsInSection section: Int) -> Int {
        if tableView == searchDisplayController?.searchResultsTableView {
            return filtertodos.count
        } else {
            return todos.count
        }
    }

    // 配置 cell
    func tableView(tableView: UITableView, cellForRowAtIndexPath indexPath: NSIndexPath) -> UITableViewCell {
        let cell = self.tableView.dequeueReusableCellWithIdentifier("todocell") as! UITableViewCell

        var todo: TodoModel?
        if tableView == searchDisplayController?.searchResultsTableView {
            todo = filtertodos[indexPath.row]
        } else {
            todo = todos[indexPath.row]
        }

        let title = cell.viewWithTag(103) as! UILabel
        let date = cell.viewWithTag(104) as! UILabel
        let image = cell.viewWithTag(102) as! UIImageView

        image.image = UIImage(named: todo!.image)
        title.text = todo!.title

        let locale = NSLocale.currentLocale()
        let dateFormat = NSDateFormatter.dateFormatFromTemplate("yyyy-MM-dd", options: 0, locale: locale)
        let dateFormatter = NSDateFormatter()
        dateFormatter.dateFormat = dateFormat
        date.text = dateFormatter.stringFromDate(todo!.date)

        return cell
    }

    // 側滑刪除
    func tableView(tableView: UITableView, commitEditingStyle editingStyle: UITableViewCellEditingStyle,
                   forRowAtIndexPath indexPath: NSIndexPath) {
        if editingStyle == .Delete {
            todos.removeAtIndex(indexPath.row)
            tableView.deleteRowsAtIndexPaths([indexPath], withRowAnimation: .Automatic)
        }
    }

    override func setEditing(editing: Bool, animated: Bool) {
        super.setEditing(editing, animated: animated)
        tableView.setEditing(editing, animated: animated)
    }

    // 允許移動
    func tableView(tableView: UITableView, canMoveRowAtIndexPath indexPath: NSIndexPath) -> Bool {
        return editing
    }

    // 完成移動:同步更新資料來源
    func tableView(tableView: UITableView, moveRowAtIndexPath sourceIndexPath: NSIndexPath,
                   toIndexPath destinationIndexPath: NSIndexPath) {
        let todo = todos.removeAtIndex(sourceIndexPath.row)
        todos.insert(todo, atIndex: destinationIndexPath.row)
    }

    // 返回時刷新
    @IBAction func close(segue: UIStoryboardSegue) {
        tableView.reloadData()
    }
}
要點歸納
實作 TableView 的本質就是兩件事:提供 dataSource 負責資料,提供 delegate 負責行為。
numberOfRowsInSection:與cellForRowAtIndexPath:來自 UITableViewDataSource。commitEditingStyle:forRowAtIndexPath:負責側滑刪除,記得同步把資料從陣列移掉,否則下次刷新又跑出來。canMoveRowAtIndexPath:決定哪些列可以拖曳,通常回傳 editing 狀態即可。moveRowAtIndexPath:toIndexPath:是排序的關鍵,UI 位置變了,資料來源也必須跟著換。
最後別忘了在 storyboard 裡把 dataSource 與 delegate 綁到 view controller 上。就這幾個方法,側滑刪除和拖曳排序就都出來了。
- 上一篇文章: Objective-C 知識點全景總結:從語法基礎到記憶體管理
- 下一篇文章: iOS 實戰:為視圖切換加上翻轉動畫