
iOS 9 新特性:Search APIs 讓 App 內容被 Spotlight 搜尋到
在 iOS 9 之前,使用者只能在 Spotlight 中靠 App 名稱找到 App。隨著 Search APIs 問世,開發者可以為 App 內部的內容建立索引,讓使用者直接搜尋關鍵字並跳進 App 的指定區域。
三個 API
NSUserActivity
NSUserActivity 在 iOS 8 的 Handoff 中就已登場。到了 iOS 9,你可以用它標記「使用者的活躍狀態」,並附上相關關鍵字,Spotlight 就能檢索這些內容。概念上類似瀏覽器的歷史紀錄:使用者可以從 Spotlight 快速回到最近看過的內容。
Web Markup
Web Markup 允許 App 把內容映射到網頁上,讓 Apple 的索引器像爬蟲一樣抓取這些被標記的頁面。這些資訊在 Safari 與 Spotlight 中都能被搜尋到。
Core Spotlight
Core Spotlight 是 iOS 9 新增的框架,可以為 App 內的任何資料建立索引。NSUserActivity 適合保存「使用者最近看過什麼」,而 Core Spotlight 則能索引「你希望被搜尋到的所有資料」。
動手做:讓朋友列表能被搜尋
相較之下,NSUserActivity 與 Web Markup 都很容易使用,Core Spotlight 稍微複雜些。我們做一個簡單的 Demo:一個朋友列表,點擊名字會進入朋友詳情頁,並把這些朋友資料寫入 Spotlight 索引。
1. 專案結構
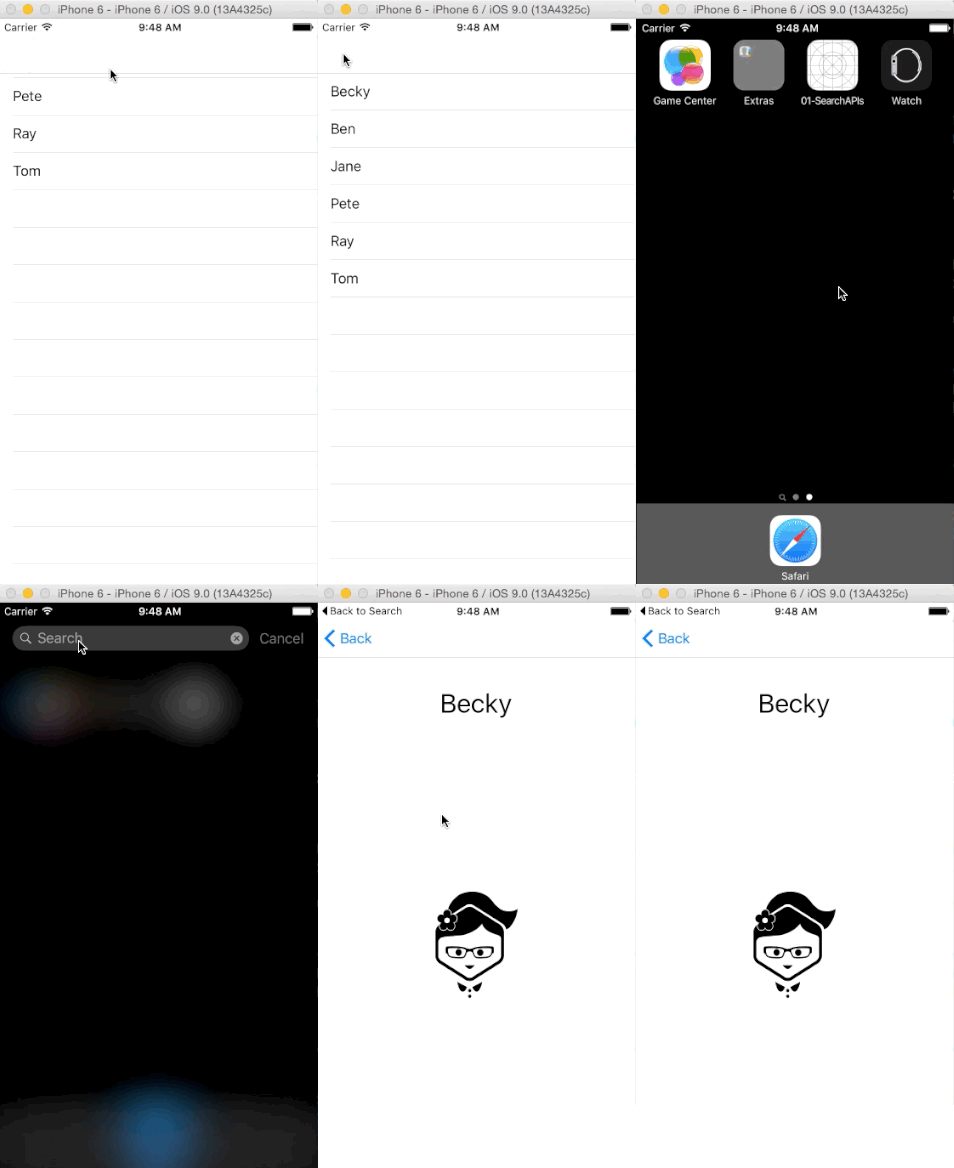
Demo 結構很單純:一個 UINavigationController,根控制器是 UITableViewController(FriendTableViewController)用來列出朋友名稱;點擊後跳到 FriendViewController 顯示詳情。所有朋友資料由一個 Datasource 管理類別負責,它的職責有兩項:儲存朋友資料,以及把資料寫入 Core Spotlight 索引。
2. 資料模型
// Person.h
@interface Person : NSObject
@property (nonatomic, copy) NSString *name;
@property (nonatomic, copy) NSString *identifer;
@property (nonatomic, copy) NSString *icon;
- (instancetype)initWithName:(NSString *)name
                   identifer:(NSString *)identifer
                        icon:(NSString *)icon;
@end

// Person.m
@implementation Person
- (instancetype)initWithName:(NSString *)name
                   identifer:(NSString *)identifer
                        icon:(NSString *)icon {
    if (self = [super init]) {
        self.name = name;
        self.identifer = identifer;
        self.icon = icon;
    }
    return self;
}
@end
3. 資料來源類別
// Datasource.h
@interface Datasource : NSObject
- (NSArray *)dataList;                              // 取得所有朋友
- (Person *)findFriendWithId:(NSString *)identifer;  // 依 id 取得單筆
- (void)savePeopleToIndex;                           // 寫入 Spotlight 索引
@end
// Datasource.m
@implementation Datasource
- (NSArray *)dataList {
Person *becky = [[Person alloc] initWithName:@"Becky" identifer:@"1" icon:@"becky"];
Person *ben = [[Person alloc] initWithName:@"Ben" identifer:@"2" icon:@"ben"];
Person *jane = [[Person alloc] initWithName:@"Jane" identifer:@"3" icon:@"jane"];
Person *pete = [[Person alloc] initWithName:@"Pete" identifer:@"4" icon:@"pete"];
Person *ray = [[Person alloc] initWithName:@"Ray" identifer:@"5" icon:@"ray"];
Person *tom = [[Person alloc] initWithName:@"Tom" identifer:@"6" icon:@"tom"];
return @[becky, ben, jane, pete, ray, tom];
}
- (Person *)findFriendWithId:(NSString *)identifer {
for (Person *p in self.dataList) {
if ([p.identifer isEqualToString:identifer]) {
return p;
}
}
return nil;
}
- (void)savePeopleToIndex {
NSMutableArray *searchableItems = [NSMutableArray array];
for (Person *p in self.dataList) {
// 建立屬性集合,內容型別標示為 image
CSSearchableItemAttributeSet *attributeSet =
[[CSSearchableItemAttributeSet alloc] initWithItemContentType:@"image"];
attributeSet.title = p.name;
attributeSet.contentDescription =
[NSString stringWithFormat:@"This is an entry all about %@", p.name];
attributeSet.thumbnailData =
UIImagePNGRepresentation([UIImage imageNamed:p.icon]);
CSSearchableItem *item =
[[CSSearchableItem alloc] initWithUniqueIdentifier:p.identifer
domainIdentifier:@"com.example.SearchAPIs.people"
attributeSet:attributeSet];
[searchableItems addObject:item];
}
// 真正寫入 Spotlight 索引
[[CSSearchableIndex defaultSearchableIndex]
indexSearchableItems:searchableItems
completionHandler:^(NSError * _Nullable error) {
if (error) {
NSLog(@"error message: %@", error.localizedDescription);
}
}];
}
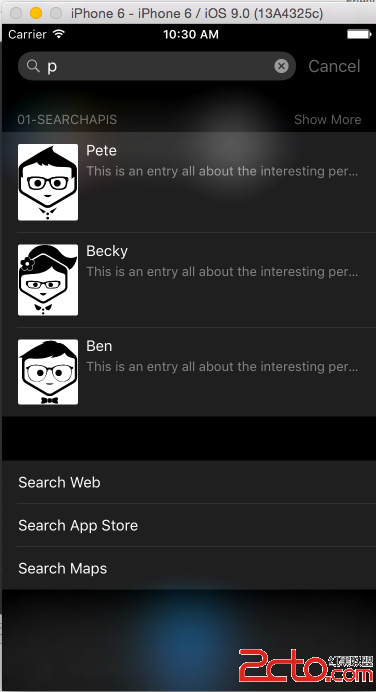
@end關鍵就在 savePeopleToIndex:先為每筆資料建立 CSSearchableItemAttributeSet,包成 CSSearchableItem,最後交給 CSSearchableIndex 的單例寫入。
4. 在列表頁觸發索引
- (void)viewDidLoad {
    [super viewDidLoad];
    Datasource *dataSource = [[Datasource alloc] init];
    self.dataList = [dataSource dataList];
    [dataSource savePeopleToIndex];
}
執行 App 後,資料就會被寫入索引。此時到 Spotlight 搜尋朋友名字,他們就會出現:
5. 處理點擊後的跳轉
此時點擊搜尋結果,只會開啟 App,不會跳到指定頁面——因為我們還沒告訴它要去哪裡。這需要在 AppDelegate 中實作 continueUserActivity::
- (BOOL)application:(UIApplication *)application
    continueUserActivity:(NSUserActivity *)userActivity
      restorationHandler:(void(^)(NSArray * _Nullable restorableObjects))restorationHandler {
    // 1. 取得在 Spotlight 中被點擊的朋友 id
    NSString *friendID = userActivity.userInfo[@"kCSSearchableItemActivityIdentifier"];

    // 2. 取得根導航控制器,並把堆疊 pop 回最底層
    UINavigationController *navigationController =
        (UINavigationController *)self.window.rootViewController;
    [navigationController popToRootViewControllerAnimated:NO];

    // 3. 跳轉到 App 內的指定位置
    FriendTableViewController *friendVC =
        (FriendTableViewController *)navigationController.viewControllers.firstObject;
    [friendVC showFriendWithId:friendID];

    return YES;
}
這裡可以發現,先前存進索引的資料,現在可以透過 userActivity.userInfo 字典取回。我們關心的就是 friend id,它在寫入索引時被存為 Person 物件的 kCSSearchableItemActivityIdentifier。
完成後,畫面左上角會出現一個「Back to Search」的入口,讓使用者隨時回到搜尋結果。
索引的刪除
本文沒有涵蓋刪除操作。實務上這很重要——例如使用者刪掉了某筆資料,索引裡卻還留著,點下去就會出錯。可用的方法有:
// 依 identifier 刪除
[[CSSearchableIndex defaultSearchableIndex]
    deleteSearchableItemsWithIdentifiers:@[@"1"]
                       completionHandler:^(NSError * _Nullable error) { }];

// 依 domainIdentifier 批次刪除
[[CSSearchableIndex defaultSearchableIndex]
    deleteSearchableItemsWithDomainIdentifiers:@[@"com.example.SearchAPIs.people"]
                             completionHandler:^(NSError * _Nullable error) { }];

// 清空全部
[[CSSearchableIndex defaultSearchableIndex]
deleteAllSearchableItemsWithCompletionHandler:^(NSError * _Nullable error) { }];另外提醒兩點:domainIdentifier 的設計決定了批次刪除的粒度,一開始就要想清楚分組策略;而 thumbnailData 若塞入大圖會讓索引變得笨重,建議先縮圖再寫入。
- 上一篇文章: iOS SDK 詳解之 UITabBar(仿新浪微博 Demo)
- 下一篇文章: iOS 實戰:製作視圖平移動畫並排除位移異常