
iOS學習筆記(三十二):iCloud雲端儲存入門實作
一、認識iCloud雲端服務
iCloud是蘋果精心打造的一整套雲端服務。透過它,使用者的通訊錄、備忘錄、郵件、照片、音樂與影片等資料都能備份到雲端伺服器,並在旗下的各台蘋果裝置之間無縫共享,完全不必煩惱資料同步的細節。更貼心的是,即使手機不慎遺失,只要在新裝置上登入同一個Apple ID,資料就能瞬間歸位。
蘋果也早早就把這套雲端儲存能力開放給開發者,讓我們能存放兩種類型的資料:
key-value data:適合同步少量的非關鍵性設定資料到App的多個執行個體,用法與NSUserDefaults相當類似。document:用來把使用者的文件與App資料存進使用者的iCloud帳戶中。
動手前的準備工作
在正式撰寫iCloud功能之前,請先完成以下設定:
首先在開發者中心建立Apple ID並啟用iCloud服務,接著產生對應的配置文件(Provisioning Profile),這裡可以直接採用萬用字元(wildcard)的Bundle ID。以上兩步都是針對實機(真機)除錯用的,若只在模擬器上測試則可略過。完成後開啟專案的Capabilities面板,找到iCloud服務並開啟它,再在Service清單中勾選Key-value storage與iCloud Documents。
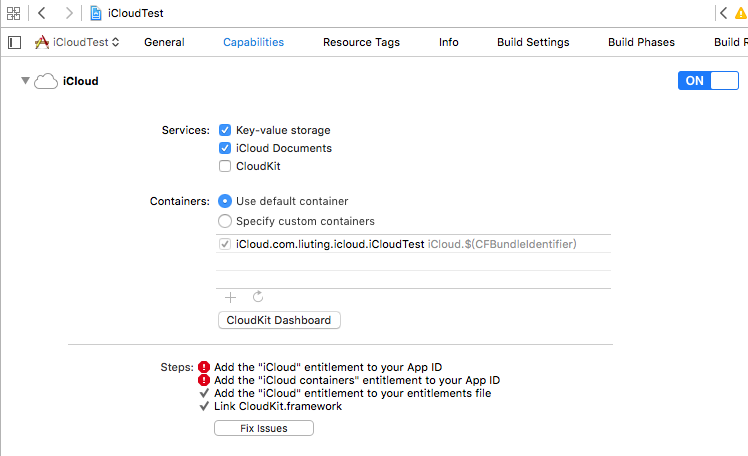
啟用後,專案裡便會自動多出一個entitlements檔案。
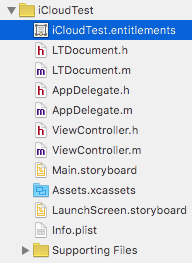
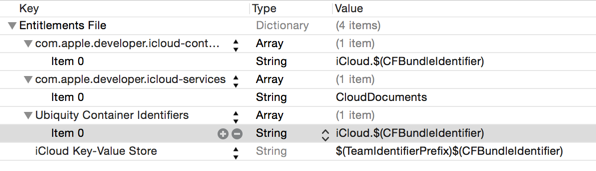
裡面的內容由系統自動產生,長得像這樣:
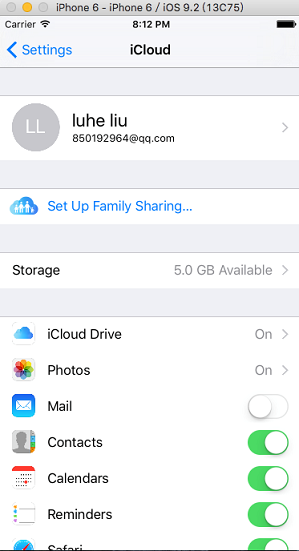
無論使用實機還是模擬器,都需要先在手機的「設定」中登入iCloud帳號,這一步是資料能順利同步的關鍵。
二、Key-Value形式的iCloud儲存
這種方式的用法與NSUserDefaults幾乎如出一轍,都是以鍵值對(key-value)的形式來存放資料。
實作範例
#import "iCloudKeysViewController.h" @interface iCloudKeysViewController() @property (strong, nonatomic) NSUbiquitousKeyValueStore *keyStore; @property (strong, nonatomic) IBOutlet UILabel *textLabel; @end @implementation iCloudKeysViewController - (void)viewDidLoad { [super viewDidLoad]; self.textLabel.text = @"Ready Go"; //獲取iCloud配置首選項 self.keyStore = [NSUbiquitousKeyValueStore defaultStore]; //注冊通知中心,當配置發生改變的時候,發生通知 NSNotificationCenter *center = [NSNotificationCenter defaultCenter]; [center addObserver:self selector:@selector(ubiquitousKeyValueStoreDidChange:) name:NSUbiquitousKeyValueStoreDidChangeExternallyNotification object:keyStore]; } /* UI點擊,點擊改變按鈕 */ - (IBAction)changeKey { [self.keyStore setString:@"Hello World" forKey:@"MyString"]; [self.keyStore synchronize]; NSLog(@"Save key"); } /* 監聽通知,當配置發生改變的時候會調用 */ - (void)ubiquitousKeyValueStoreDidChange:(NSNotification *)notification { NSLog(@"External Change detected"); UIAlertView *alert = [[UIAlertView alloc] initWithTitle:@"Change detected" message:@"Change detected" delegate:nil cancelButtonTitle:@"Ok" otherButtonTitles:nil, nil]; [alert show]; //顯示改變的信息 textLabel.text = [keyStore stringForKey:@"MyString"]; } @end
三、Document形式的iCloud儲存
核心類別 UIDocument
文件形式的儲存主要仰賴UIDocument這個類別來完成,它一口氣提供了新增、修改、查詢、開啟與刪除文件的完整能力。UIDocument對文件的所有操作都建立在單一「雲端URL」之上,對開發者而言根本不必區分本地與雲端,這大大減輕了我們的開發負擔。
取得雲端URL的方法
呼叫NSFileManager的實體方法即可:
-(NSURL *)URLForUbiquityContainerIdentifier:(NSString *)identifier;
呼叫時需傳入雲端儲存容器的唯一識別碼,這個值可以在自動產生的entitlements檔案中,找到Ubiquity Container Identifiers欄位查得。若傳入nil,則代表使用第一個容器。
補充知識
第一個容器的預設識別碼是
iCloud.$(CFBundleIdentifier),其中$(CFBundleIdentifier)代表Bundle ID。因此只要知道App的Bundle ID,就能推算出第一個容器的識別碼,例如iCloud.com.liuting.icloud.iCloudTest。
UIDocument的常用實體方法
/* 將指定URL的文檔保存到iCloud(可以是新增或者覆蓋,通過saveOperation參數設定)*/ - (void)saveToURL:(NSURL *)url forSaveOperation:(UIDocumentSaveOperation)saveOperation completionHandler:(void (^)(BOOL success))completionHandler; /* 保存操作option */ typedef NS_ENUM(NSInteger, UIDocumentSaveOperation) { UIDocumentSaveForCreating,/* 創建 */ UIDocumentSaveForOverwriting/* 覆蓋寫入 */ }; /* 打開文檔,參數是打開文檔成功回調 */ - (void)openWithCompletionHandler:(void (^)(BOOL success))completionHandler;
刪除文件則改用 NSFileManager 的實體方法
/* 刪除指定URL下的文件 */ - (BOOL)removeItemAtURL:(NSURL *)URL error:(NSError **)error;
值得注意的地方
UIDocument在設計之初並沒有提供統一的資料存放方式,而是要求我們繼承它、重寫兩個實體方法來自行處理資料的讀寫:
/* 保存文檔時調用 @param typeName 文檔文件類型 @param outError 錯誤信息輸出 @return 文檔數據 */ -(id)contentsForType:(NSString *)typeName error:(NSError **)outError; /* 讀取數據時調用 @param contents 文檔數據 @param typeName 文檔文件類型 @param outError 錯誤信息輸出 @return 讀取是否成功 */ -(BOOL)loadFromContents:(id)contents ofType:(NSString *)typeName error:(NSError **)outError;
換句話說,UIDocument保存資料的本質,就是把對應類型的資料轉換成雲端可儲存的NSData或NSFileWrapper;而讀取資料的本質,則是把從雲端下載的NSData或NSFileWrapper還原成對應類型的資料。
以下是我自訂的 Document 類別,繼承自 UIDocument
LTDocument.h
#import @interface LTDocument : UIDocument @property (strong, nonatomic) NSData *data;/*< 文檔數據 */ @end
LTDocument.m
#import "LTDocument.h" @implementation LTDocument #pragma mark - 重寫父類方法 /** * 保存時調用 * @param typeName 文檔文件類型後綴 * @param outError 錯誤信息輸出 * @return 文檔數據 */ - (id)contentsForType:(NSString *)typeName error:(NSError *__autoreleasing *)outError { if (!self.data) { self.data = [NSData data]; } return self.data; } /** * 讀取數據時調用 * @param contents 文檔數據 * @param typeName 文檔文件類型後綴 * @param outError 錯誤信息輸出 * @return 讀取是否成功 */ - (BOOL)loadFromContents:(id)contents ofType:(NSString *)typeName error:(NSError *__autoreleasing *)outError { self.data = [contents copy]; return true; } @end
若想載入iCloud中的文件清單,就得請出另一個利器NSMetadataQuery。考量到網路傳輸的延遲,實務上很少一次就把所有資料抓完,而是透過NSMetadataQuery並把searchScopes指定為NSMetadataQueryUbiquitousDocumentScope,將查詢範圍鎖定在iCloud文件。此外,NSMetadataQuery還能透過謂詞(predicate)進一步篩選關鍵字等條件,並在搜尋結束後以通知的形式回報結果。
使用範例
1. 屬性與巨集定義
#import "ViewController.h" #import "LTDocument.h" #define kContainerIdentifier @"iCloud.com.liuting.icloud.iCloudTest" @interface ViewController () @property (weak, nonatomic) IBOutlet UITextField *documentField;/*< 輸入框 */ @property (weak, nonatomic) IBOutlet UILabel *documentShowLable;/*< 顯示欄 */ @property (weak, nonatomic) IBOutlet UITableView *documentTableView;/* 文檔列表 */ /* 文檔文件信息,鍵為文件名,值為創建日期 */ @property (strong, nonatomic) NSMutableDictionary *files; @property (strong, nonatomic) NSMetadataQuery *query;/*< 查詢文檔對象 */ @property (strong, nonatomic) LTDocument *document;/*< 當前選中文檔 */ @end
2. 取得雲端URL的方法
/** * 取得雲端存儲文件的地址 * @param fileName 文件名,如果文件名為nil,則重新創建一個URL * @return 文件地址 */ - (NSURL *)getUbiquityFileURL:(NSString *)fileName{ //取得雲端URL基地址(參數中傳入nil則會默認獲取第一個容器),需要一個容器標示 NSFileManager *manager = [NSFileManager defaultManager]; NSURL *url = [manager URLForUbiquityContainerIdentifier:kContainerIdentifier]; //取得Documents目錄 url = [url URLByAppendingPathComponent:@"Documents"]; //取得最終地址 url = [url URLByAppendingPathComponent:fileName]; return url; }
3. 查詢文件清單的方法
/* 從iCloud上加載所有文檔信息 */ - (void)loadDocuments { if (!self.query) { self.query = [[NSMetadataQuery alloc] init]; self.query.searchScopes = @[NSMetadataQueryUbiquitousDocumentsScope]; //注意查詢狀態是通過通知的形式告訴監聽對象的 NSNotificationCenter *center = [NSNotificationCenter defaultCenter]; [center addObserver:self selector:@selector(metadataQueryFinish:) name:NSMetadataQueryDidFinishGatheringNotification object:self.query];//數據獲取完成通知 [center addObserver:self selector:@selector(metadataQueryFinish:) name:NSMetadataQueryDidUpdateNotification object:self.query];//查詢更新通知 } //開始查詢 [self.query startQuery]; } /* 查詢更新或者數據獲取完成的通知調用 */ - (void)metadataQueryFinish:(NSNotification *)notification { NSLog(@"數據獲取成功!"); NSArray *items = self.query.results;//查詢結果集 self.files = [NSMutableDictionary dictionary]; //變量結果集,存儲文件名稱、創建日期 [items enumerateObjectsUsingBlock:^(id obj, NSUInteger idx, BOOL *stop) { NSMetadataItem *item = obj; //獲取文件名 NSString *fileName = [item valueForAttribute:NSMetadataItemFSNameKey]; //獲取文件創建日期 NSDate *date = [item valueForAttribute:NSMetadataItemFSContentChangeDateKey]; NSDateFormatter *dateformate = [[NSDateFormatter alloc]init]; dateformate.dateFormat = @"YY-MM-dd HH:mm"; NSString *dateString = [dateformate stringFromDate:date]; //保存文件名和文件創建日期 [self.files setObject:dateString forKey:fileName]; }]; //表格刷新 self.documentShowLable.text = @""; [self.documentTableView reloadData]; }
4. UI點擊事件
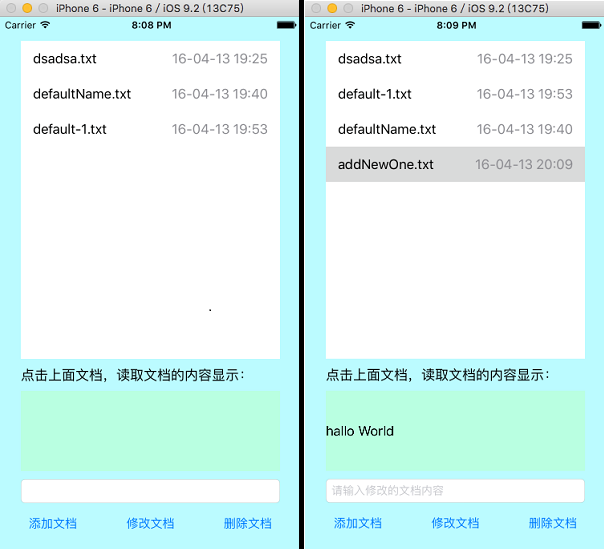
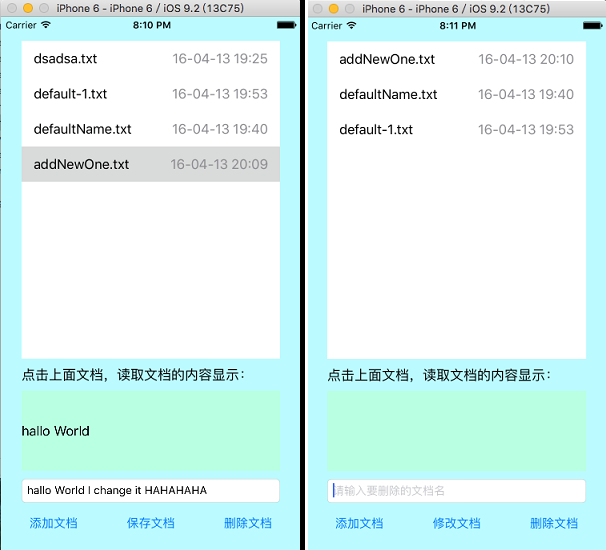
#pragma mark - UI點擊事件 /* 點擊添加文檔 */ - (IBAction)addDocument:(id)sender { //提示信息 if (self.documentField.text.length <= 0) { NSLog(@"請輸入要創建的文檔名"); self.documentField.placeholder = @"請輸入要創建的文檔名"; return; } //創建文檔URL NSString *text = self.documentField.text; NSString *fileName = [NSString stringWithFormat:@"%@.txt",text]; NSURL *url = [self getUbiquityFileURL:fileName]; //創建雲端文檔對象 LTDocument *document = [[LTDocument alloc] initWithFileURL:url]; //設置文檔內容 NSString *dataString = @"hallo World"; document.data = [dataString dataUsingEncoding:NSUTF8StringEncoding]; //保存或創建文檔,UIDocumentSaveForCreating是創建文檔 [document saveToURL:url forSaveOperation:UIDocumentSaveForCreating completionHandler:^(BOOL success) { if (success) { NSLog(@"創建文檔成功."); self.documentField.text = @""; //從iCloud上加載所有文檔信息 [self loadDocuments]; }else{ NSLog(@"創建文檔失敗."); } }]; } /* 點擊修改文檔 */ - (IBAction)saveDocument:(UIButton *)sender { if ([sender.titleLabel.text isEqualToString:@"修改文檔"]) { self.documentField.text = self.documentShowLable.text; [sender setTitle:@"保存文檔" forState:UIControlStateNormal]; } else if([sender.titleLabel.text isEqualToString:@"保存文檔"]) { [sender setTitle:@"修改文檔" forState:UIControlStateNormal]; self.documentField.placeholder = @"請輸入修改的文檔內容"; //要保存的文檔內容 NSString *dataText = self.documentField.text; NSData *data = [dataText dataUsingEncoding:NSUTF8StringEncoding]; self.document.data = data; //保存或創建文檔,UIDocumentSaveForOverwriting是覆蓋保存文檔 [self.document saveToURL:self.document.fileURL forSaveOperation:UIDocumentSaveForOverwriting completionHandler:^(BOOL success) { NSLog(@"保存成功!"); self.documentShowLable.text = self.documentField.text; self.documentField.text = @""; }]; } } /* 點擊刪除文檔 */ - (IBAction)removeDocument:(id)sender { //提示信息 if (self.documentField.text.length <= 0) { self.documentField.placeholder = @"請輸入要刪除的文檔名"; return; } //判斷要刪除的文檔是否存在 NSString *text = self.documentField.text; NSString *fileName = [NSString stringWithFormat:@"%@.txt",text]; NSArray *fileNames = [self.files allKeys]; if (![fileNames containsObject:fileName]) { NSLog(@"沒有要刪除的文檔"); return; } //創建要刪除的文檔URL NSURL *url = [self getUbiquityFileURL:fileName]; NSError *error = nil; //刪除文檔文件 [[NSFileManager defaultManager] removeItemAtURL:url error:&error]; if (error) { NSLog(@"刪除文檔過程中發生錯誤,錯誤信息:%@",error.localizedDescription); return; } //從集合中刪除 [self.files removeObjectForKey:fileName]; self.documentField.text = @""; }
5. 視圖控制器的初始化與清單呈現
@implementation ViewController - (void)viewDidLoad { [super viewDidLoad]; self.documentTableView.delegate = self; self.documentTableView.dataSource = self; /* 從iCloud上加載所有文檔信息 */ [self loadDocuments]; } #pragma mark - UITableView數據源 - (NSInteger)numberOfSectionsInTableView:(UITableView *)tableView { return 1; } - (NSInteger)tableView:(UITableView *)tableView numberOfRowsInSection:(NSInteger)section { return self.files.count; } - (UITableViewCell *)tableView:(UITableView *)tableView cellForRowAtIndexPath:(NSIndexPath *)indexPath { static NSString *identtityKey = @"myTableViewCellIdentityKey1"; UITableViewCell *cell = [self.documentTableView dequeueReusableCellWithIdentifier:identtityKey]; if(cell == nil){ cell = [[UITableViewCell alloc] initWithStyle:UITableViewCellStyleValue1 reuseIdentifier:identtityKey]; } //顯示文檔名和文檔創建日期 NSArray *fileNames = self.files.allKeys; NSString *fileName = fileNames[indexPath.row]; cell.textLabel.text = fileName; cell.detailTextLabel.text = [self.files valueForKey:fileName]; return cell; } #pragma mark - UITableView代理方法 /* 點擊文檔列表的其中一個文檔調用 */ - (void)tableView:(UITableView *)tableView didSelectRowAtIndexPath:(NSIndexPath *)indexPath { UITableViewCell *cell = [self.documentTableView cellForRowAtIndexPath:indexPath]; //獲取文檔URL NSURL *url = [self getUbiquityFileURL:cell.textLabel.text]; //創建文檔操作對象 LTDocument *document = [[LTDocument alloc] initWithFileURL:url]; self.document = document; //打開文檔並讀取文檔內容 [document openWithCompletionHandler:^(BOOL success) { if(success){ NSLog(@"讀取數據成功."); NSString *dataText = [[NSString alloc] initWithData:document.data encoding:NSUTF8StringEncoding]; self.documentShowLable.text = dataText; }else{ NSLog(@"讀取數據失敗."); } }]; } @end
- 上一篇文章: iOS 推送證書全流程實戰:從申請到成功發出通知
- 下一篇文章: iOS地圖開發入門:MKMapView核心用法全解析