
iOS 開發之窺探 UICollectionView(三)——使用自定義布局實現瀑布流
UICollectionView 之所以強大,正是因為它的布局系統完全開放。放棄系統內建的流式布局,自己實作一個 UICollectionViewLayout 子類,你能拿到的自由度是指數級的。本篇就從零開始,做一個參數可配置的瀑布流:每個 Cell 的間距、列數、高度上下限都可以自由指定。
一、先看效果
不同配置參數下的執行結果如下,三張截圖的列數分別為 2、3、8,間距也各不相同。密集恐懼症的同學請謹慎下滑。
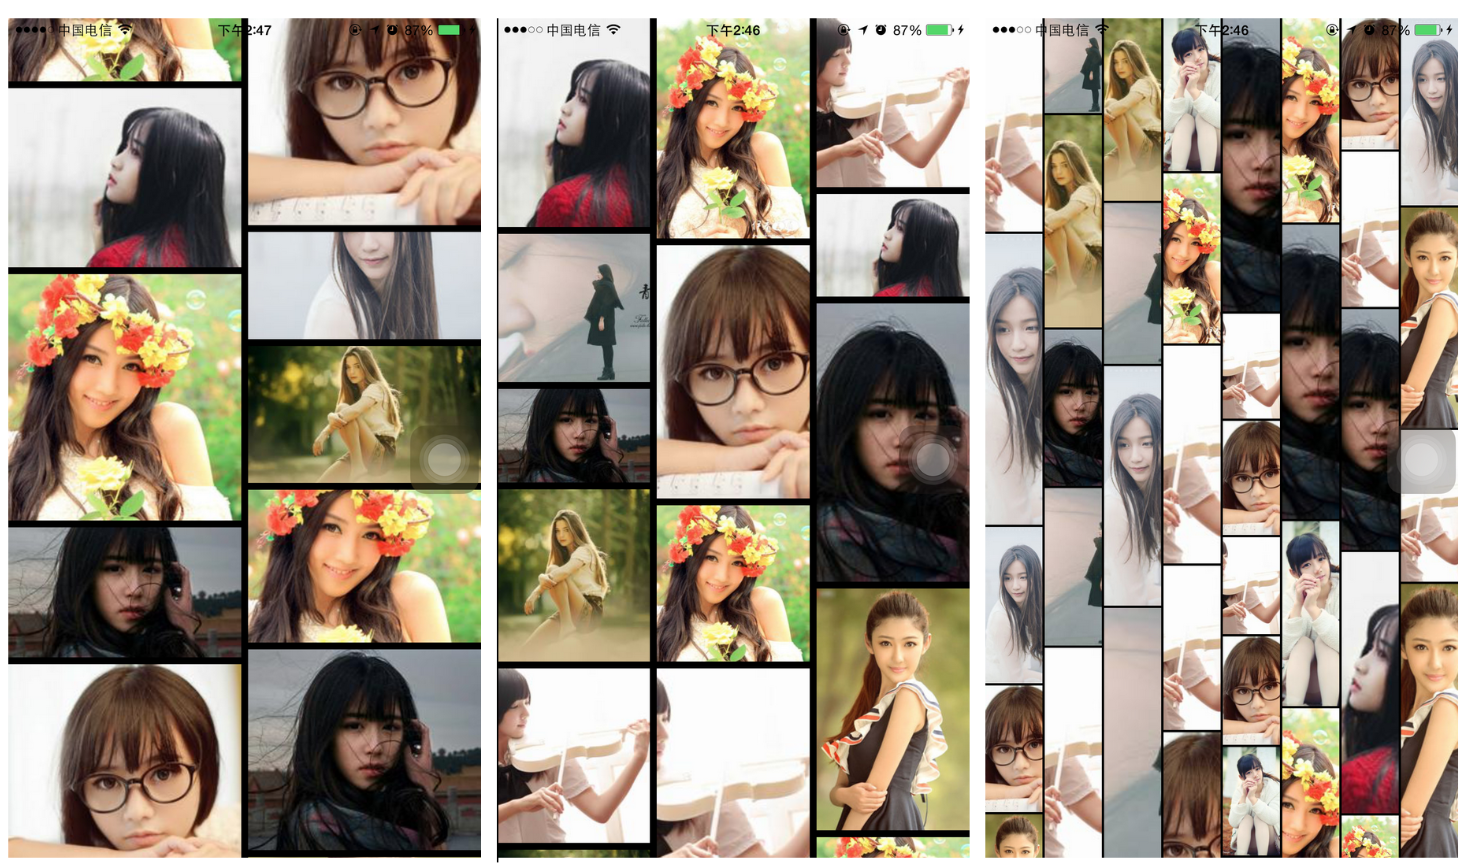
這些效果全部由自定義布局完成,接下來拆解實現原理。
二、認識 UICollectionViewLayout
自定義 CollectionView 的本質,就是繼承 UICollectionViewLayout 並重寫若干方法來決定 Cell 的擺放位置。先弄清哪些方法必須實作,再往上疊加業務邏輯。
1. prepareLayout:布局預加載
布局首次被載入時呼叫一次;布局失效後、重新查詢布局資訊前也會再呼叫一次。它的角色類似視圖控制器的 viewDidLoad,適合做初始化。子類重寫時記得呼叫 super。
- (void)prepareLayout;
2. collectionViewContentSize:內容滾動範圍
必須實作。回傳的是全部內容的寬高,而不僅是可見區域;CollectionView 依此設定自身的 contentSize 以支援滾動。
- (CGSize)collectionViewContentSize;
3. 布局屬性相關的四個方法
// 回傳指定矩形內所有視圖的布局屬性
- (NSArray *)layoutAttributesForElementsInRect:(CGRect)rect;

// 按需為指定 indexPath 提供布局屬性(所有子類都應實作)
- (UICollectionViewLayoutAttributes *)layoutAttributesForItemAtIndexPath:(NSIndexPath *)indexPath;

// 追加視圖與裝飾視圖的布局屬性
- (UICollectionViewLayoutAttributes *)layoutAttributesForSupplementaryViewOfKind:(NSString *)elementKind
                                                                     atIndexPath:(NSIndexPath *)indexPath;
- (UICollectionViewLayoutAttributes *)layoutAttributesForDecorationViewOfKind:(NSString *)elementKind
                                                                   atIndexPath:(NSIndexPath *)indexPath;
使用套路是固定的:第一個方法彙整一批屬性物件;第二個方法負責「生產」單個屬性,在其中定制 frame、transform、alpha 等參數。
4. UICollectionViewLayoutAttributes 常用屬性
@property (nonatomic) CGRect frame;
@property (nonatomic) CGPoint center;
@property (nonatomic) CGSize size;
@property (nonatomic) CATransform3D transform3D;
@property (nonatomic) CGRect bounds;
@property (nonatomic) CGAffineTransform transform;
@property (nonatomic) CGFloat alpha;
@property (nonatomic) NSInteger zIndex;              // 預設 0
@property (nonatomic, getter=isHidden) BOOL hidden;  // hidden 為 YES 時可作為效能優化
光是這幾個屬性,就足夠支撐瀑布流、輪播、3D 效果、自定義轉場等一大批定製布局。本篇文章只會用到其中的 frame。
三、動手實現瀑布流
新建一個類,繼承自 UICollectionViewLayout(它是抽象基類,不能直接實例化),然後逐一實作上述方法。
1. prepareLayout:一次性初始化
該方法在 CollectionView 重新加載時只呼叫一次,因此適合放配置讀取與尺寸計算:
#pragma mark - UICollectionViewLayout 虛基類中重寫的方法

/** 預加載 layout,只會被執行一次 */
- (void)prepareLayout {
    [super prepareLayout];
    [self initData];
    [self initCellWidth];
    [self initCellHeight];
}
2. collectionViewContentSize
寬度就是螢幕寬度;高度取「每列最後一個 Cell 的 Y 坐標 + 自身高度」的最大值:
/** 回傳 CollectionView 的 ContentSize */
- (CGSize)collectionViewContentSize {
    CGFloat height = [self maxCellYArrayWithArray:_cellYArray];
    return CGSizeMake(SCREEN_WIDTH, height);
}
3. layoutAttributesForElementsInRect:
為每個 Cell 綁定一個 LayoutAttributes 物件並以陣列回傳:
- (NSArray *)layoutAttributesForElementsInRect:(CGRect)rect {
    [self initCellYArray];
    NSMutableArray *array = [NSMutableArray array];

    for (int i = 0; i < _numberOfCellsInSections; i++) {
        NSIndexPath *indexPath = [NSIndexPath indexPathForItem:i inSection:0];
        UICollectionViewLayoutAttributes *attributes =
            [self layoutAttributesForItemAtIndexPath:indexPath];
        [array addObject:attributes];
    }
    return array;
}
4. layoutAttributesForItemAtIndexPath::瀑布流的關鍵
這裡只設定 frame 就足以實現瀑布流,其他屬性一概未動——由此可見自定義布局的強大之處。
核心演算法四步走:
· Cell 寬度:列數與間距確定後,用螢幕寬度反推即可;
· Cell 高度:在上下限之間隨機生成;
· X 坐標:由列序、間距與 Cell 寬度直接算出;
· Y 坐標:取當前最矮那一列的上一個 Cell 的 Y 坐標 + 間距,並把新值寫回該列的 Y 坐標陣列。
- (UICollectionViewLayoutAttributes *)layoutAttributesForItemAtIndexPath:(NSIndexPath *)indexPath {
    UICollectionViewLayoutAttributes *attributes =
        [UICollectionViewLayoutAttributes layoutAttributesForCellWithIndexPath:indexPath];

    CGFloat cellHeight = [_cellHeightArray[indexPath.row] floatValue];

    // 找出當前最矮的那一列
    NSInteger minYIndex = [self minCellYArrayWithArray:_cellYArray];
    CGFloat tempX = [_cellXArray[minYIndex] floatValue];
    CGFloat tempY = [_cellYArray[minYIndex] floatValue];

    attributes.frame = CGRectMake(tempX, tempY, _cellWidth, cellHeight);

    // 更新該列已使用的高度
    _cellYArray[minYIndex] = @(tempY + cellHeight + _padding);

    return attributes;
}
「找最矮列插入」是瀑布流有別於網格布局的靈魂所在——正是這個策略讓內容自動向下流動,不留空白。
5. initData:配置參數
本篇為了先跑通效果,參數暫且寫死;下一篇會把它們移到 delegate 中,讓配置方式接近 UICollectionViewDelegateFlowLayout。
/** 初始化相關數據 */
- (void)initData {
    _numberOfSections      = [self.collectionView numberOfSections];
    _numberOfCellsInSections = [self.collectionView numberOfItemsInSection:0];
    _columnCount   = 5;    // 列數
    _padding       = 5;    // 間距
    _cellMinHeight = 50;   // 最小高度
    _cellMaxHeight = 150;  // 最大高度
}
6. initCellWidth:計算寬度與 X 坐標
5 列 Cell 之間有 4 個間隙,所以每個 Cell 寬度 =(螢幕寬 − 間距總寬)÷ 列數。X 坐標隨之確定:
/** 根據 Cell 列數求出 Cell 寬度 */
- (void)initCellWidth {
    _cellWidth = (SCREEN_WIDTH - (_columnCount - 1) * _padding) / _columnCount;

    _cellXArray = [[NSMutableArray alloc] initWithCapacity:_columnCount];
    for (int i = 0; i < _columnCount; i++) {
        CGFloat tempX = i * (_cellWidth + _padding);
        [_cellXArray addObject:@(tempX)];
    }
}
7. initCellHeight:隨機生成高度
/** 隨機生成 Cell 的高度 */
- (void)initCellHeight {
    _cellHeightArray = [[NSMutableArray alloc] initWithCapacity:_numberOfCellsInSections];
    for (int i = 0; i < _numberOfCellsInSections; i++) {
        CGFloat cellHeight = arc4random() % (_cellMaxHeight - _cellMinHeight) + _cellMinHeight;
        [_cellHeightArray addObject:@(cellHeight)];
    }
}
高度預先算好並快取,避免滾動過程中反覆計算。
8. initCellYArray:維護每列的當前高度
瀑布流的特點是同一列 Cell 的 X 坐標相同,因此只需維護一個「每列已用高度」陣列,就能推算下一個 Cell 該放哪裡:
/** 初始化每列 Cell 的 Y 軸坐標 */
- (void)initCellYArray {
    _cellYArray = [[NSMutableArray alloc] initWithCapacity:_columnCount];
    for (int i = 0; i < _columnCount; i++) {
        [_cellYArray addObject:@(0)];
    }
}
9. 求 Y 坐標陣列的最大值和最小值索引
/** 求 CellY 數組中的最大值 */
- (CGFloat)maxCellYArrayWithArray:(NSMutableArray *)array {
    if (array.count == 0) {
        return 0.0f;
    }
    CGFloat max = [array[0] floatValue];
    for (NSNumber *number in array) {
        CGFloat temp = [number floatValue];
        if (max < temp) {
            max = temp;
        }
    }
    return max;
}

/** 求 CellY 數組中最小值的索引,即 Cell 應插入的列 */
- (CGFloat)minCellYArrayWithArray:(NSMutableArray *)array {
    if (array.count == 0) {
        return 0.0f;
    }
    NSInteger minIndex = 0;
    CGFloat min = [array[0] floatValue];
    for (int i = 0; i < array.count; i++) {
        CGFloat temp = [array[i] floatValue];
        if (min > temp) {
            min = temp;
            minIndex = i;
        }
    }
    return minIndex;
}
最大值決定 contentSize 的高度;最小值索引決定下一個 Cell 落在哪一列。
四、階段小結
自定義 CollectionView 布局的第一階段到此結束。回顧一下要點:繼承 UICollectionViewLayout,重寫 prepareLayout 做初始化、collectionViewContentSize 決定滾動範圍、layoutAttributesForItemAtIndexPath: 決定每個 Cell 的位置;瀑布流的演算法核心是「最矮列優先」策略加上一份 Y 坐標快取陣列。
下一篇會在此基礎上進一步重構,把寫死的配置參數透過 delegate 對外開放,讓使用方式與系統的 UICollectionViewDelegateFlowLayout 保持一致。
GitHub 分享地址:https://github.com/lizelu/CustomCollectionViewLayout