
iOS 開發之窺探 UICollectionView(五)——打造一款炫酷的 3D 圖片瀏覽組件
本系列文章由淺入深地梳理了 UICollectionView 的用法,既涵蓋系統內建的流式布局(UICollectionViewDelegateFlowLayout),也講解了如何按自身需求自定義 CollectionViewLayout。自定義布局的自由度極高,而這份自由度也直接決定了它能實現多麼豐富的效果。上一篇我們做了可配置的瀑布流,這一篇換個方向:做一個帶 3D 旋轉效果的圖片瀏覽器。
一、效果預覽
先看成員成果。Demo 執行效果如下(轉成 GIF 後有掉幀,真機上跑起來是流暢的):

核心行為有四點:
· 切換圖片時,Cell 做一次 360 度旋轉;
· 同時調整 Cell 層級,當前顯示的圖片置於最上層;
· 拖動停止後,若目標圖片未居中,自動做一次位置矯正;
· 點擊圖片時用仿射變換放大,再點擊縮小。
自定義布局的思路與上一篇完全一致:重寫 UICollectionViewLayout 的相關方法,再透過 delegate 回呼把布局參數傳進來。思路相通,具體實現各異——學東西要學會舉一反三,希望這兩篇能幫你寫出自己的定製效果。
二、這個自定義布局怎麼用
先講用法,再講原理。用起來比做出來容易,就像開車比造車簡單,所以第二部分先解決「怎麼開」。
其實所有 CollectionView 自定義布局的接入步驟都一樣:
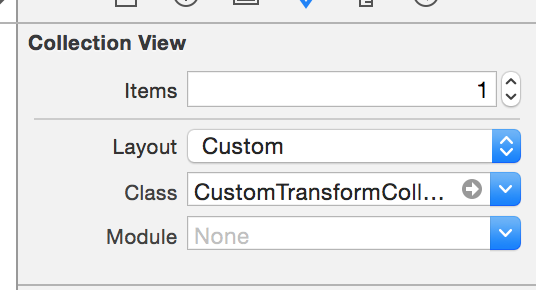
第 1 步:指定布局類
本 Demo 用 Storyboard 搭建,所以可以直接在 Storyboard 中把 Layout 選項調成 Custom,然後在下方 Class 中關聯自定義布局檔案。純程式碼專案則在建立 CollectionView 時傳入布局物件即可。
第 2 步:綁定 delegate
給 Storyboard 上的 CollectionViewController 關聯自定義類,取得布局物件並設定代理:
- (void)viewDidLoad {
    [super viewDidLoad];
    _customeLayout = (CustomTransformCollecionLayout *)self.collectionViewLayout;
    _customeLayout.layoutDelegate = self;
}
第 3 步:實作布局代理方法
除了 CollectionView 自身的 DataSource 與 Delegate,還要實作布局代理。這個布局只需兩個方法:一個回傳 Cell 尺寸,一個回傳 Cell 間距。
#pragma mark - CustomTransformCollecionLayoutDelegate

- (CGSize)itemSizeWithCollectionView:(UICollectionView *)collectionView
                 collectionViewLayout:(CustomTransformCollecionLayout *)collectionViewLayout {
    return CGSizeMake(200, 200);
}

- (CGFloat)marginSizeWithCollectionView:(UICollectionView *)collectionView
                   collectionViewLayout:(CustomTransformCollecionLayout *)collectionViewLayout {
    return 10.0f;
}
第 4 步:點擊放大縮小
點擊 Cell 的縮放邏輯寫在 UICollectionViewDataSource 的 didSelectItemAtIndexPath: 中,透過 transform 切換即可,此處不再展開,完整實作見文末 GitHub 連結。
三、實現原理(造車環節)
1. 頭文件:定義協議與代理
頭文件中定義了一個協議,兩個方法即上面實作的 Cell 尺寸與間距。類的介面中宣告一個 weak 類型的 delegate,避免循環引用。
#define SCREEN_WIDTH [[UIScreen mainScreen] bounds].size.width #define SCREEN_HEIGHT [[UIScreen mainScreen] bounds].size.height @class CustomTransformCollecionLayout; @protocol CustomTransformCollecionLayoutDelegate/** 確定 cell 的大小 */ - (CGSize)itemSizeWithCollectionView:(UICollectionView *)collectionView collectionViewLayout:(CustomTransformCollecionLayout *)collectionViewLayout; /** 確定 cell 的間距 */ - (CGFloat)marginSizeWithCollectionView:(UICollectionView *)collectionView collectionViewLayout:(CustomTransformCollecionLayout *)collectionViewLayout; @end @interface CustomTransformCollecionLayout : UICollectionViewLayout @property (nonatomic, weak) id layoutDelegate; @end
2. 實現文件中的私有屬性
@interface CustomTransformCollecionLayout ()
@property (nonatomic) NSInteger numberOfSections;        // Section 個數
@property (nonatomic) NSInteger numberOfCellsInSection;  // 每個 Section 的 Cell 數
@property (nonatomic) CGSize    itemSize;                // Cell 尺寸,由代理提供
@property (nonatomic) CGFloat   itemMargin;              // Cell 間距,由代理提供
@property (nonatomic, strong) NSMutableArray *itemsX;    // 存放計算好的 X 坐標
@end
3. 重寫 UICollectionViewLayout 的關鍵方法
(1) prepareLayout —— 預加載。CollectionView 加載數據時呼叫一次,適合做初始化:
- (void)prepareLayout {
    [super prepareLayout];
    [self initData];
    [self initItemsX];
}
(2) collectionViewContentSize —— 滾動區域大小。
- (CGSize)collectionViewContentSize {
    CGFloat width = _numberOfCellsInSection * (_itemSize.width + _itemMargin);
    return CGSizeMake(width, SCREEN_HEIGHT);
}
本 Demo 是橫向滾動,所以寬度由 Cell 總寬決定,高度取螢幕高度。
(3) layoutAttributesForElementsInRect: —— 為每個 Cell 綁定布局屬性。
- (NSArray *)layoutAttributesForElementsInRect:(CGRect)rect {
    NSMutableArray *array = [NSMutableArray array];
    for (int i = 0; i < _numberOfCellsInSection; i++) {
        NSIndexPath *indexPath = [NSIndexPath indexPathForItem:i inSection:0];
        UICollectionViewLayoutAttributes *attributes =
            [self layoutAttributesForItemAtIndexPath:indexPath];
        [array addObject:attributes];
    }
    return array;
}
(4) layoutAttributesForItemAtIndexPath: —— 旋轉效果的靈魂。這裡為每個 Cell 設定不同的 transform,其數值依據 CollectionView 的滾動偏移量計算,因此滾動時 Cell 會跟著旋轉。具體算法已在程式碼註釋中標明。
(5) shouldInvalidateLayoutForBoundsChange: —— 讓它動起來。必須回傳 YES,這樣每次邊界變化(也就是滾動)都會重新計算布局屬性,Cell 才能持續更新姿態:
- (BOOL)shouldInvalidateLayoutForBoundsChange:(CGRect)newBounds {
    return !CGRectEqualToRect(newBounds, self.collectionView.bounds);
}
(6) targetContentOffsetForProposedContentOffset:withScrollingDirection: —— 修正滾動偏移量,讓停止位置自動吸附到螢幕中央的 Cell。
4. 自定義輔助方法
#pragma mark - 自定義方法

/** 根據滾動偏移量計算當前應該顯示第幾個 Cell */
- (NSInteger)countIndexWithOffsetX:(CGFloat)offsetX {
    return (offsetX + (SCREEN_WIDTH / 2)) / (_itemSize.width + _itemMargin);
}

/** 初始化私有屬性,透過代理取得配置參數 */
- (void)initData {
    _numberOfSections     = self.collectionView.numberOfSections;
    _numberOfCellsInSection = [self.collectionView numberOfItemsInSection:0];
    _itemSize   = [_layoutDelegate itemSizeWithCollectionView:self.collectionView
                                        collectionViewLayout:self];
    _itemMargin = [_layoutDelegate marginSizeWithCollectionView:self.collectionView
                                          collectionViewLayout:self];
}

/** 預先計算每個 Cell 的 X 坐標 */
- (void)initItemsX {
    _itemsX = [[NSMutableArray alloc] initWithCapacity:_numberOfCellsInSection];
    for (int i = 0; i < _numberOfCellsInSection; i++) {
        CGFloat tempX = i * (_itemSize.width + _itemMargin) + _itemSize.width / 2;
        [_itemsX addObject:@(tempX)];
    }
}
把 X 坐標提前算好並快取,是這類布局常見的效能優化手段——滾動過程中就沒有必要重複做同樣的乘法運算。
四、小結
這個組件的實現要點可以概括為三條:用 layoutAttributesForItemAtIndexPath: 為每個 Cell 計算 transform 實現旋轉;用 shouldInvalidateLayoutForBoundsChange: 保證滾動時持續刷新;用 targetContentOffsetForProposedContentOffset: 完成居中吸附。層級調整與點擊縮放則在 LayoutAttributes 的 zIndex 和 Cell 的點擊回呼中處理。
經過上述步驟,你就能寫出效果圖中的自定義動畫。完整程式碼已分享至 GitHub:
https://github.com/lizelu/CustomTransformCollecionLayout